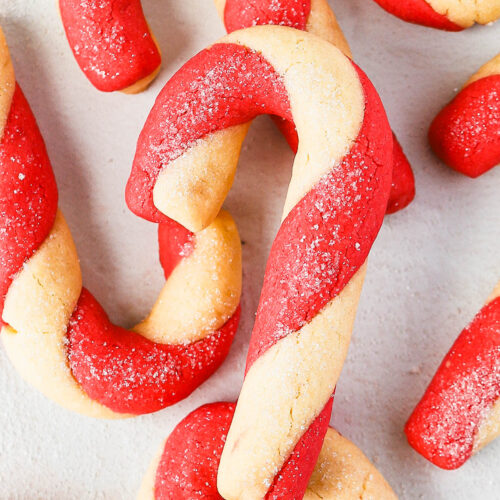
Candy Cane Cookies
Enjoy the nostalgic flavors of Christmas with this easy small batch recipe for candy cane cookies. These soft and tender cookies are reminiscent of a candy cane twist, with a delicious balance of vanilla and peppermint. Perfect for holiday baking and cookie swaps!
Servings: 14 Cookies
Equipment
- Ruler
Ingredients
- 6 tablespoons unsalted butter, room temperature
- 6 tablespoons granulated sugar
- 1 large egg yolk, room temperature
- 2 tablespoons milk, room temperature any kind
- 1 teaspoon vanilla extract
- ¼ teaspoon salt
- 1 ¼ cups all purpose flour
- ¼ teaspoon peppermint extract
- 2 to 3 drops red food coloring
- white sparkling sugar optional
Instructions
- In the work bowl of a stand mixer fitted with the paddle attachment, add the butter and sugar. Beat on medium speed until light and creamy. Add the egg yolk, milk, and vanilla extract and beat until well combined - scraping down the sides of the bowl as needed.6 tablespoons unsalted butter, room temperature, 6 tablespoons granulated sugar, 1 large egg yolk, room temperature, 1 teaspoon vanilla extract, 2 tablespoons milk, room temperature
- Turn the mixer to low speed and sprinkle in the salt, then flour in a few increments - letting the flour mix in before adding the next increment. Scrape down the sides of the bowl as needed. After adding the last increment of flour, let the dough mix until it is no longer crumbly and a dough forms.1 ¼ cups all purpose flour, ¼ teaspoon salt
- Turn off the mixer and remove half of the dough. Gently knead the dough together with your hands to form a ball. Flatten into a disc and wrap in plastic wrap.
- With the remaining dough in the mixer, add the peppermint extract and 2 drops of red food coloring. Turn the mixer on low and beat until the food coloring starts to color the dough. Add more food coloring to get your desired color - I recommend a drop at a time. Gently knead the dough together with your hands to form a ball. Flatten into a disc and wrap in plastic wrap.¼ teaspoon peppermint extract, 2 to 3 drops red food coloring
- Refrigerate the dough discs for 2 to 3 hours.
- When ready to bake, preheat the oven to 350F degrees and adjust the oven rack to the middle position. Line 2 baking sheets with a piece of parchment paper.
- Shape the cookies 1. To make shaping, chilling, and baking more efficient, I recommend shaping 7 cookies first. While these are chilling, you can shape the next 7 and chill those while the first batch is baking.2. Use a teaspoon for each dough to not cross colors. Take 2 teaspoons of each dough. 2. Separately, roll each color of dough into a ball with the palms of your hands. 3. Roll each dough ball into a rope 5 inches long. 4. Gently press the two dough ropes together. 5. Gently hold one end, and roll the dough rope in one direction so it starts to twist and make the swirl. 7. Once you have your dough swirled, roll the rope a couple more times to smooth out any seams. 8. Gently curve the top to make the top of your candy cane. 9. Place the cookies 2 inches apart on the baking sheet. Optional - Sprinkle the cookies with sparkle sugar for a little shimmer. 10. Refrigerate the baking sheet with shaped cookies for 10 minutes. The cookies will benefit from time to chill again so they don't spread. 11. While the first batch of cookies are chilling, shape the remaining and follow the steps to chill and bake.Note - If the dough starts to get too sticky, or hard to roll without breaking, re-wrap the dough in plastic wrap and refrigerate for 10 to 15 minutes to firm up.
- Bake for 10 to 11 minutes, or until the edges are set and barely start to golden.
- Cool the cookies on the baking sheet set on a wire cooling rack for 5 minutes, then transfer to the cooling rack to cool completely. The cookies can be stored covered at room temperature for up to 1 week.
Notes
- Serving Size - This is a small batch recipe. I have not tested a larger batch. If you try it, I would recommend omitting the milk and using 1 whole egg.
- Yield - As written, the recipe will yield 14 cookies. The number of cookies will depend on how large or small you make them.
- Bake One Sheet At A Time - I prefer to bake one baking sheet at a time to get an even bake on the cookies. Otherwise, opening the oven and having to rotate pans may yield an uneven bake and it lets the heat out of the oven.
- Shape and Bake in Batches - Since we bake one baking sheet at a time, shape the cookies in two batches. While the first batch of shaped cookies is chilling, shape the second batch. This creates an efficient rotation for shaping, chilling, and baking. Also, you only have one baking sheet in the refrigerator at a time!
- Chill Shaped Cookies - To avoid spreading, refrigerate the shaped cookies for 10 minutes before baking. This will give the dough time to firm up.
- Freezing the Cookie Dough – The cookie dough can be frozen for up to 3 months. Shape into a disc, wrap in plastic wrap, and let it chill in the refrigerator first. This will eliminate any extra moisture that may alter the texture as it freezes. Then, place in a freezer bag. Thaw in the refrigerator.
- Freezing Baked Cookies – Baked cookies can be frozen for up to 3 months. Gently place in a freezer bag and thaw at room temperature.