
Homemade Flaky Croissants Recipe
These homemade flaky croissants showcase buttery crisp layers that shatter with every bite. Made with a scaled-down yield, this recipe walks you through every detail of the dough, high-fat butter block, and key lamination steps — because that soft, pull-apart interior is worth the time.
Servings: 10 Croissants
Calories: 470kcal
Equipment
- Rolling Pin
- Pastry Brush
- Pizza Cutter or Knife
- Tape Measure or Ruler
Ingredients
Croissant Dough
- 2 ¼ teaspoons (1 packet) instant yeast active dry yeast also works
- ½ cup water, room temperature
- 3 ½ cups all-purpose flour
- ⅓ cup granulated sugar
- 2 teaspoons salt
- 1 cup whole milk I have also used 2% milk
Butter Square
- 1 ½ cups (3 sticks) unsalted butter, cut into cubes slightly cool, not completely at room temp
- 2 tablespoons all-purpose flour
Egg Wash
- 1 large egg, beaten used to brush the croissants
- 1 tablespoon water
Instructions
- Please read the recipe before beginning. There are a lot of steps and tips to help through the process! It is helpful to get all of the ingredients prepped before you need them.
Croissant Dough
- Remove the milk and butter from the refrigerator. Cut the butter into tablespoon cubes and set aside.1 ½ cups (3 sticks) unsalted butter, cut into cubes, 1 cup whole milk
- Spray a large mixing bowl with cooking spray and set aside. This will be the bowl used to proof the dough. Tip - If your butter wrappers have a little extra butter on them, these are also a great option to grease the bowl.
- In the work bowl of the stand mixer, add 3 and 1/2 cups of flour. Add the sugar and salt on one side of the bowl. If using Instant Yeast - Add the yeast on the other side of the bowl - away from the salt - and use the dough hook attachment to stir and combine. If not using instant yeast, stir the dry ingredients.3 ½ cups all-purpose flour, ⅓ cup granulated sugar, 2 teaspoons salt
- If using active dry yeast - Sprinkle the yeast over the room temperature water in a liquid measuring cup. Allow the yeast to proof and get foamy - about 5 minutes. Add the yeast mix when you add the milk (next step).2 ¼ teaspoons (1 packet) instant yeast
- Mix the Dough - Pour the water and milk over the flour. Mix the dough on medium-high speed, until it is smooth, and no longer sticky - about 8 to 10 minutes. If the dough is very sticky, add more flour a tablespoon at a time. If it is very dry, add more water, a teaspoon at a time.½ cup water, room temperature, 1 cup whole milk
- Rest the Dough - Remove the dough from the mixer and gently form into a smooth ball in your hands. Place in the prepped mixing bowl and cover with plastic wrap. Rest the dough in a warm place for at least 30 minutes. Tip - Warm places to rest dough include: in your oven if you have a 'proof' setting; on top of your refrigerator; on the counter at room temp if it is a warm day.
I like to set a timer for 8 minutes, then check to see how the dough is doing.
Butter Square
- Wipe out the bowl of the mixer (doesn't have to be totally clean), and attach the paddle attachment to the mixer. Add the cubed butter and 2 tablespoons of flour and beat until smooth and creamy. Do not overmix - we are not mixing or creaming as we would for cookie dough.2 tablespoons all-purpose flour, 1 ½ cups (3 sticks) unsalted butter, cut into cubes
- Shape and Chill the Butter Square - Scrape the butter onto the middle of a long piece of plastic wrap. Using the plastic wrap, shape the butter into a flat square - approx. 6-inch x 6-inch wide by 1-inch thick. We are using the plastic wrap to shape rather than our hands, so we don't melt the butter. Wrap the butter completely in the wrap and chill in the refrigerator while the dough is proofing.
- Shape the Dough - Once the dough has proofed, pour it onto a generously floured work surface, and sprinkle the top lightly with flour. Roll into a square, approximately 10-inch x 10-inch. Use a pastry brush to brush excess flour off the dough.
- Place the Butter Square - Remove the chilled butter from the refrigerator, and place it diagonally in the center of the dough (so it looks like a diamond in the center of the dough). Fold the four corners of the dough over the butter, tightly pinching each of the seams to close.
- Refrigerate the Dough - You can use one of the prepared baking sheets you need to bake the croissants to refrigerate the dough. Or, to save room in the fridge, use a smaller baking sheet or large plate. Cover with plastic wrap and refrigerate for 60 minutes.
- Roll and Fold the Dough - Place the chilled dough packet, seams side up, onto a well-floured surface. 1. Lightly dust the top of the dough with flour and roll into a 16-inch x 8-inch rectangle, with the long side facing you. 2. Brush off the excess flour. 3. Working from the left and right sides, fold the dough into thirds, like a letter. 4. Place the dough back onto the baking sheet (or plate), cover, and refrigerate again for at least 60 minutes.
- Repeat Roll and Fold the Dough - You are going to repeat the rolling, folding, and refrigerating process (steps 1-4 above) 2 more times (also called "turns") - for a total of 3 turns. Each time, start with the dough long side facing you. When you have completed all turns, brush excess flour off the dough and wrap the folded dough in plastic wrap, and refrigerate at least overnight.
- Remove the chilled dough from the plastic wrap and place it on a lightly floured surface. Cut the rectangle in half (to make rolling and shaping the dough more manageable), and place one half of the dough back in the fridge. Seal up the cut edges as best you can with your fingertips.
- Line your two baking sheets with parchment paper (you may already have one prepared if you used it to refrigerate your dough).
- Roll the dough into a rectangle - approx. 13-inch wide x 10-inch tall, and about 1/4 inch thick - with the long side facing you. Trim the edges to make them straight. We are going to make triangles that are 4-inch x 9-inch. The shape of the rectangle and trimming straight edges will accommodate these shape sizes.
- Cut Croissant Triangles (see the Notes below for a sketch on how to cut) - I recommend using a pizza cutter, or a very sharp knife to cut the croissant triangles. Once you have your straight rectangle, make two notches in the bottom of the long side, every 4 inches. On the top of the rectangle, make a notch at 2 inches from each corner. Then, from either of those notches, make one more at 4 inches. You will have a total of 3 notches on the top, and 2 on the bottom of the rectangle. You will have scraps of dough, and there are recommendations on how to use in the recipe Notes. New Tip - A lovely reader provided an alternative way to cut the croissants without scraps, which yields a total of 12 croissants. See the Notes below.
- Start with the wide end of the triangle and roll up to the point. The roll does not need to be tight, and it does not need to be loose. Just a natural roll of the dough. Brush off excess flour as you roll up the croissant.
- Repeat the above steps for the other half of the dough you put in the refrigerator
- Freezing Note - It is at this time, before the final proof, that you can freeze the croissants. If you are working with frozen croissants, remove them from the freezer the night before you want to bake them. Place the croissants on a baking sheet and thaw in the refrigerator. Then, the next morning you are going to bake them, allow them to come to room temperature for at least an hour (consider this the final proof time for frozen croissants), then follow the baking instructions below.
- Final Proof Shaped Croissants - Place the shaped croissants on the prepared baking sheets, with the point of the croissant down - 5 per sheet (or 6 with alt. cutting method). Cover the baking sheets with a proofing bag or a large piece of plastic wrap. Tip - I use a large turkey roasting bag as my proofing bag. Set the croissants in a warm place to proof, until the croissants have doubled in size and are soft and pillowy - about 60 to 90 minutes.
- Preheat the Oven - Towards the end of the proof time, preheat the oven to 375F degrees and adjust the oven rack to the middle position. 350F degrees if you are using a convection fan oven.
- Lightly brush the egg wash on each croissant and bake for 20 minutes - rotating the pans halfway through - until the croissants are nice and golden. Immediately transfer the croissants to a wire rack to cool completely. Note - I prefer to bake the croissants 1 baking sheet at a time - unless your oven is large enough to accommodate both pans. Wait to brush the second batch with egg wash until ready to bake.1 large egg, beaten, 1 tablespoon water
For the next few rolling the dough steps, I find it helpful to put a little extra flour in a measuring cup to set next to the work surface, so you don't have to keep dipping into the flour container.
If butter starts to sneak through the dough as you're rolling it, dust it with a little flour, and press it so it sticks to the butter.
The chilled dough will take some time and muscle to roll. Lightly flour, rotate, and flip the dough as needed until you get the desired rectangle shape.
Notes
- Serving Size - As written, the recipe makes 10 croissants. Review the alternative cutting methods below to get 2 more croissants. I do not recommend doubling the recipe. Rather, make 2 batches and work with one at a time. Doubling the recipe will make working with the dough and butter too large and cumbersome.
- Storing - Croissants are best the day they are baked. However, they will last for up to 2 days at room temperature. Beyond that, cover tightly and refrigerate for up to a week.
- Freezing - Freeze tightly wrapped croissants for up to 3 months and thaw at room temperature.
- Reheating Croissants - Reheat in the oven for about 5 minutes at 325F degrees.
- Hand Mixer - To use a hand mixer, use the dough hook attachment. Use a large bowl and a plastic bowl scraper to scrape the bowl as needed. It will take a few minutes longer to get the dough to come together – keep this in mind because you will be holding the mixer. Knead the dough by hand, which will take upwards of 10 minutes.
- Make By Hand - While I recommend making the croissants with a stand mixer to mix and knead the dough (it's easier and faster), you can make them by hand. It will take longer and require more "elbow grease". Use a dough whisk (you can find one on Amazon), plastic bowl scraper, and large bowl to mix the dough, then knead by hand. I found this video from Craftsy that demonstrates this well. https://www.youtube.com/watch?v=EpxA58G2Y0g
- Primary Cutting Method - Will yield straight triangles and 10 croissants:

- Alternative Cutting Method - To eliminate scraps and get 12 croissants:
- With this method, the croissants may be slightly smaller and not a perfect triangle shape.
- Follow the steps through Step 8
- It is your choice whether or not to trim the edges with this cutting method.
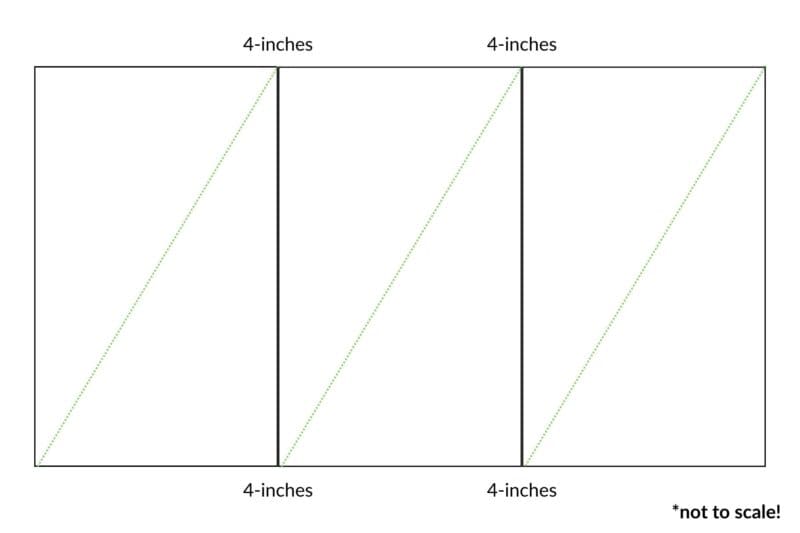
- Cut the dough rectangle into 3 equal sections. Depending on whether you trimmed the edges, each section will be roughly 4 inches wide.
- Then cut each section into a diagonal - yielding 2 croissants per section, for a total of 6 croissants.
- Repeat the steps for the other half of the dough in the fridge.
 What to make with the croissant dough scraps
- Monkey Bread - Grease mini bundt pans, or the cups of a muffin pan. How many will depend on how many scraps you have leftover. I was able to make 3 mini bundts. Cut the scraps into small 2 inch pieces, and gently shape into balls. Toss in cinnamon sugar and place in prepared pans and bake for 20-25 minutes, or until the tops are golden brown.
- Cinnamon Pastry Twists - Twist the scraps and sprinkle all sides with cinnamon sugar. Bake on a baking sheet for 20 minutes, or until golden brown
- Cinnamon Pinwheels - Sprinkle the dough with cinnamon sugar and twist into a pinwheel. Bake on a baking sheet for 20 minutes, or until golden brown.
- Donut Holes - Gently roll the scraps into equal-sized balls. Fry in 2 inches of canola oil heated to 350F degrees (I use a Dutch oven for frying). Roll the donut holes in powdered sugar, cinnamon sugar, or your favorite glaze.
Nutrition
Calories: 470kcal | Carbohydrates: 43g | Protein: 7g | Fat: 31g | Saturated Fat: 19g | Polyunsaturated Fat: 1g | Monounsaturated Fat: 8g | Trans Fat: 1g | Cholesterol: 98mg | Sodium: 488mg | Potassium: 111mg | Fiber: 2g | Sugar: 8g | Vitamin A: 953IU | Vitamin C: 0.003mg | Calcium: 49mg | Iron: 2mg