Homemade Flaky Croissants Recipe
This post may contain affiliate links. See my disclosure policy.
These homemade flaky croissants are the most popular recipe on Butter and Bliss – and for good reason. Simple yeast dough and high-fat butter are laminated into dozens of paper-thin layers to deliver a signature flaky exterior and soft, pull-apart interior that no store-bought croissant can touch. My scaled-down recipe walks you through every step of the two-day process. From building the dough to the final shape, the buttery croissants are worth every fold.

FEATURED REVIEW
“I’m a pretty seasoned cook and love to bake and I actually said to my family before they tried them that I think these may be the yummiest things to ever come out of my kitchen! I made them with the almond filling and it is just fantastic!” ★★★★★ Karen
You Can Master Croissants At Home

Little did I know when I took that baking course years ago on how to make croissants, that these little gems would become the foundation for what makes Butter and Bliss popular. The fundamentals I learned for making successful pastry allowed me to tailor and perfect my recipe that has become loved by bakers across the country.
I published this recipe in 2020, and have since updated it with new step-by-step process photos to guide you through every stage of the recipe.
This recipe has evolved into my equally popular almond croissants recipe, that uses a day-old version of these croissants. And it also serves as inspiration to try an equally flaky puff pastry with the fruit filled pinwheel Danish pastries.
But, let’s get to it. Is there a trick, or secret, to making buttery croissants with paper thin layers? Here’s my three-cents after making dozens of these over the years:
- Quality, cold butter – Good croissants start with good butter — the kind that has a higher fat content so you get the best flavor. And it has to be cold. Hence the time the dough spends in the refrigerator. The butter will create steam when heated (baked), resulting in puffy pastry.
- Rolling and folding the dough – Also called lamination. This creates all those layers. And when you combine all those layers with the high-fat cold butter from above – it’s like a literal poof in the oven. Bakery-worthy pastries.
- Don’t rush it – I’m not going to mislead you — (good) croissants take time to make. The dough needs time to develop flavor, and hydrate.This is an overnight recipe. Can you try to make them in a day? Sure. But the result may not be as good as it could be.
So, consider this my invitation to enjoy the time you’ll spend in your kitchen making these croissants. They’re worth it.

Step-by-Step Photos To Make Croissants
First, use a stand mixer if you can. You need it to make the dough and butter block. And to get a head start on the butter block, cut the butter into tablespoon pieces — it makes mixing easier and faster.

Making The Dough
Start with the straightforward yeast dough. Add the dry ingredients to the mixing bowl, making sure to add the instant yeast opposite the salt — salt inhibits yeast.

Instant yeast away from salt. Smooth, properly kneaded dough.


Give everything a quick stir with the dough hook, then add the liquid and mix on medium-high speed for about 10 minutes. You’re looking for soft, smooth dough.
And a tip from me — keep an eye on the mixer while it works. This is a hefty dough that likes to slap around the bowl, and it will bounce your mixer around, and nearly off the counter.
The Butter Block
Once the smooth dough ball is in its bowl to proof for at least 30 minutes, use the same mixing bowl to make the butter block. And no need to clean it.
Mix the butter with a little flour until creamy, then turn it out onto a large piece of plastic wrap and shape it into a 6-inch square. Use the plastic wrap to help you shape it rather than your hands — it keeps the butter from melting and your hands clean.
Butter mixed with flour until creamy. Shape butter into a 6-inch square.

Wrap the butter square and refrigerate it while waiting for the dough. If it softens too quickly, split the time between the fridge and freezer to firm it back up.
Once the dough has proofed, roll it out on a floured surface into a 10-inch square. From here on out, as you work with the dough, you’ll want to keep a pastry brush handy to brush off excess flour.
Butter block placed diagonally on the dough. Pinch seams closed around the butter block.


Place the chilled butter block in the center on the diagonal, pull the corners up around it, and pinch the seams closed. Place the sealed packet on a small baking sheet and chill for an hour.
Laminating
Flour your work surface and roll the sealed packet into a 16-inch by 8-inch rectangle — a baking mat with measuring marks is helpful here, or a tape measure works just as well.
Fold the dough into thirds like a business letter. That’s your first turn. Place the dough on a baking sheet, cover with plastic wrap, and refrigerate for an hour.
Repeat two more times for a total of three turns, always starting with the long side facing you.


After the last turn, wrap the dough in the plastic wrap, then it’s off to the fridge, where it needs to sit overnight.

Shaping Croissants
You’re in the home stretch. The dough has had time to rest, hydrate, and develop flavor overnight — it may have puffed slightly, which is perfectly fine.
Cut the dough rectangle in half to make it more manageable, and pinch the exposed cut edges closed as best you can. Keep the second half chilled until you’re ready for it.

Roll the dough out on a well-floured surface into a 10-inch by 13-inch rectangle. The dough will be cold and resistant — flour, rotate, flip, and keep going until you get there. If it’s stubbornly tough, give it (and you) a few minutes to rest.
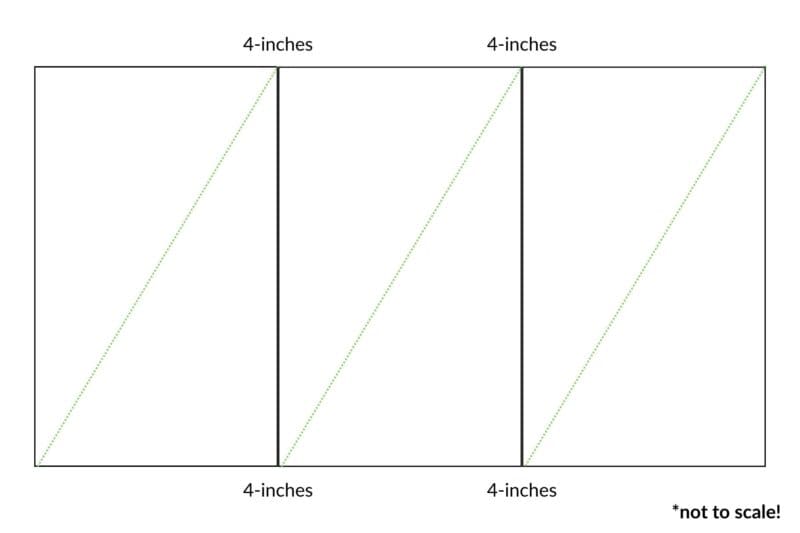
Trim uneven edges off the rectangle with a pizza cutter. Measure and notch the dough for cutting — 2 inches in from each corner on one edge, then one notch at 4 inches; two notches 4 inches apart on the opposite edge.


Cut diagonally to each notch from the corners to create triangles. The end pieces will be smaller — save them for mini croissants or croissant twists. A few ideas are in the recipe card.


Starting from the wider end, roll each triangle into its crescent shape — natural tension, no tugging. Pulling on the dough disrupts the laminated layers you just worked hard to build.
Place each croissant tip-side down on a parchment-lined baking sheet with enough room to puff and bake. Repeat with the second half of the dough.
Proofing and Baking The Croissants
Proofed croissants. Soft, doubled in size. Egg wash before baking for a shiny exterior.


Tuck the baking sheet into a proofing bag or cover with plastic wrap and place in a warm spot — a proof setting on the oven is ideal. Let the croissants rest until doubled in size. Before baking, brush each one lightly with egg wash for that deep golden, shiny exterior.
Then bake, and try to be patient while your kitchen smells incredible.

Helpful Tips To Get You Started
The recipe card has detailed notes to walk you through the full process, but here are a few things worth knowing before you begin.
1. Plan ahead and prep your fridge — The overnight chill is actually working in your favor. It means fresh-baked croissants the next morning. Before you start, make room in the refrigerator for a baking sheet. You’ll need it more than once.
2. Start the dough in the morning — A cooler kitchen means cooler hands and a cooler work surface, which keeps the butter from softening too quickly as you work through the lamination. Temperature is everything with laminated dough.
3. Use all-purpose flour — Bread flour produces a chewier, denser crumb. All-purpose keeps the layers light and the interior tender — exactly what you want in a croissant.
4. Butter brands — I use Kerrygold (they sell it at Sam’s Club), but other brands like Minerva Dairy, Vermont Creamery, and Cabot, work great.
5. Don’t stress about perfect shape — There’s something genuinely charming about hand-shaped pastry. If the triangles are a little uneven and the crescents aren’t perfectly symmetrical, they will still taste exceptional.
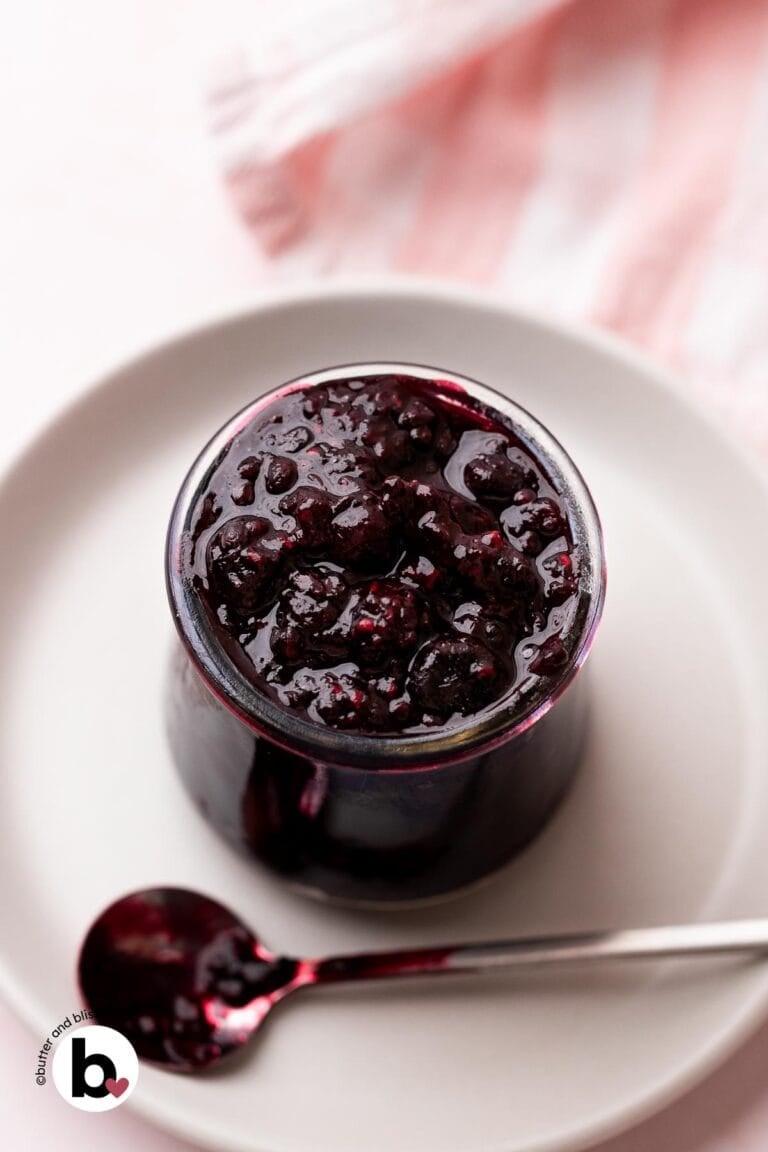
6. Enjoy them the day they’re baked — Like any laminated pastry, croissants are at their best fresh from the oven when the layers are still crisp and the butter flavor is at its peak. Pair them with a little mixed berry compote or homemade lemon curd for a proper breakfast.

Did You Make It? Let’s Hear About It!
⭐⭐⭐⭐⭐
If you make these homemade flaky croissants, I want to hear about it! Leave a rating and a comment below — were they worth clearing your weekend for? Your feedback helps other home bakers find the confidence to try this recipe.

Homemade Flaky Croissants Recipe
by Erin Cernich
Equipment
- Rolling Pin
- Pastry Brush
- Pizza Cutter or Knife
- Tape Measure or Ruler
Ingredients
Croissant Dough
- 2 ¼ teaspoons (1 packet) instant yeast (active dry yeast also works)
- ½ cup water, room temperature
- 3 ½ cups all-purpose flour
- ⅓ cup granulated sugar
- 2 teaspoons salt
- 1 cup whole milk (I have also used 2% milk)
Butter Square
- 1 ½ cups (3 sticks) unsalted butter, cut into cubes (slightly cool, not completely at room temp)
- 2 tablespoons all-purpose flour
Egg Wash
- 1 large egg, beaten (used to brush the croissants)
- 1 tablespoon water
Instructions
- Please read the recipe before beginning. There are a lot of steps and tips to help through the process! It is helpful to get all of the ingredients prepped before you need them.
Croissant Dough
- Remove the milk and butter from the refrigerator. Cut the butter into tablespoon cubes and set aside.1 ½ cups (3 sticks) unsalted butter, cut into cubes, 1 cup whole milk
- Spray a large mixing bowl with cooking spray and set aside. This will be the bowl used to proof the dough. Tip – If your butter wrappers have a little extra butter on them, these are also a great option to grease the bowl.
- In the work bowl of the stand mixer, add 3 and 1/2 cups of flour. Add the sugar and salt on one side of the bowl. If using Instant Yeast – Add the yeast on the other side of the bowl – away from the salt – and use the dough hook attachment to stir and combine. If not using instant yeast, stir the dry ingredients.3 ½ cups all-purpose flour, ⅓ cup granulated sugar, 2 teaspoons salt
- If using active dry yeast – Sprinkle the yeast over the room temperature water in a liquid measuring cup. Allow the yeast to proof and get foamy – about 5 minutes. Add the yeast mix when you add the milk (next step).2 ¼ teaspoons (1 packet) instant yeast
- Mix the Dough – Pour the water and milk over the flour. Mix the dough on medium-high speed, until it is smooth, and no longer sticky – about 8 to 10 minutes. If the dough is very sticky, add more flour a tablespoon at a time. If it is very dry, add more water, a teaspoon at a time.½ cup water, room temperature, 1 cup whole milk
- Rest the Dough – Remove the dough from the mixer and gently form into a smooth ball in your hands. Place in the prepped mixing bowl and cover with plastic wrap. Rest the dough in a warm place for at least 30 minutes. Tip – Warm places to rest dough include: in your oven if you have a 'proof' setting; on top of your refrigerator; on the counter at room temp if it is a warm day.
Butter Square
- Wipe out the bowl of the mixer (doesn't have to be totally clean), and attach the paddle attachment to the mixer. Add the cubed butter and 2 tablespoons of flour and beat until smooth and creamy. Do not overmix – we are not mixing or creaming as we would for cookie dough.2 tablespoons all-purpose flour, 1 ½ cups (3 sticks) unsalted butter, cut into cubes
- Shape and Chill the Butter Square – Scrape the butter onto the middle of a long piece of plastic wrap. Using the plastic wrap, shape the butter into a flat square – approx. 6-inch x 6-inch wide by 1-inch thick. We are using the plastic wrap to shape rather than our hands, so we don't melt the butter. Wrap the butter completely in the wrap and chill in the refrigerator while the dough is proofing.
- Shape the Dough – Once the dough has proofed, pour it onto a generously floured work surface, and sprinkle the top lightly with flour. Roll into a square, approximately 10-inch x 10-inch. Use a pastry brush to brush excess flour off the dough.
- Place the Butter Square – Remove the chilled butter from the refrigerator, and place it diagonally in the center of the dough (so it looks like a diamond in the center of the dough). Fold the four corners of the dough over the butter, tightly pinching each of the seams to close.
- Refrigerate the Dough – You can use one of the prepared baking sheets you need to bake the croissants to refrigerate the dough. Or, to save room in the fridge, use a smaller baking sheet or large plate. Cover with plastic wrap and refrigerate for 60 minutes.
- Roll and Fold the Dough – Place the chilled dough packet, seams side up, onto a well-floured surface. 1. Lightly dust the top of the dough with flour and roll into a 16-inch x 8-inch rectangle, with the long side facing you. 2. Brush off the excess flour. 3. Working from the left and right sides, fold the dough into thirds, like a letter. 4. Place the dough back onto the baking sheet (or plate), cover, and refrigerate again for at least 60 minutes.
- Repeat Roll and Fold the Dough – You are going to repeat the rolling, folding, and refrigerating process (steps 1-4 above) 2 more times (also called "turns") – for a total of 3 turns. Each time, start with the dough long side facing you. When you have completed all turns, brush excess flour off the dough and wrap the folded dough in plastic wrap, and refrigerate at least overnight.
- Remove the chilled dough from the plastic wrap and place it on a lightly floured surface. Cut the rectangle in half (to make rolling and shaping the dough more manageable), and place one half of the dough back in the fridge. Seal up the cut edges as best you can with your fingertips.
- Line your two baking sheets with parchment paper (you may already have one prepared if you used it to refrigerate your dough).
- Roll the dough into a rectangle – approx. 13-inch wide x 10-inch tall, and about 1/4 inch thick – with the long side facing you. Trim the edges to make them straight. We are going to make triangles that are 4-inch x 9-inch. The shape of the rectangle and trimming straight edges will accommodate these shape sizes.
- Cut Croissant Triangles (see the Notes below for a sketch on how to cut) – I recommend using a pizza cutter, or a very sharp knife to cut the croissant triangles. Once you have your straight rectangle, make two notches in the bottom of the long side, every 4 inches. On the top of the rectangle, make a notch at 2 inches from each corner. Then, from either of those notches, make one more at 4 inches. You will have a total of 3 notches on the top, and 2 on the bottom of the rectangle. You will have scraps of dough, and there are recommendations on how to use in the recipe Notes. New Tip – A lovely reader provided an alternative way to cut the croissants without scraps, which yields a total of 12 croissants. See the Notes below.
- Start with the wide end of the triangle and roll up to the point. The roll does not need to be tight, and it does not need to be loose. Just a natural roll of the dough. Brush off excess flour as you roll up the croissant.
- Repeat the above steps for the other half of the dough you put in the refrigerator
- Freezing Note – It is at this time, before the final proof, that you can freeze the croissants. If you are working with frozen croissants, remove them from the freezer the night before you want to bake them. Place the croissants on a baking sheet and thaw in the refrigerator. Then, the next morning you are going to bake them, allow them to come to room temperature for at least an hour (consider this the final proof time for frozen croissants), then follow the baking instructions below.
- Final Proof Shaped Croissants – Place the shaped croissants on the prepared baking sheets, with the point of the croissant down – 5 per sheet (or 6 with alt. cutting method). Cover the baking sheets with a proofing bag or a large piece of plastic wrap. Tip – I use a large turkey roasting bag as my proofing bag. Set the croissants in a warm place to proof, until the croissants have doubled in size and are soft and pillowy – about 60 to 90 minutes.
- Preheat the Oven – Towards the end of the proof time, preheat the oven to 375F degrees and adjust the oven rack to the middle position. 350F degrees if you are using a convection fan oven.
- Lightly brush the egg wash on each croissant and bake for 20 minutes – rotating the pans halfway through – until the croissants are nice and golden. Immediately transfer the croissants to a wire rack to cool completely. Note – I prefer to bake the croissants 1 baking sheet at a time – unless your oven is large enough to accommodate both pans. Wait to brush the second batch with egg wash until ready to bake.1 large egg, beaten, 1 tablespoon water
Notes
- Serving Size – As written, the recipe makes 10 croissants. Review the alternative cutting methods below to get 2 more croissants. I do not recommend doubling the recipe. Rather, make 2 batches and work with one at a time. Doubling the recipe will make working with the dough and butter too large and cumbersome.
- Storing – Croissants are best the day they are baked. However, they will last for up to 2 days at room temperature. Beyond that, cover tightly and refrigerate for up to a week.
- Freezing – Freeze tightly wrapped croissants for up to 3 months and thaw at room temperature.
- Reheating Croissants – Reheat in the oven for about 5 minutes at 325F degrees.
- Hand Mixer – To use a hand mixer, use the dough hook attachment. Use a large bowl and a plastic bowl scraper to scrape the bowl as needed. It will take a few minutes longer to get the dough to come together – keep this in mind because you will be holding the mixer. Knead the dough by hand, which will take upwards of 10 minutes.
- Make By Hand – While I recommend making the croissants with a stand mixer to mix and knead the dough (it’s easier and faster), you can make them by hand. It will take longer and require more “elbow grease”. Use a dough whisk (you can find one on Amazon), plastic bowl scraper, and large bowl to mix the dough, then knead by hand. I found this video from Craftsy that demonstrates this well. https://www.youtube.com/watch?v=EpxA58G2Y0g
- Primary Cutting Method – Will yield straight triangles and 10 croissants:

- Alternative Cutting Method – To eliminate scraps and get 12 croissants:
- With this method, the croissants may be slightly smaller and not a perfect triangle shape.
- Follow the steps through Step 8
- It is your choice whether or not to trim the edges with this cutting method.
- Cut the dough rectangle into 3 equal sections. Depending on whether you trimmed the edges, each section will be roughly 4 inches wide.
- Then cut each section into a diagonal – yielding 2 croissants per section, for a total of 6 croissants.
- Repeat the steps for the other half of the dough in the fridge.
 What to make with the croissant dough scraps
- Monkey Bread – Grease mini bundt pans, or the cups of a muffin pan. How many will depend on how many scraps you have leftover. I was able to make 3 mini bundts. Cut the scraps into small 2 inch pieces, and gently shape into balls. Toss in cinnamon sugar and place in prepared pans and bake for 20-25 minutes, or until the tops are golden brown.
- Cinnamon Pastry Twists – Twist the scraps and sprinkle all sides with cinnamon sugar. Bake on a baking sheet for 20 minutes, or until golden brown
- Cinnamon Pinwheels – Sprinkle the dough with cinnamon sugar and twist into a pinwheel. Bake on a baking sheet for 20 minutes, or until golden brown.
- Donut Holes – Gently roll the scraps into equal-sized balls. Fry in 2 inches of canola oil heated to 350F degrees (I use a Dutch oven for frying). Roll the donut holes in powdered sugar, cinnamon sugar, or your favorite glaze.
Nutrition Estimates
TRY THESE SMALL BATCH RECIPES NEXT!


About the Author …
Hi, I’m Erin! With years of experience baking for two in my own small household, I know about the love for desserts without the leftovers. I’ve tested, written, and photographed every one of the 300+ recipes on my website. And even had some of my desserts featured on Taste of Home, The Spruce Eats, ELLE, Parade, and more! From traditional to gluten free desserts for two, I have the recipe for you.
Click here to learn more about me →
I’ve made this recipe so many times! They are so good! I love to add some dark chocolate in them or dip later on
Thank you so much Mattie – I truly appreciate the lovely comments. And I’ll have to try the dip in chocolate next time – that sounds incredible!
I made these this weekend. It was my first time making croissants. Such a fun experience! I stuffed them with almond paste. They are amazing! Thank you for posting the recipe.
Thank you so much Fawn! So glad you enjoyed the croissants and I appreciate you trying the recipe!
A wondrous recipe. The description is so vivid even a bumbling fool could get it. Ahaha I love it. So flaky comprable to a french bakery to only crescent I will indulge in.
This comment just made my day Vicki! 🙂 Thanks so much for the kind words and I’m so happy to hear you enjoyed the croissants!
I just followed the instructions and it is a great recipe. It is SO DELICIOUS!!
Yay – so glad you enjoyed them!! Thank you for trying the recipe Evelyn!
Very clear instructions and delicious croissants!
Thank you so much!
I recently read Ina Garten’s memoir and she inspired me to attempt croissants. After looking on Pinterest, your recipe was so detailed and felt manageable. I baked croissants Christmas morning and have made them now three more times. I love how they turn our perfectly each time. I was certain it was just a Christmas morning miracle and some beginners luck with the first batch! I made a couple of adjustments because my oven bakes a little hot. Thanks so much for breaking each step down.
Thank you so much for the lovely comment Chrissy – this truly made my day! So happy to hear you love the croissants (I do too!) – they are such a treat. Thank you so much for visiting the blog!
This recipe was amazing and fairly easy to follow for someone who has never made croissants! A little tip, use a sheet that has walled edges. I mistakenly used a flat air bake sheet, and the egg brush dripped into the bottom of my oven. A smoke filled kitchen was not part of my plan but was a happy detour in the journey.
Thank you for trying the recipe Whitney – and thanks for the tip on the baking sheet! Happy New Year!