Mini Angel Food Cake
This post may contain affiliate links. See my disclosure policy.
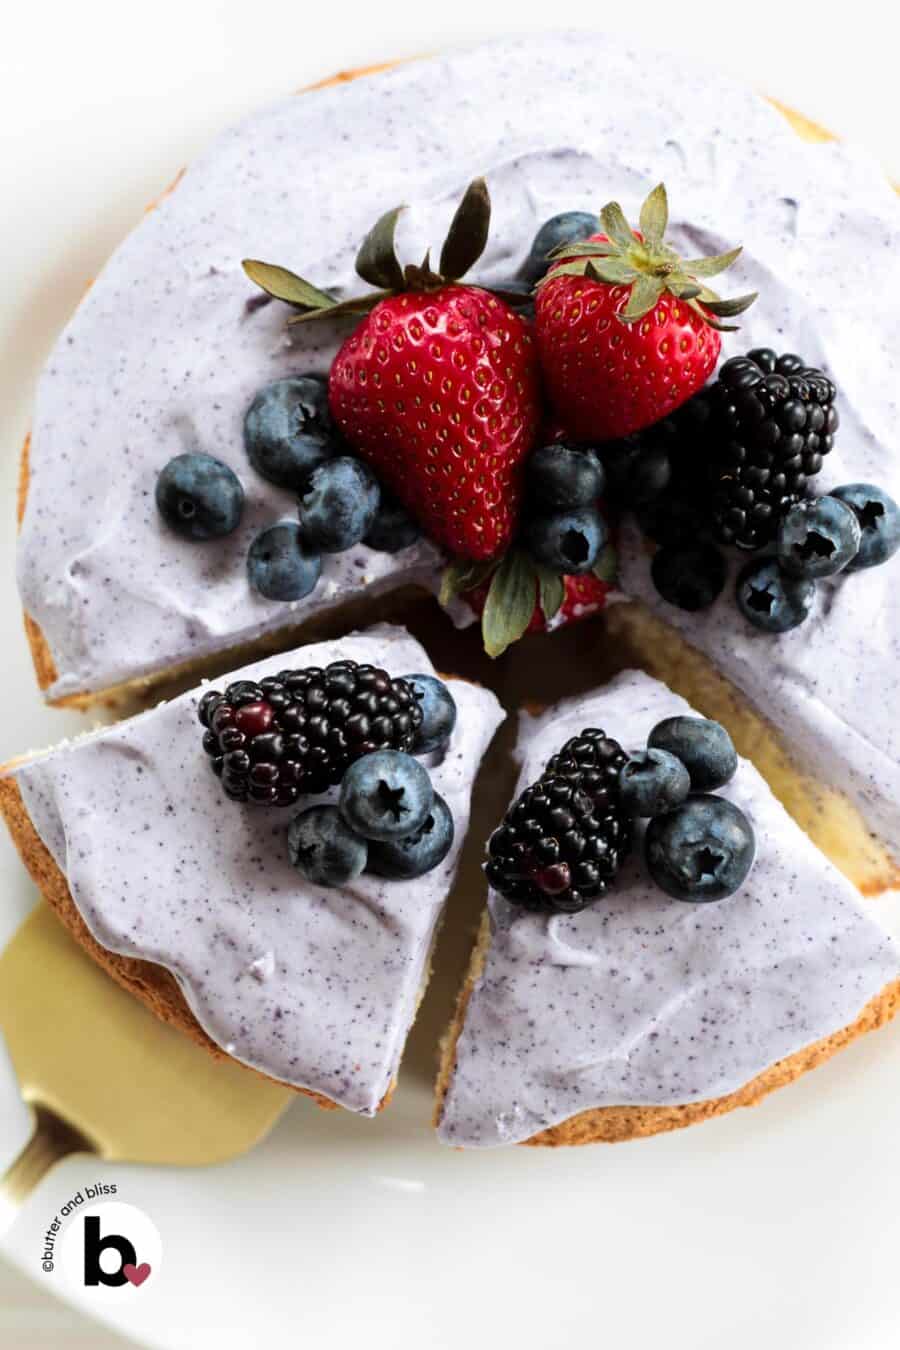
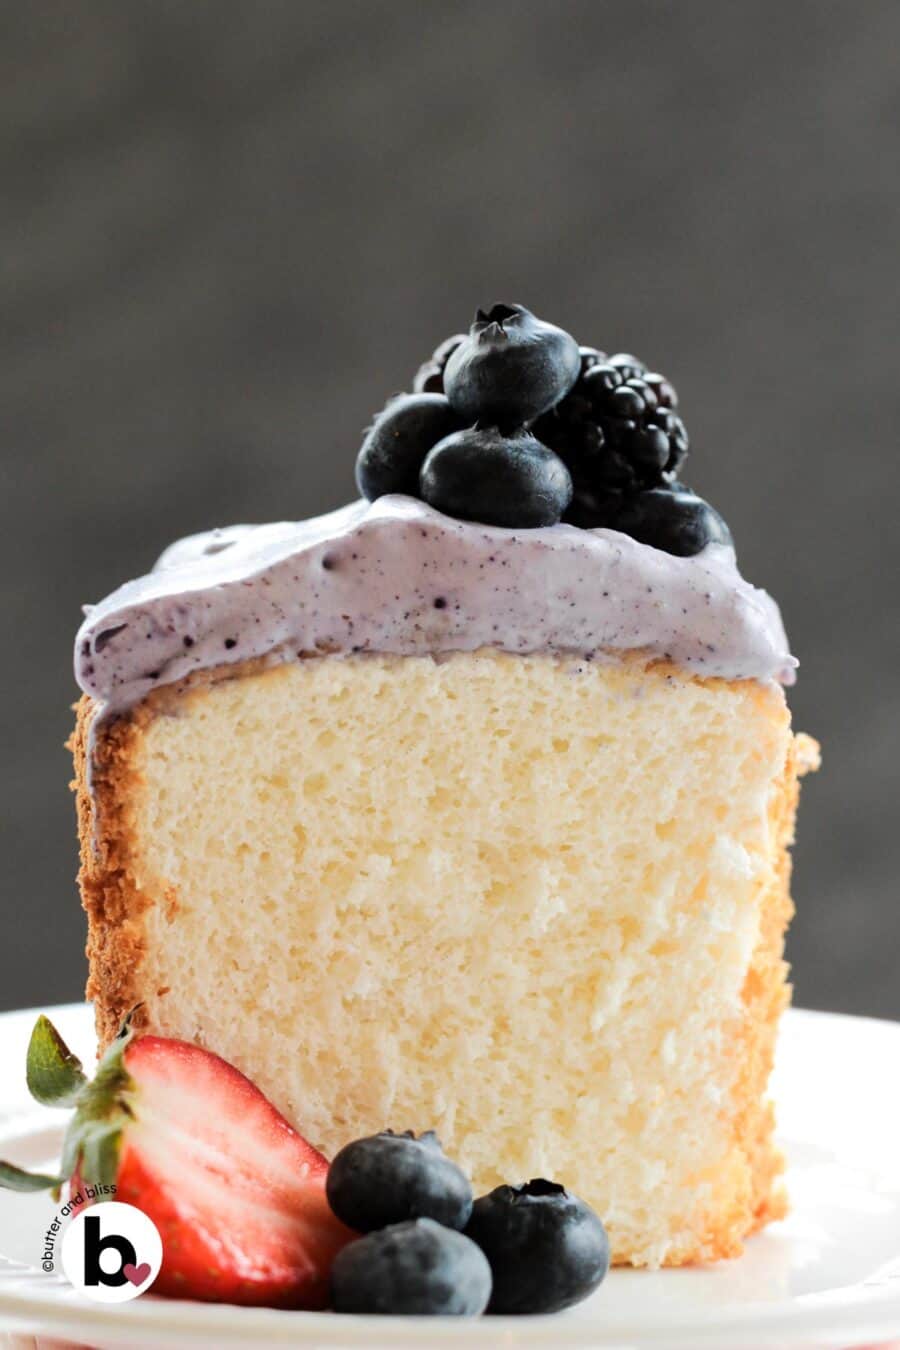
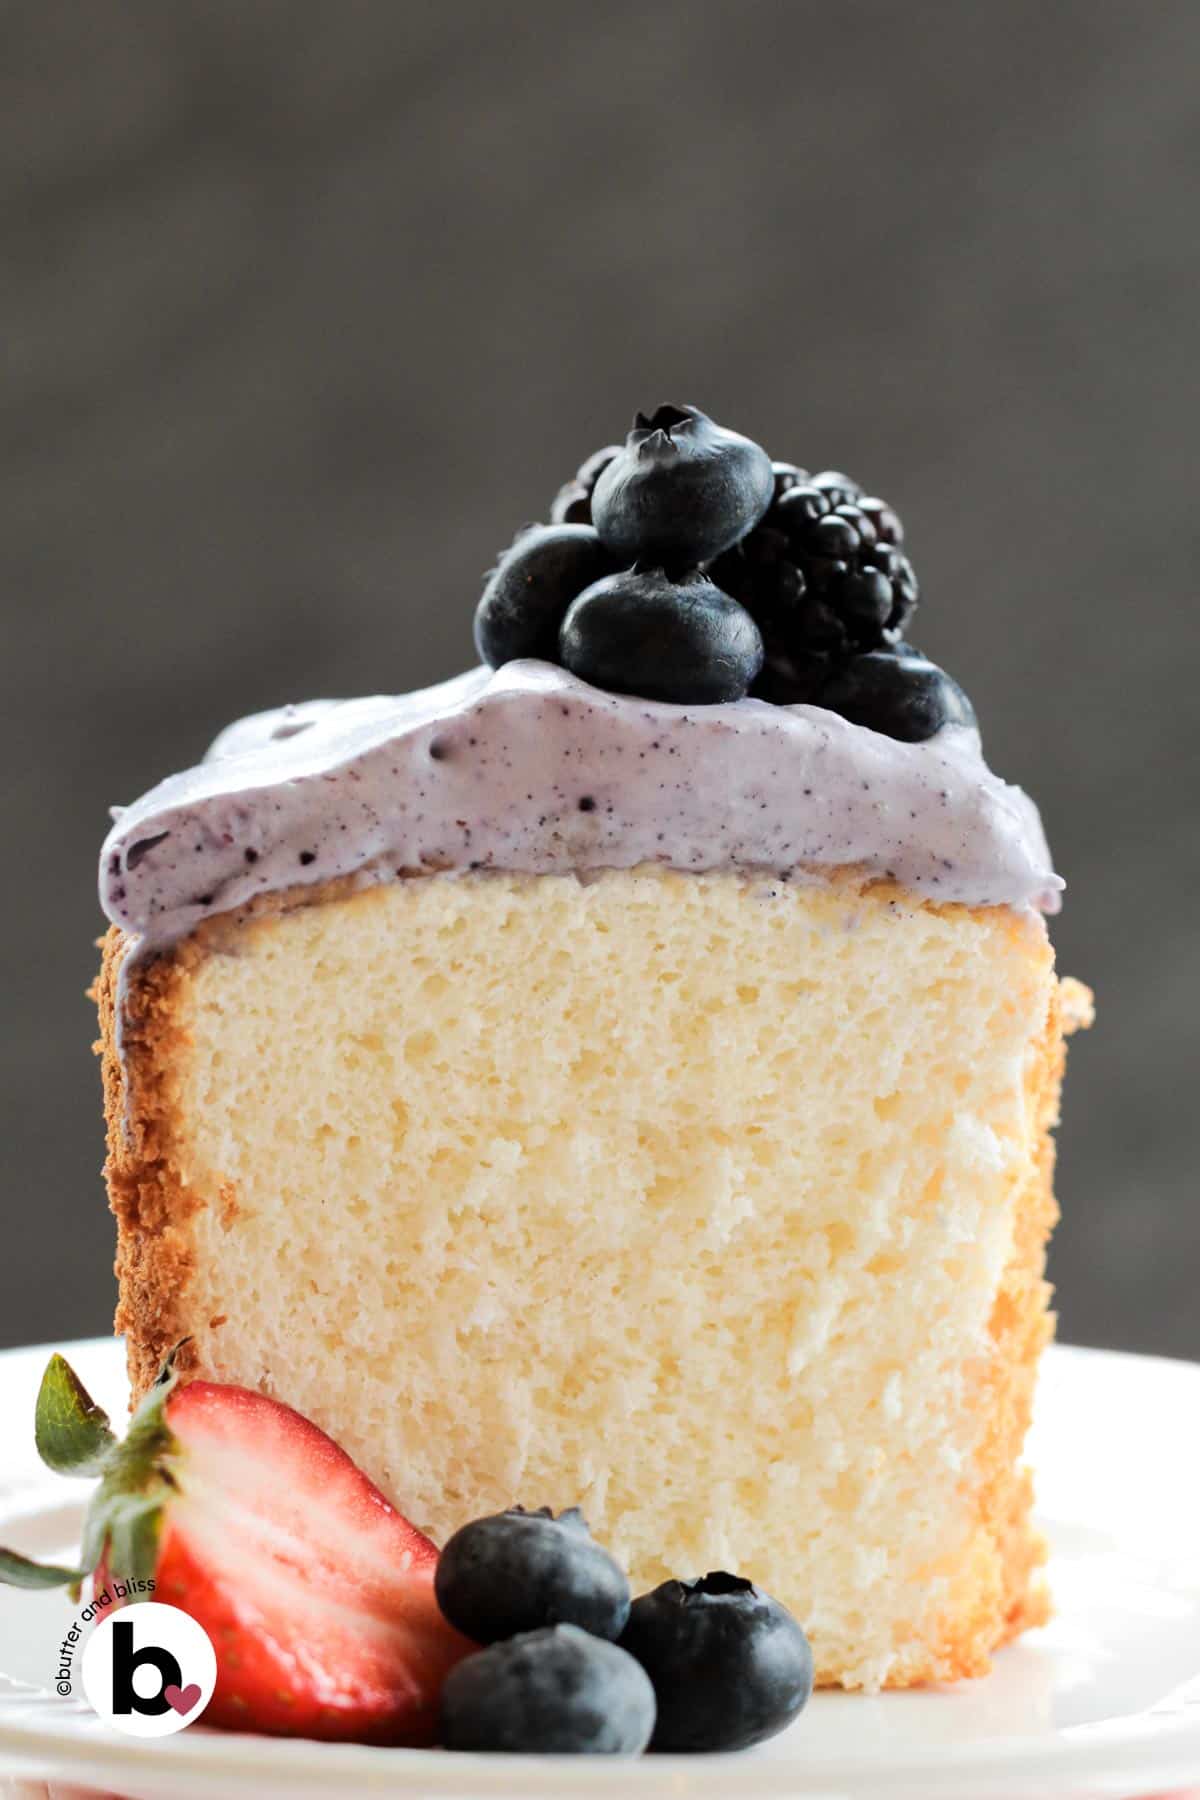
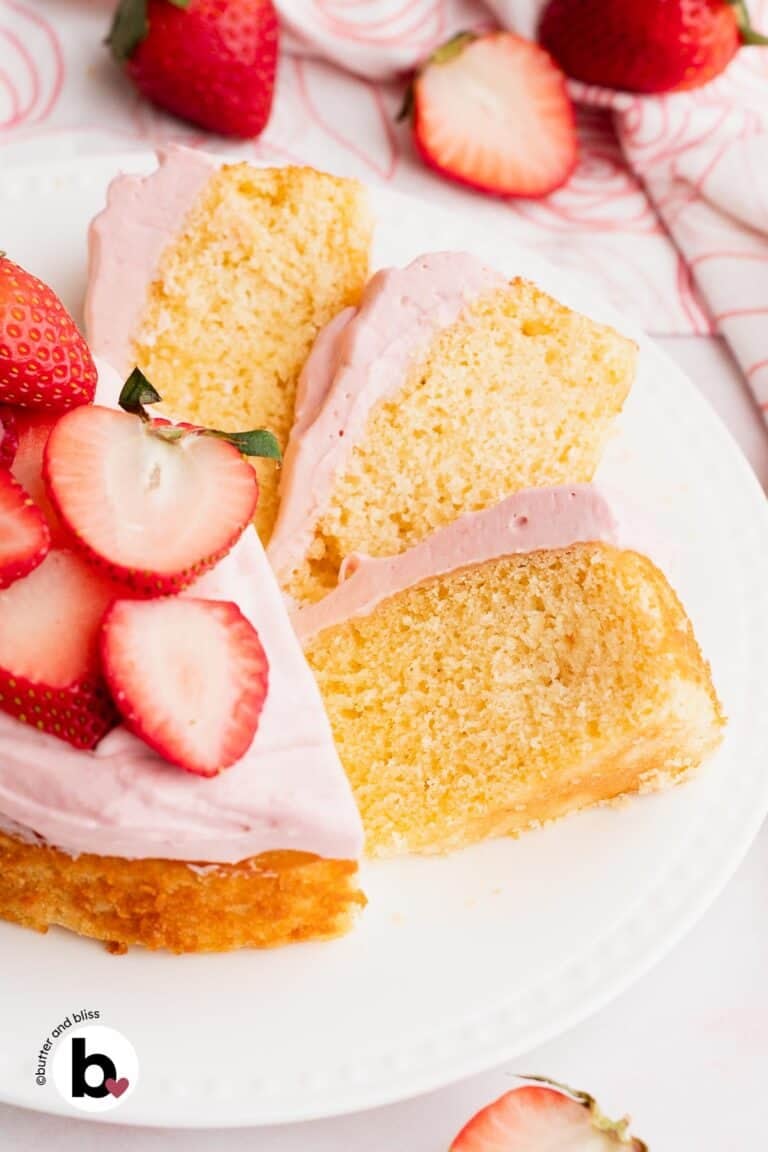
With a light, fluffy, and delicately sweet crumb, this mini angel food cake is a beautiful dessert worthy of any quiet weeknight or spring celebration. Baked in a 7-inch angel food cake pan, this cake uses a combination of cake flour and powdered sugar for a cottony-soft texture, and subtle notes of vanilla and almond for flavor. Pair each of the six perfectly portioned slices with whipped cream and fresh berries.
My Small, Classic Angel Food Cake

I’ve always loved angel food cake. And it didn’t matter if it was from a grocery store or homemade. Though, the from-scratch versions always seemed to show up at Easter, covered in marshmallow, coconut flakes, and jelly beans.
Well, we don’t need all that to make this cake shine. The precision that goes into making an angel food cake tall, soft, and lightly sweet should be honored, and it only took me five tries to get it there.
After discovering the 7-inch angel food cake pan at a craft store — complete with a removable bottom and center tube for proper baking — it was like a sign to make my own small batch cake.
My recipe uses both granulated sugar and powdered sugar as a nod to old-fashioned recipes. The powdered sugar sweetens and lightens the crumb, and when combined with cake flour, the result is, well, angelic. And don’t let the technique with the egg whites make you nervous. I give you visual steps to lead you to glossy peaks.
The result is worth every step — a bouncy cake that tastes like it came from a bakery. Top it simply with pastry cream, lemon curd or whipped cream (my blueberry dairy-free whipped cream is delish), and fresh berries, and you have a small batch dessert that’s as elegant as it is unfussy, once you know the rules.


Erin’s Testing Notes
Egg Whites are the foundation of an angel food cake, and a few things to know to make them work properly.
- Any grease, oil, or traces of egg yolk will inhibit their ability to whip properly. Set yourself up for success by first wiping the beaters and mixing bowl with lemon juice (or vinegar) to clean them. Then, separate the eggs when they are cold (the yolks hold up better). The whites still have to come to room temperature.
- The egg whites are whipped to medium (firm) peaks, which means they will be glossy with a slight curl at the tip. Overwhipped whites will yield something that is more bread than cake. And underwhipped, the cake won’t rise at all.
Angel Food Cake Pan is the only pan I recommend for this recipe since it’s designed to get the cake out cleanly.
- Resist your baking instinct to grease the pan. The batter needs to cling to the sides as it rises, and greasing the pan robs it of that grip.
- Once the batter is in the pan, it will be so airy that it’s almost inevitable air pockets will get trapped and give you a slice with holes in it. It’s more about appearance than it is about taste. A dinner knife run slowly through the batter knocks out those bubbles.
- Cooling is as important as baking. Let gravity work and cool the cake upside down. This keeps the height intact and ensures the cake doesn’t collapse under its own weight.
How To Make A Small Angel Food Cake
We sift the cake flour and powdered sugar twice during the process. The first time, sift them together into a mixing bowl and set that aside.
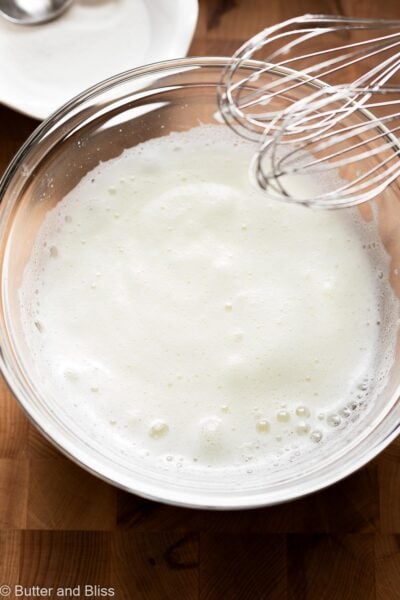
The egg whites go into the clean mixing bowl and are whipped until foamy. Add the cream of tartar and continue to whip until they turn opaque white. At that point, gradually add the granulated sugar.

Foamy egg whites. Opaque egg whites.

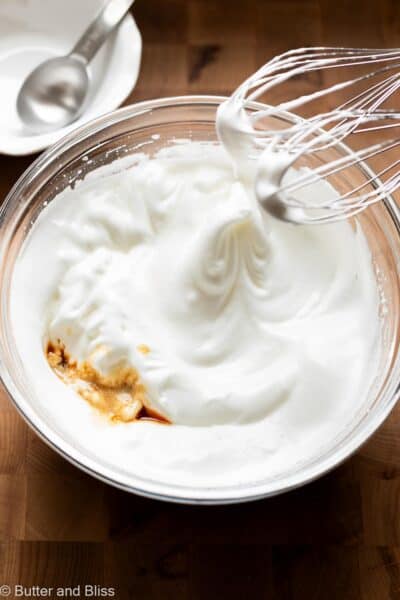
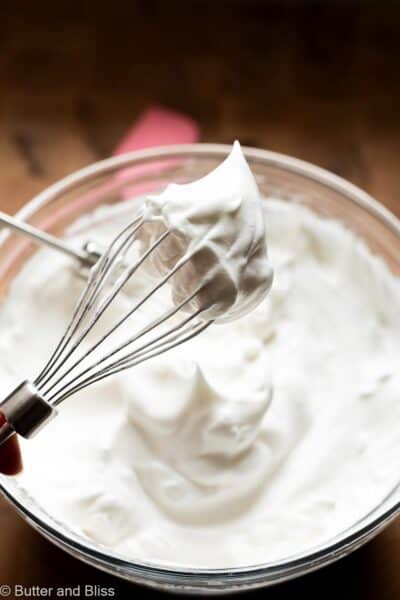
Once all of the sugar is added, add the extracts and finish whipping the whites until they are super voluminous and glossy. And when you lift the beater, the tip will stand on its own, with a little droop.
Whipped egg whites after sugar is added. Egg whites at medium/firm peaks.
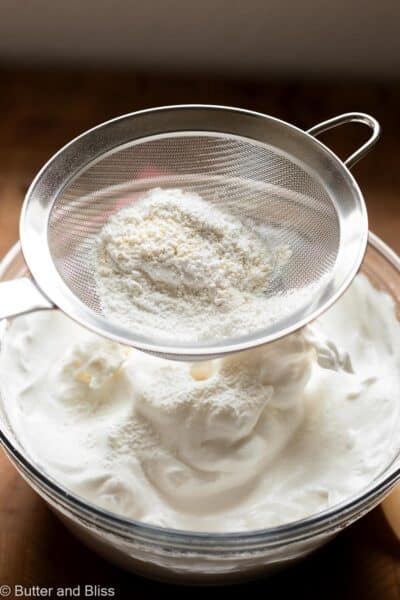
Then the cake flour mix is sifted again, directly over the egg whites, in three increments. This will keep the heavy dry ingredients from collapsing the freshly fluffed whites.
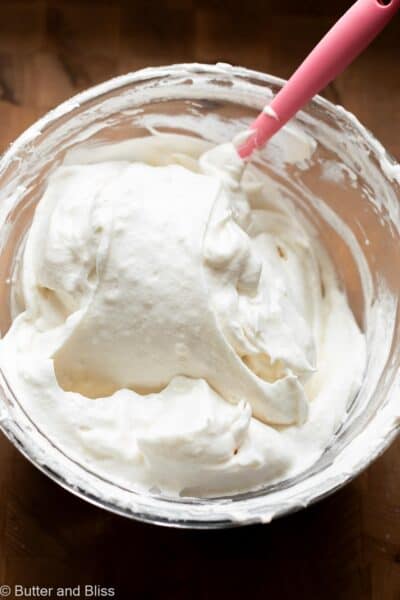
After each addition, gently fold the dry ingredients into the whites with a spatula, reaching the bottom of the bowl to catch any flour that sank.
Sift dry ingredients a second time over whipped egg whites. Gently fold dry ingredients into whipped egg whites.
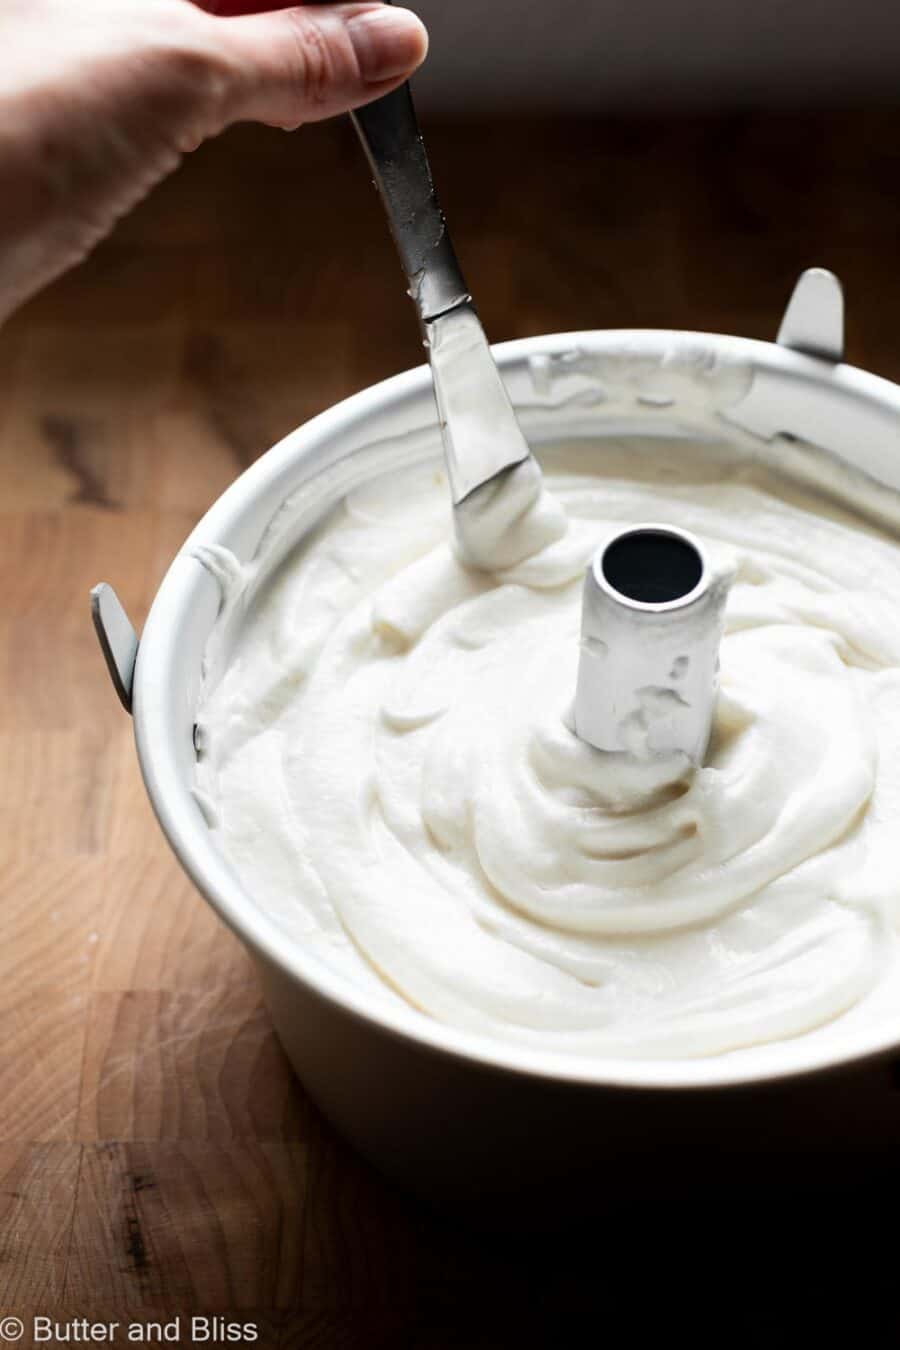
Pour the batter into the pan and smooth it out with the spatula. Then, slowly run a dinner knife through the batter to remove air pockets.
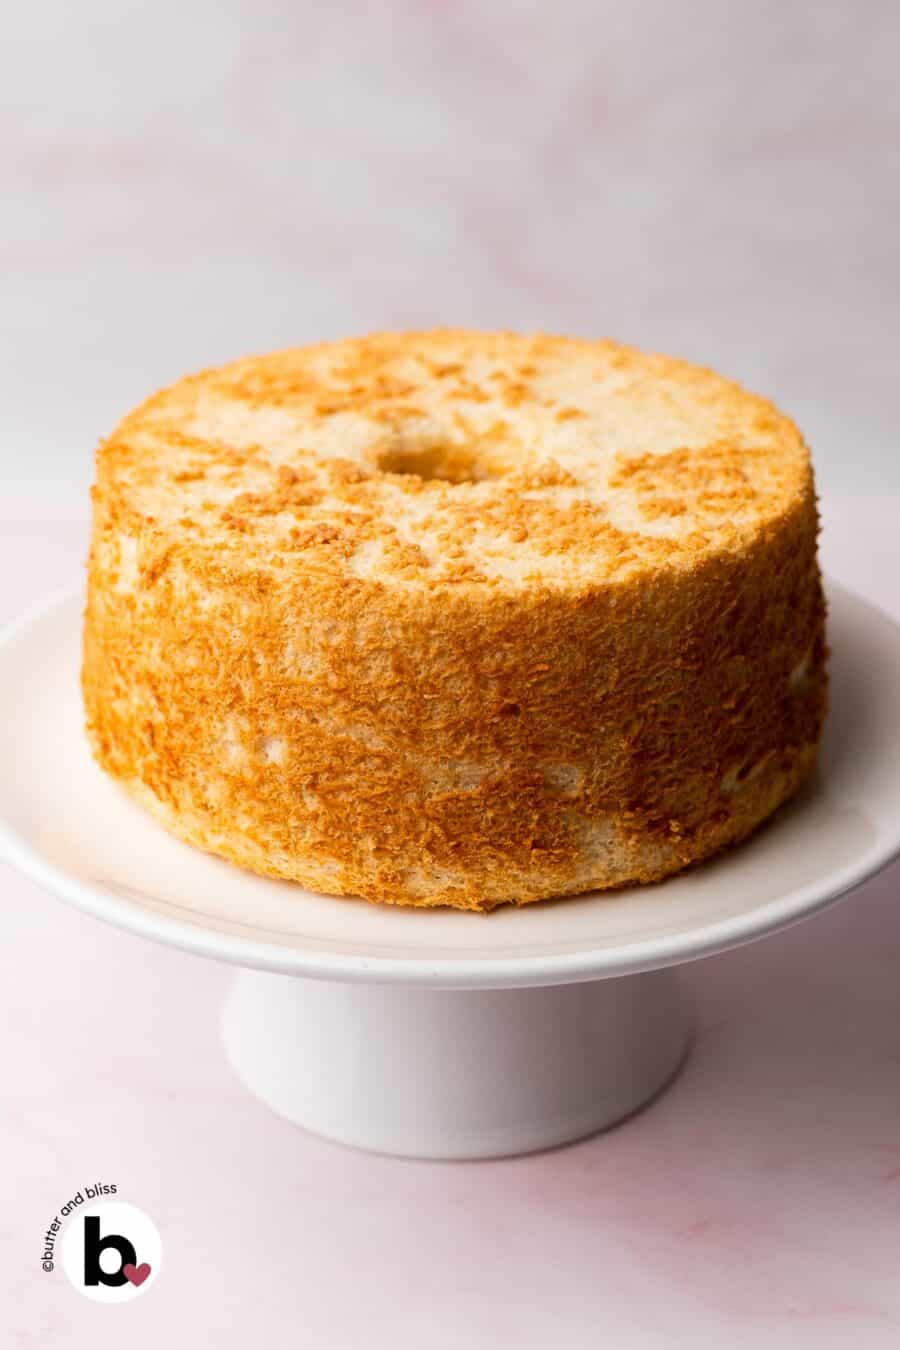
The baked cake will have a golden top, and it may have a few cracks, which is ok. That’s just the cake baking and rising properly.
As soon as it comes out of the oven, invert the pan and cool the cake upside down. Depending on your angel food pan, it will either rest on the middle tube or on the pointy feet along the edge.

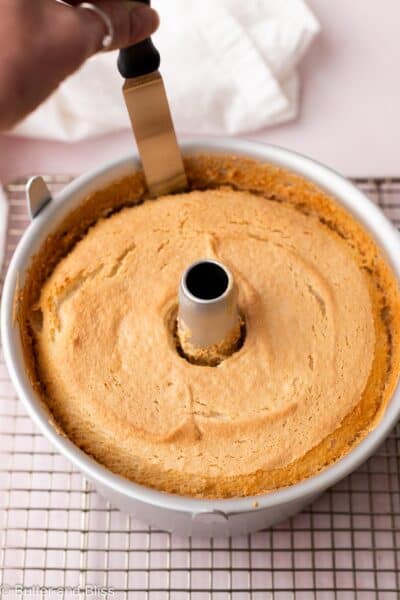
Getting the cake out of the pan is easier than it looks, and you’ll be thankful for the little tube pan and a thin knife. Once the cake is released, it’s almost inevitable that pieces of the exterior will stick to the pan – but that’s part of the charm of this cake.
The Best Ways To Serve An Angel Food Cake
- The bottom of the cake is typically smoother — if you’d rather not show the cracked top, that’s your presentation side.
- Cut the cake with a serrated knife to preserve lofty slices. You don’t want to crush all your hard work just as you’re ready to serve the cake.
- While whipped cream is the obvious choice to garnish the cake (like stable vanilla whipped cream or strawberry whipped cream), a dollop of bright lemon curd or a simple sprinkle of powdered sugar is all this cake needs.
Did You Make It? Let’s Hear About It!
⭐⭐⭐⭐⭐
Did you go classic with whipped cream and berries, or did you finish the angel food cake with something I haven’t thought of yet? I’d love to hear about it in the comments below.
Mini Angel Food Cake
by Erin Cernich
Ingredients
- ½ cup cake flour
- 6 tablespoons powdered sugar
- ¼ teaspoon salt
- 6 large egg whites, room temperature
- ½ cup granulated sugar
- ¾ teaspoon cream of tartar
- 1 teaspoon vanilla extract
- ¼ teaspoon almond extract
Instructions
- Preheat the oven to 350F degrees and adjust the oven rack to the middle position. Use a 7-inch angel food cake pan with a removable bottom – do not grease or line it.
- So the egg whites whip properly, wipe the bowl and hand mixer whisk attachments with lemon juice or vinegar to clean off any potential grease or oil.
- In a small bowl, sift together the cake flour, powdered sugar, and salt.1/2 cup cake flour, 6 tablespoons powdered sugar, ¼ teaspoon salt
- Beat the egg whites – In a medium bowl (my bowl was 2.5 quarts), add the egg whites. On medium-low speed, mix the whites until foamy – about 1 minute. Sprinkle the cream of tartar over the top and mix on medium-high until the whites turn pillowy – about 1 minute. While the mixer is running, add the granulated sugar gradually, about 2 tablespoons at a time. Then add the extracts and continue to beat the egg whites until medium (also called firm) peaks form. They should be white, glossy, and when you lift the beaters, the peaks should stand on their own with a soft curl at the tip. This will take about another 1 to 2 minutes.6 large egg whites, room temperature, 1/2 cup granulated sugar, 3/4 teaspoon cream of tartar, 1 teaspoon vanilla extract, ¼ teaspoon almond extract
- In 3 increments, the dry ingredients will be sifted again, through the mesh strainer, over the egg whites. After each addition, use a rubber spatula to gently fold the dry ingredients into the whites. Do not rush this – you don't want to deflate the egg whites.
- Pour the batter into the ungreased and unlined pan. Use the spatula to gently smooth out the top. Then, take a dinner knife and gently run it through the batter to remove any air pockets.
- Bake for 26 to 30 minutes, or until the cake is lightly golden, a toothpick inserted in the middle comes out clean, and the top will be springy.
- Invert the cake to sit on the center tube of the angel food cake pan. Let it cool inverted for at least 1 hour. Then, using a very thin paring knife or offset spatula, run along the edges of the cake, including the tube in the middle. Lift the cake out on the removable bottom. Run the knife along the bottom to fully release the cake. Place the cake on the wire rack to finish cooling.
- Use a serrated knife to cut the cake so it doesn't squish when slicing. Top with whipped cream and fresh fruit before serving.
Notes
- Serving Size – The 7-inch cake will yield 6 to 8 slices. The recipe can be doubled and made in a 10-inch angel food cake pan and baked for about 40 to 45 minutes.
- Egg Whites – Use fresh, not carton eggs. And, the eggs separate more easily when they are cold. But the egg whites MUST be at room temperature to whip properly. Separate the whites into the clean mixing bowl and let them come to room temperature (about 20 to 30 minutes).
- Whites Not Whipping – If there are any traces of egg yolks in the whites, they won’t whip. Also, if there is any residual oil/grease in the mixing bowl or on the mixing beaters. Be careful when separating the eggs and wipe down the bowl and beaters first.
- Sift Flour Twice – This will aerate the flour (and powdered sugar), making it easier to fold into the whites, and baking a light and fluffy cake.
- Ungreased Cake Pan – Part of what makes an angel food cake so tall is that the batter “crawls” up the side of the pan when baking. Greasing the pan won’t allow this to happen.
- Storage – Cover the cake and store at room temperature for up to 2 days, or covered and refrigerated for up to 5 days.
- Freezing – Wrap the cake tightly in plastic wrap and keep at room temperature overnight. Then, slide it into a freezer bag and freeze for up to 3 months. Thaw in the refrigerator and bring to room temp to serve.
- Whipped Topping – I used my blueberry dairy-free whipped cream in the photos. Vanilla whipped cream and strawberry whipped cream would also be delicious.
Nutrition Estimates
TRY THESE SMALL BATCH RECIPES NEXT!

About the Author …
Hi, I’m Erin! With years of experience baking for two in my own small household, I know about the love for desserts without the leftovers. I’ve tested, written, and photographed every one of the 300+ recipes on my website. And even had some of my desserts featured on Taste of Home, The Spruce Eats, ELLE, Parade, and more! From traditional to gluten free desserts for two, I have the recipe for you.
Click here to learn more about me →
I couldn’t wait to try a piece. Just had a piece and just delicious!!
Thank you so much Laurie – this just made my day! I make this for Easter every year and can’t resist snacking on it all day!:) I hope your granddaughter enjoys this for her birthday, and so appreciative you tried the recipe.
I just made this today. My twin granddaughters birthdays are next week and I bake two cakes. One wanted angel food cake with whipped cream and strawberries. The other wanted a fudgy chocolate cake. So I usually try to find recipes for making smaller cakes. I didn’t want to make a normal size angel food cake and came across your recipe. I ordered a 7 inch pan and made a “test” cake today to ensure it will work for the birthday cake. It turned out amazing! Looks and smells good. I will try a piece tonight for dessert. So happy I found your recipe as will be perfect size for one of the cakes.