Cheddar and Jalapeno Bread
This post may contain affiliate links. See my disclosure policy.
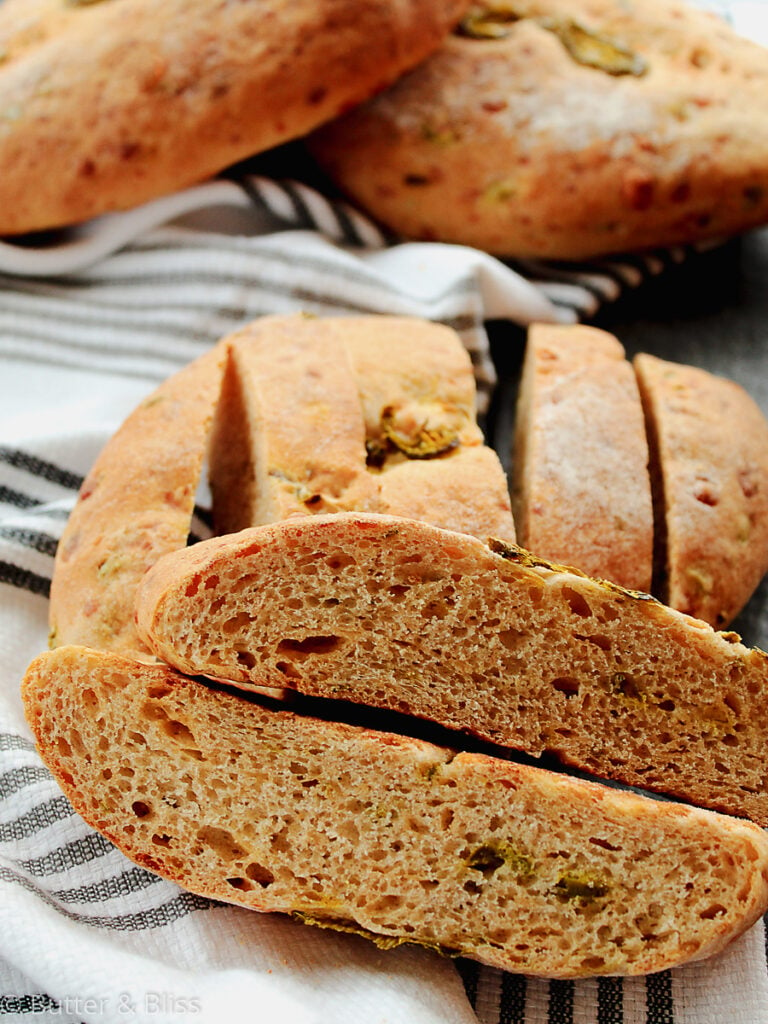
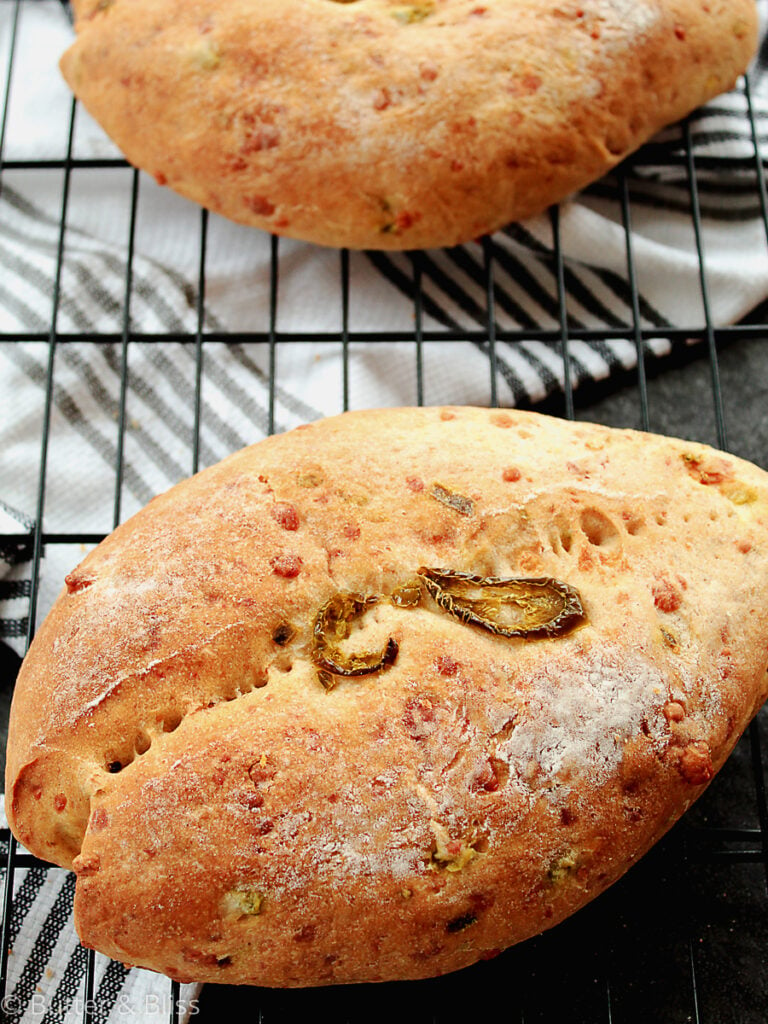
This Cheddar and Jalapeno Bread is a delicious combination of a perfect crusty outside and soft chewy inside. Sharp cheddar cheese adds zest while the pickled jalapenos add a little tangy heat.

Every time I make bread, I learn something new. I think I have finally come to understand and appreciate that yeast is just another ingredient in the recipe. It just takes some preparation – much like bringing eggs or liquids to room temperature. So, I no longer stress when I make bread. The yeast will tell you it’s ready when it gets all foamy and creamy when you dissolve it in water. The dough will let you know it has proofed long enough when it doubles in size. And when it is done baking, it will sound hollow when you tap on the bottom.
I found this recipe from Paul Hollywood’s How To Bake cookbook, and I loved the idea of making 4 smaller loaves rather than one big one. They are easier to portion for breakfast and lunches without having to worry about the whole loaf going stale because you cut into it. I adapted his recipe by adding different flavors adding more butter because well, it’s butter.
Bread Loaf Flavors
The flavor of the bread is delicious enough without having to add in other flavors. Though, adding a little cheese to just about anything is a great idea. Cheddar and jalapeno are arguably one of the best flavor combinations, though you can get creative. Other flavor combinations that would be delightful:
- Caramelized onion and bacon
- Green olives and Italian seasoning
- Sun-dried tomatoes and asiago cheese
- Honey and oatmeal
- Garlic and rosemary
- Triple cheese – you pick the 3!
Jalapeno Bread … is it too hot?
The answer is no. You can regulate how much heat you want in the bread by adding more or less pickled jalapeno. The amount of jalapeno in this recipe gives you the perfect amount of pickled heat. Though I can stand things a little hotter, so the next time I may add more! 🙂 My thought is you want to be able to taste the jalapeno.
Why pickled jalapeno and not fresh?
I’m a HUGE fan of vinegar, so this was a personal preference. I do believe the pickled jalapeno imparts more of the flavor. Fresh jalapeno would be delightful as well, but you may lose some of the spicy flavors when it is baked. If you do try fresh though, please let me know!
Yeast – Active Dry or Instant
My preference in yeast is using an active dry yeast. This means it needs to ‘proof’ in water before using. This essentially ‘proves’ that is alive and working. My reason for using active yeast is simply that I am a little old-school. I like to see the ingredients working and I want to know it is alive. It is also fun to watch – it is like tiny little explosions in the cup! 🙂
However, you can use instant yeast. If you do, you add it to the mixing bowl with the flour, just keep it away from the salt until you start mixing. Salt directly on the yeast can deactivate it, and then it won’t work and your dough will not rise.
Proofing the dough
This is when you want the yeast in your dough to work with gluten and relax it. When this happens, the dough will rise. A good rise is when the dough has doubled in size. It also emits a lovely yeasty, bready aroma. 🙂 Smells just like a bakery!
A couple of tricks I have picked up from the hours of the Great British Bake Off:
- Use a shower cap to cover the bowl when proofing the dough for the first rise. The elastic on the cap hugs the bowl nicely. Plus, you now have a use for all of those hotel shower caps you pick up from your vacations!
- For the second rise, since the loaves are now on their baking sheets, you want to make sure they have room to grown. There are such things as proofing bags, and they are expensive. I use large oven roasting bags instead. They are less expensive, the right size, and can be reused.
From here, the cheddar and jalapeno bread loaves are one of the easiest yeast bread recipes I have made to date. I can’t reiterate enough that don’t stress about working with yeast dough and have fun with your flavors!

Cheddar and Jalapeno Bread
by Erin Cernich
Ingredients
- 2 ¼ teaspoon active dry yeast (1 packet)
- 1 ½ cups warm water
- ⅛ teaspoon granulated sugar
- 400 grams bread flour
- 100 grams all-purpose flour
- 3 tablespoons unsalted butter, cut into cubes (room temperature)
- 2 teaspoons salt
- 1 cup sharp cheddar cheese, grated
- 6 ounces pickled jalapenos, chopped and dried
Instructions
- In a small liquid measuring cup, add 1/4 cup of the water and whisk in the yeast and sprinkle the sugar on top. Set aside for 5-10 minutes until the yeast dissolves and turns creamy. This is called proofing or proving the yeast.
- In a large mixing bowl, add both flours, butter, and salt. Using your hands or a pastry cutter, mix until combined breaking up the butter into pea-sized pieces. Do not overwork the butter – you don’t want it to melt.
- Stir in the prepared yeast, 1 cup of the remaining water, grated cheese and dried jalapenos. Mix with your hands or a wooden spatula until the cheese and jalapenos are incorporated. The dough should be soft, but not too wet. If the dough is dry, add in a little of the remaining water – about 2 teaspoons at a time.
- Use the dough to clean the sides of the bowl, then turn out onto a lightly floured surface. Knead the dough for 5-8 minutes. You will work the dough through the wet stage and knead until the dough is soft and smooth.
- Transfer the dough to a lightly oiled bowl (olive oil is great), cover with plastic wrap and a dry dish towel, and place in a warm (room temperature) area to proof. You want the dough to double in size and depending on the temperature in your kitchen, it could take anywhere from 1-2 hours to rise.
- Once the dough has proofed, pour out onto a lightly floured surface and cut into 4 approximately equal pieces. Shape each piece into an oval and transfer to the prepared baking sheets – 2 on each. Lightly dust the tops of each loaf with flour, then using a sharp paring knife, make a slash down the center of each loaf.
- Cover the baking trays lightly with plastic wrap or put each in clean plastic proofing bags (if you have them). Large roasting bags work great for this and can be reused. Set aside for their second proof for 60 minutes, or until the loaves have doubled in size again.
- While the loaves are proofing, preheat the oven to 450F degrees and place the oven racks in the top and bottom third of the oven.
- When the loaves are done proofing, bake for 20 minutes or until the loaves are golden brown. Rotate the pans halfway through baking.
- The loaves are best served warm! Store leftovers in a paper bag at room temperature for up to 2 days. The bread will get pretty stale after that.
Notes
- The recipe calls for active dry yeast, but you could also use instant yeast. If you do, you add the yeast to the bowl with the flour and keep the salt and the yeast separate until you mix. Salt directly on top of yeast will deactivate it.
- If you choose to use the active dry yeast, the water should be warm. You can use a digital food thermometer to measure or, by touch the water will feel like warm bath water.
- When proofing the dough for the first rise, you will cover it with plastic wrap. Another trick is using a clear plastic shower cap (like the ones you get at hotels). The elastic in the shower cap keeps it snuggly on to of the bowl.
- When proofing for the second rise, I recommend large roasting bags. They are inexpensive and can be reused. I have also used kitchen garbage bags. Just make sure they are unscented!
Nutrition Estimates
TRY THESE SMALL BATCH RECIPES NEXT!


About the Author …
Hi, I’m Erin! With years of experience baking for two in my own small household, I know about the love for desserts without the leftovers. I’ve tested, written, and photographed every one of the 300+ recipes on my website. And even had some of my desserts featured on Taste of Home, The Spruce Eats, ELLE, Parade, and more! From traditional to gluten free desserts for two, I have the recipe for you.
Click here to learn more about me →