Chocolate Peanut Butter Dipped Cookie Sandwiches
This post may contain affiliate links. See my disclosure policy.
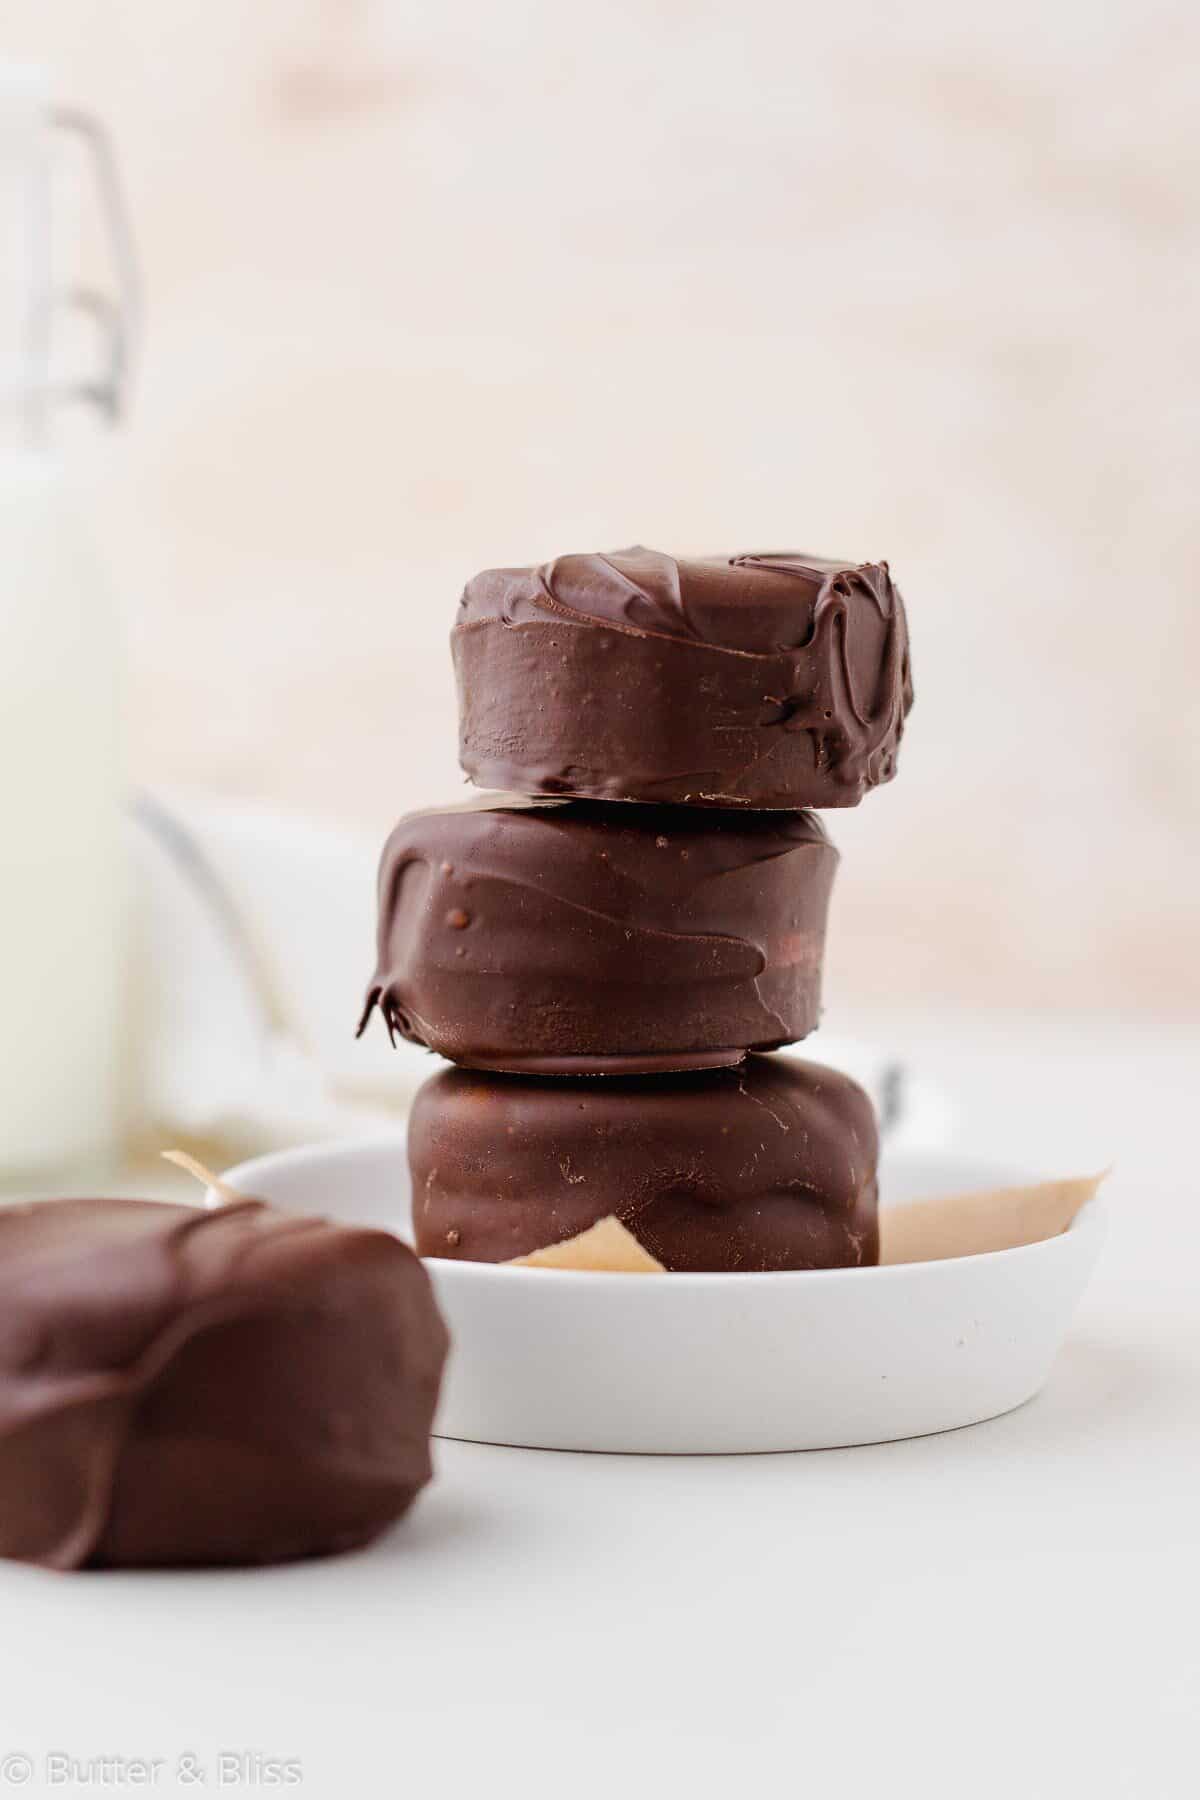
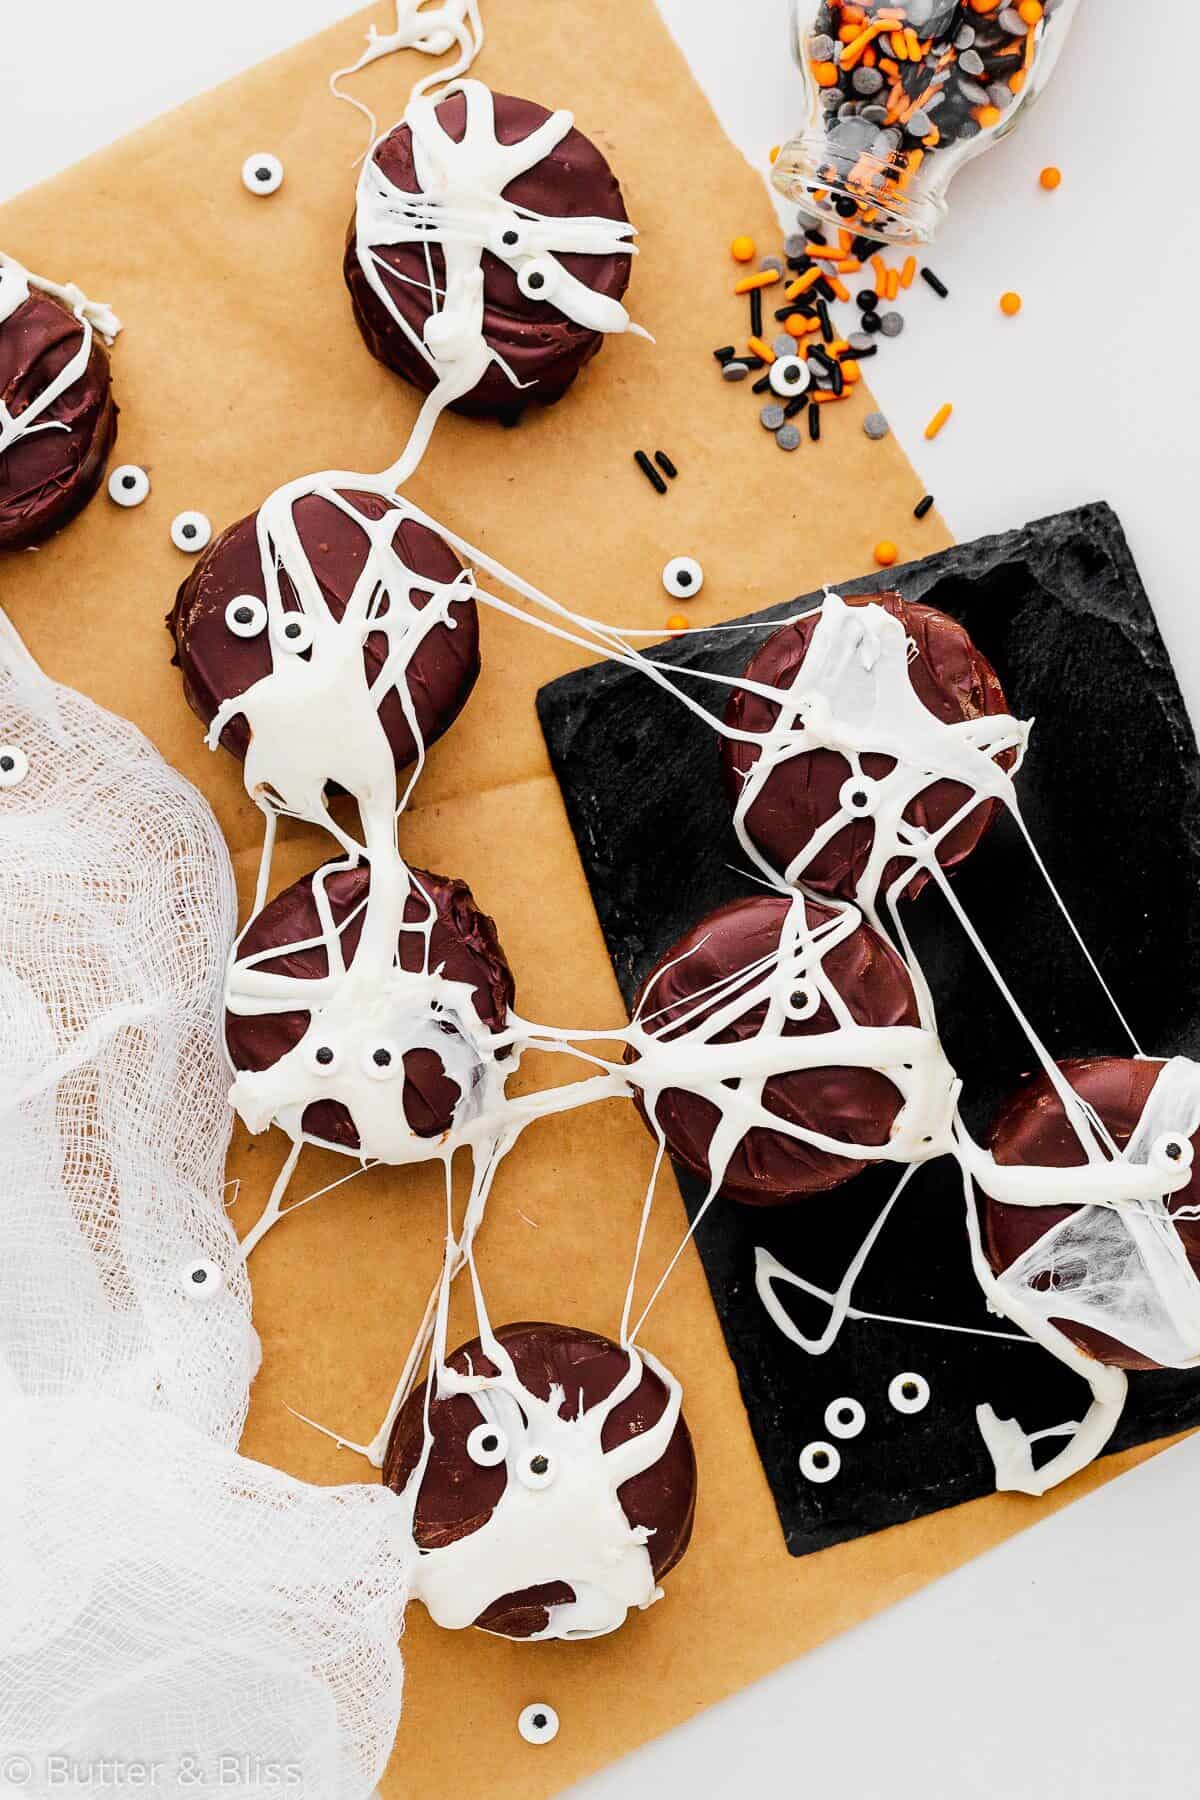
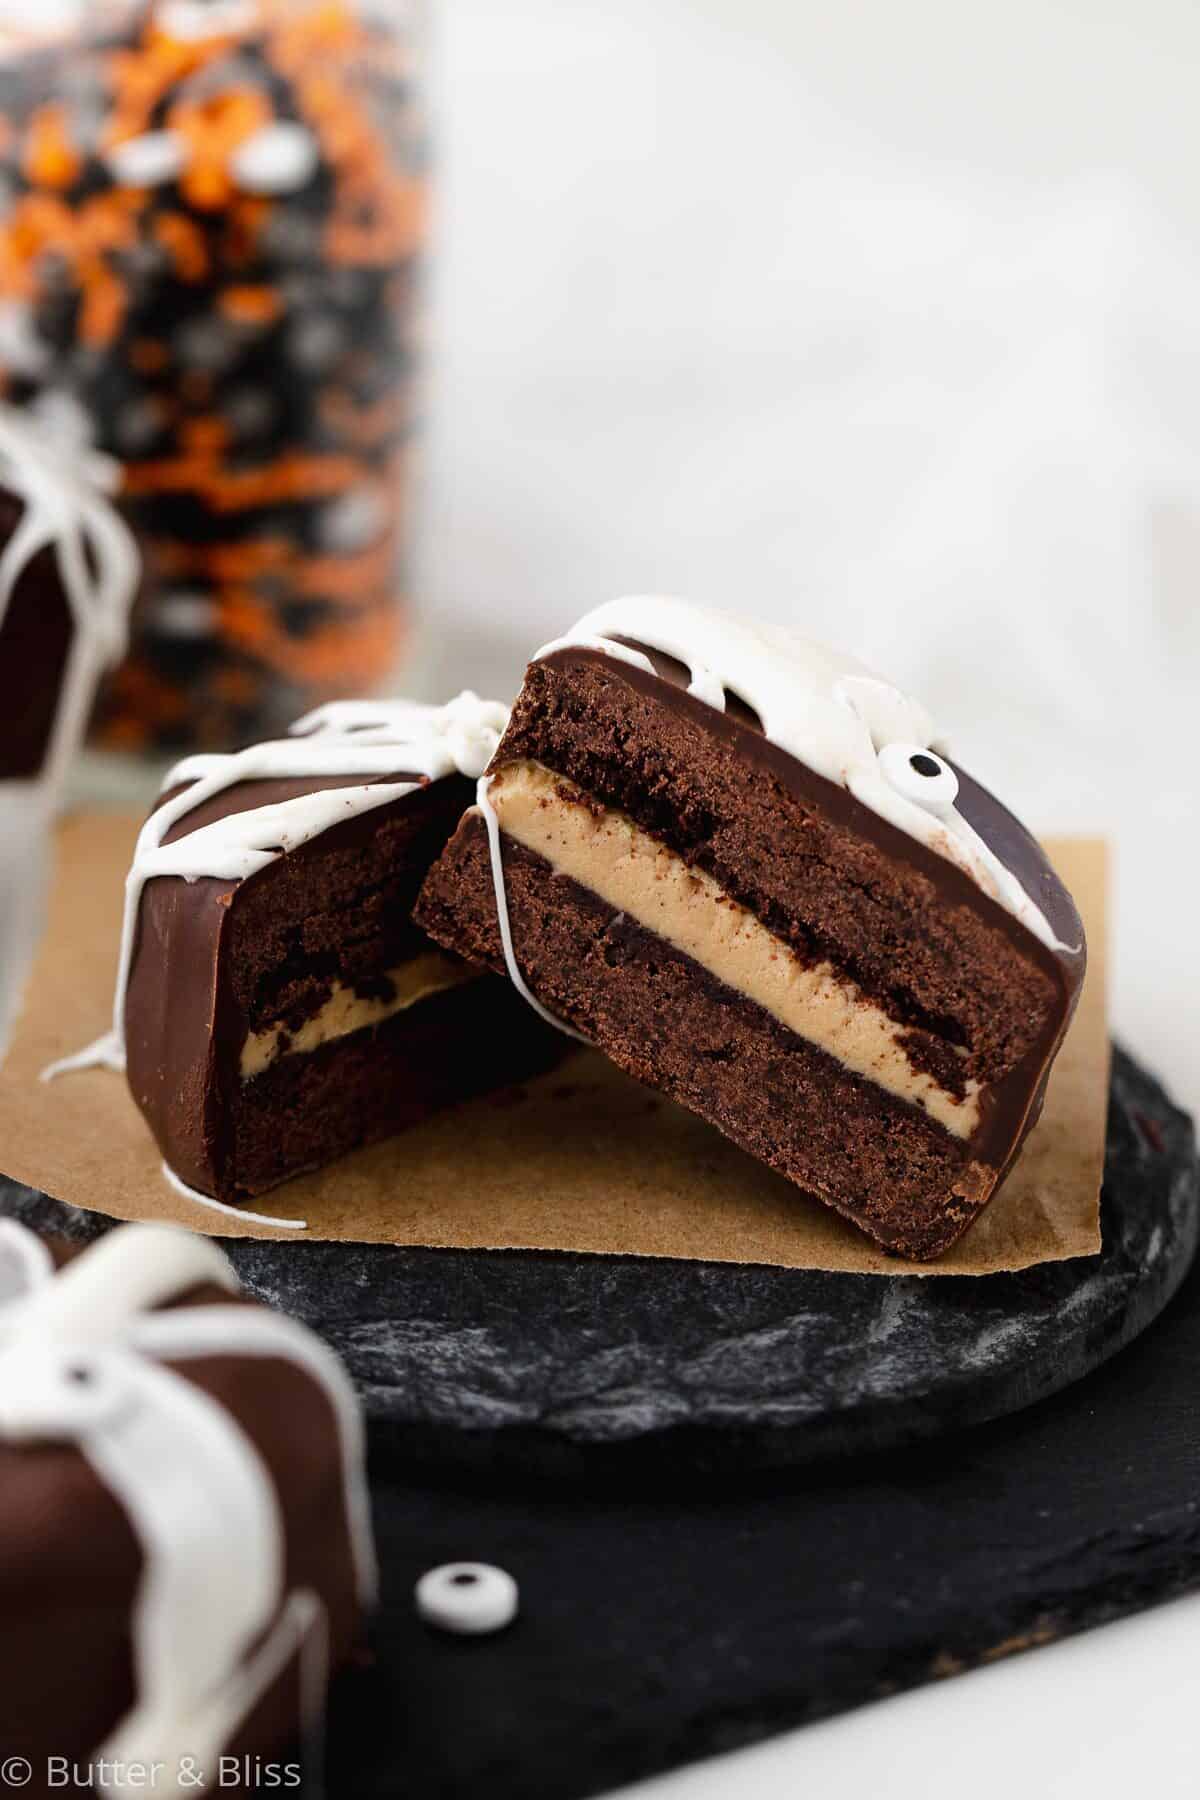
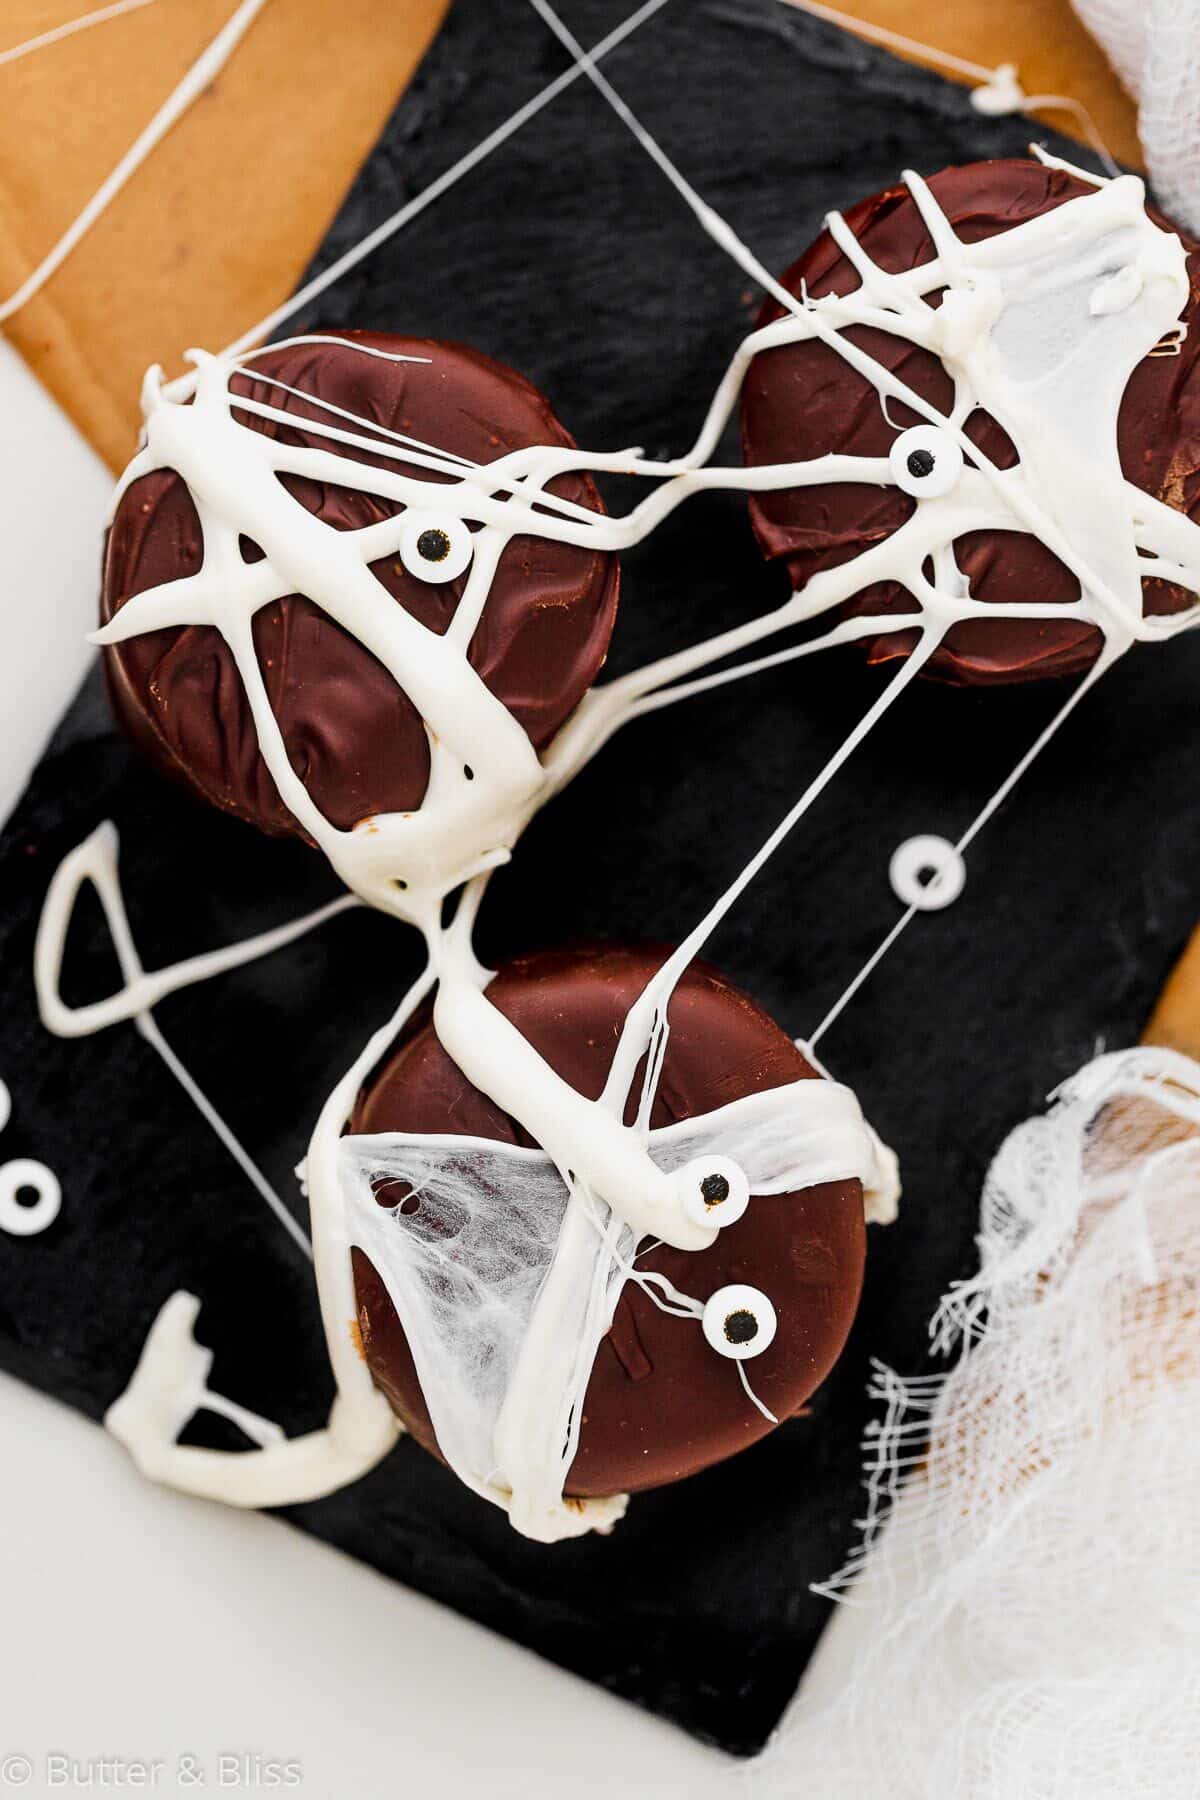
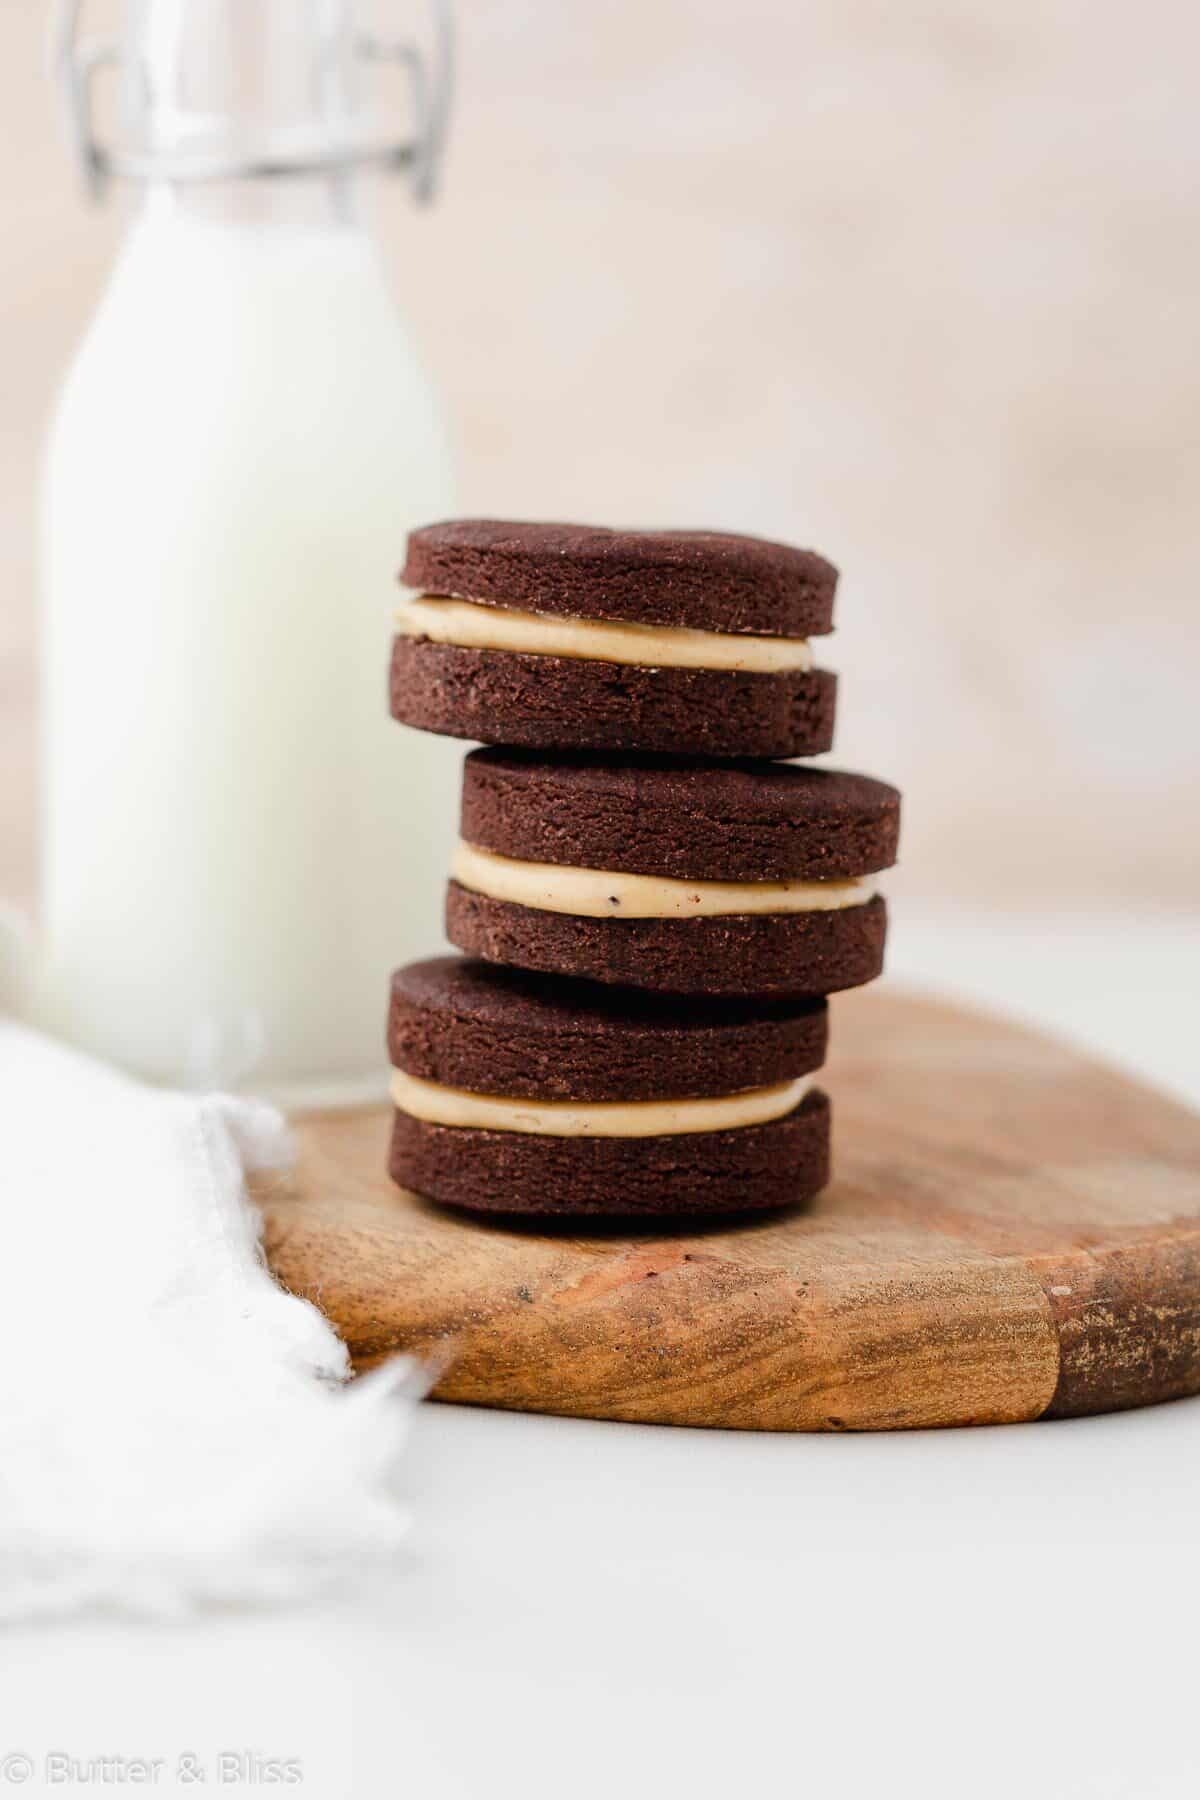
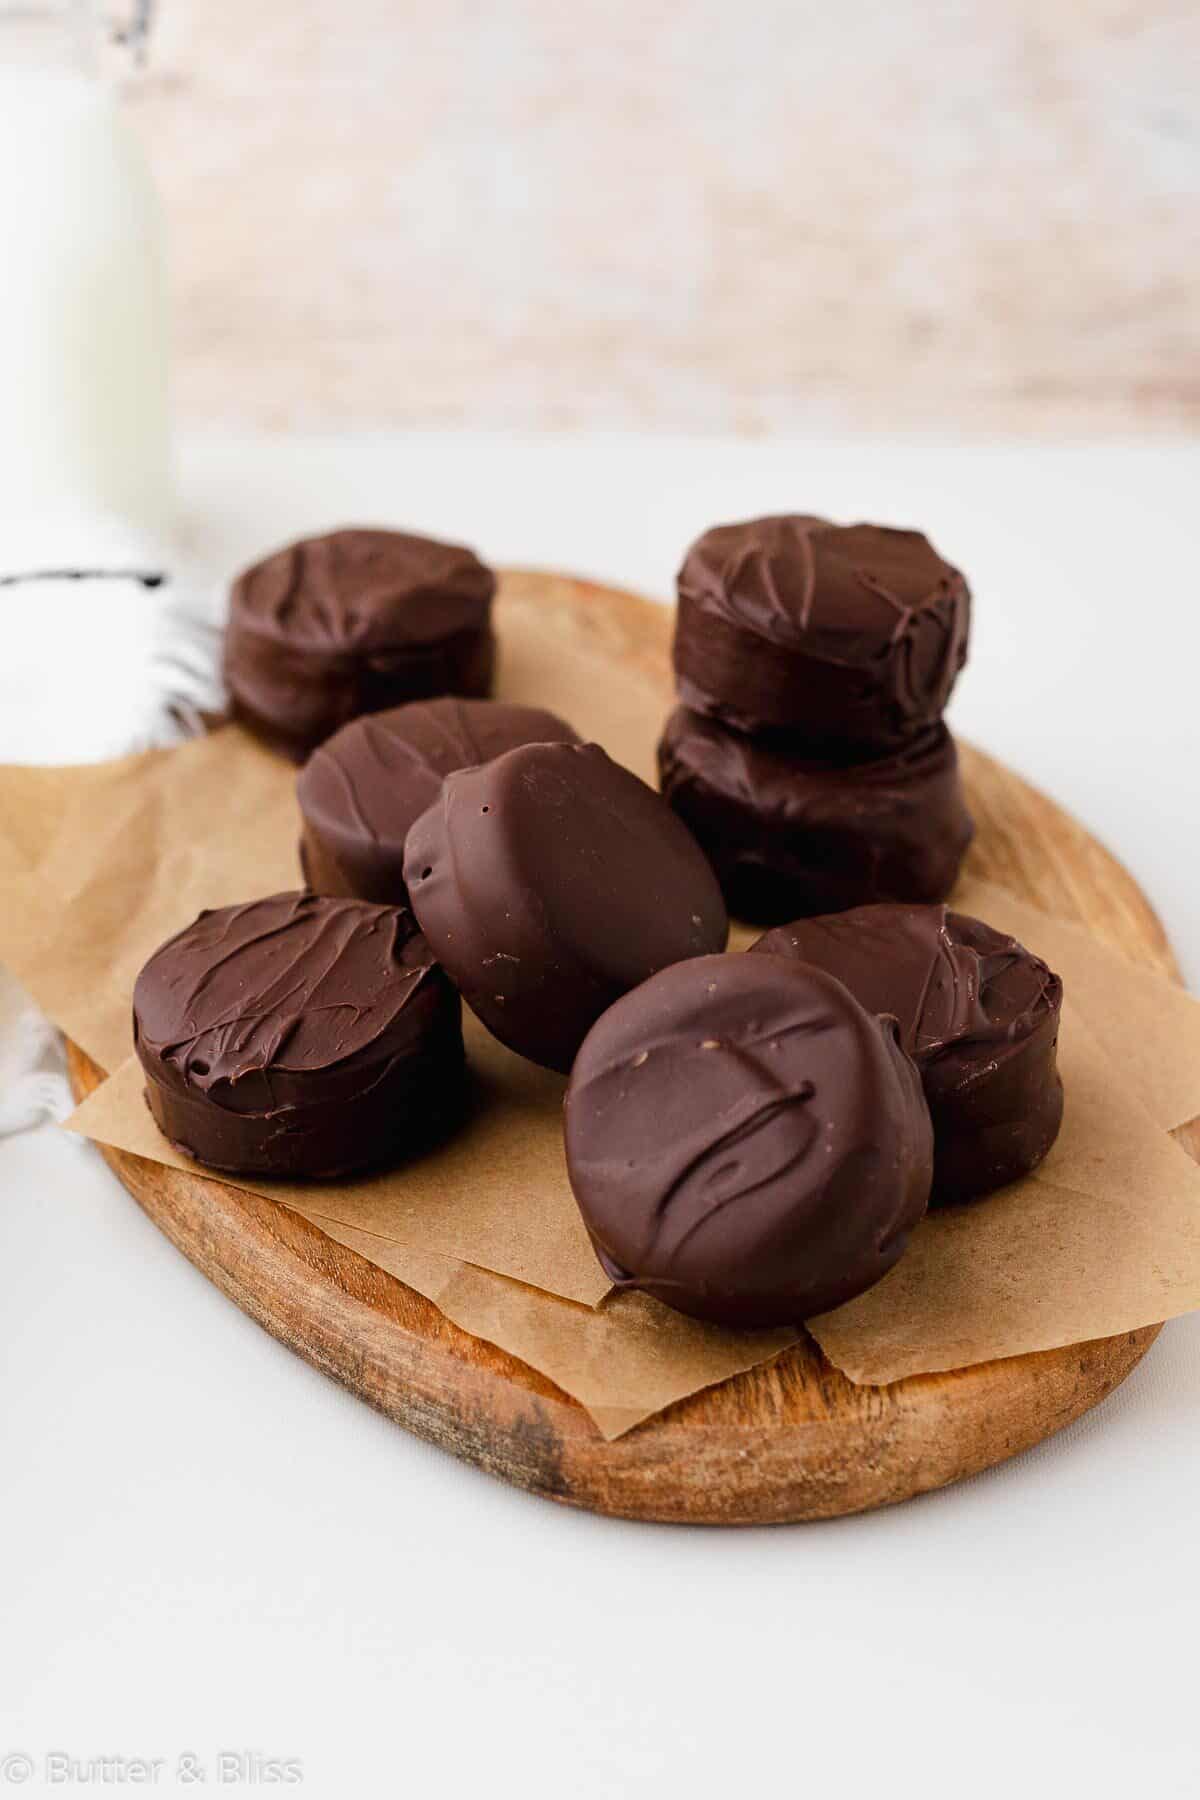
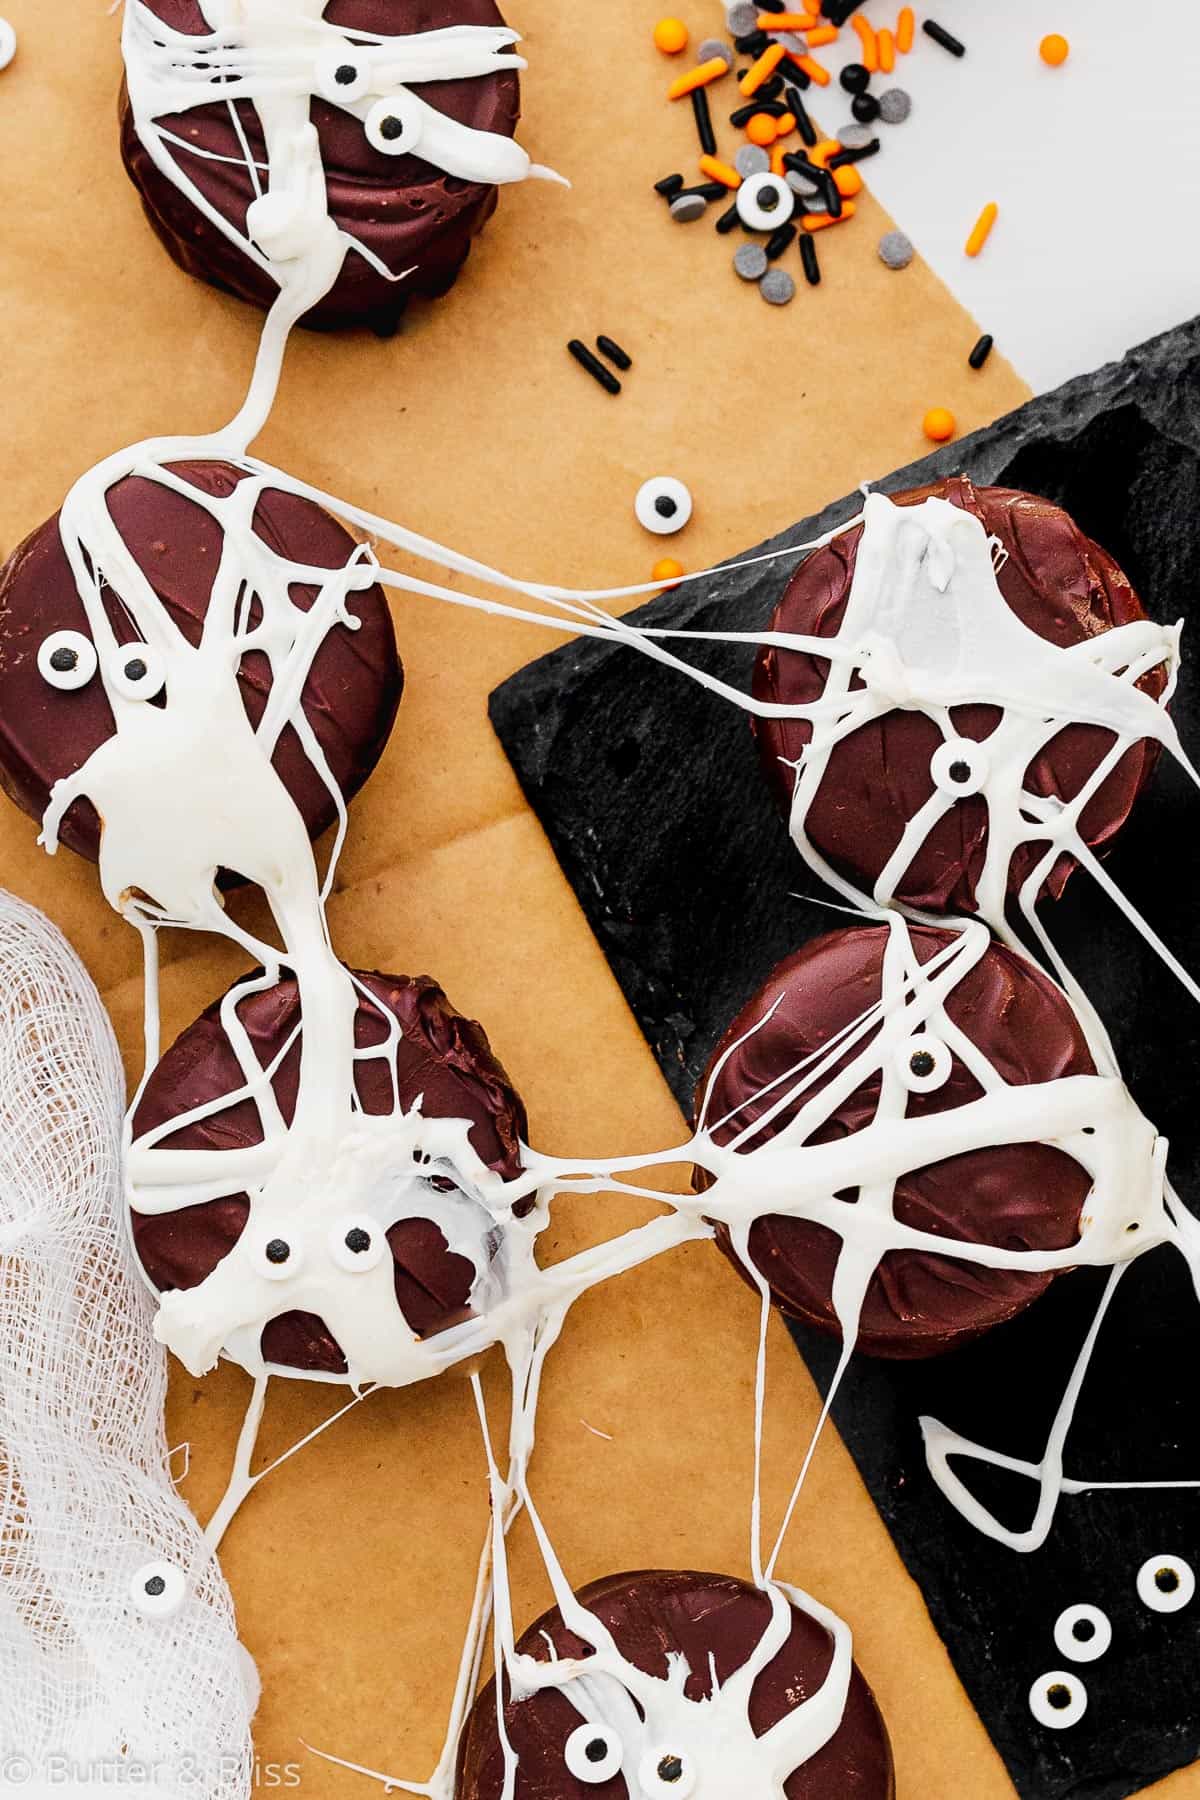
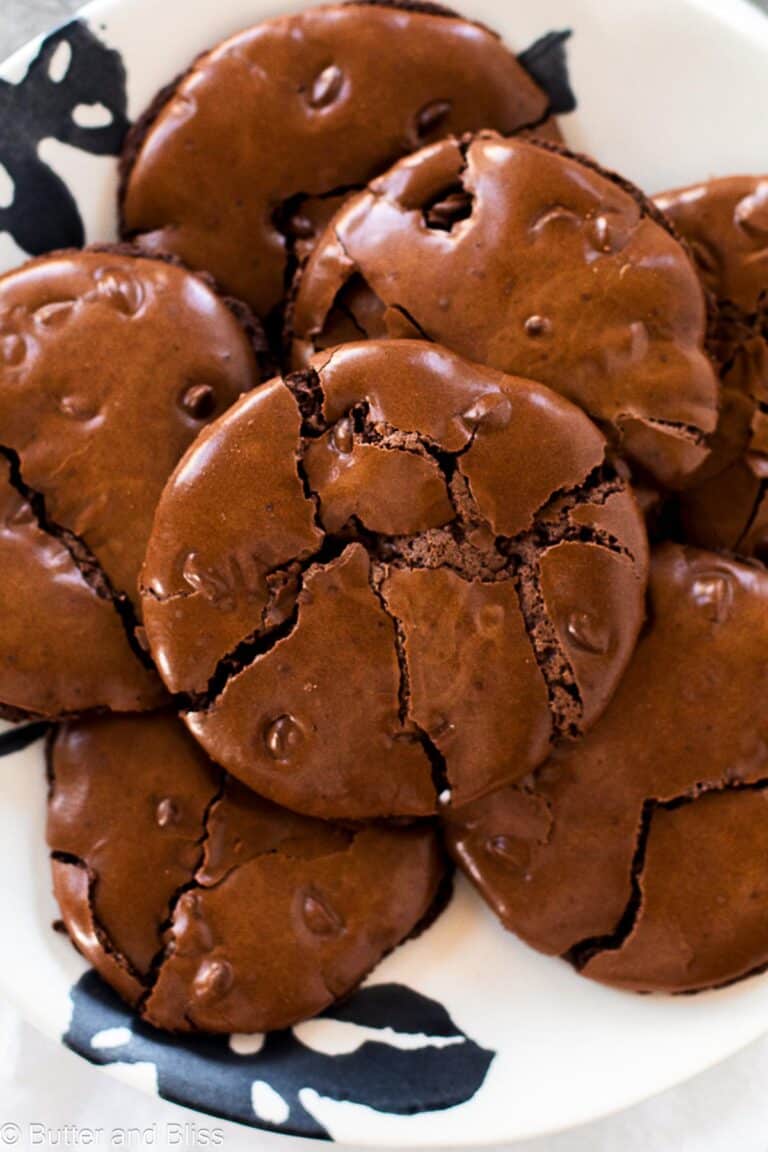
Chocolate Peanut Butter Cookies are like two cookies in one – delicious cookie sandwiches and festive decorated dipped cookies! This is a small batch cookie recipe for tender chocolate butter cookies filled with browned butter peanut butter filling, then dipped in smooth melted chocolate. For a Halloween cookie idea, web melted marshmallows over the cookies and adorn with spooky fun sprinkles.
Chocolate Peanut Butter Dipped Cookie Sandwiches
This recipe for Chocolate Peanut Butter Dipped Cookie Sandwiches is very versatile and the cookies can be prepared in a number of different ways. For example:
- Simple chocolate butter cookie – The chocolate butter cookie by itself makes a delicious cookie to accompany a hot cup of tea or cocoa.
- Chocolate cookie sandwich – Make a classic cookie sandwich with your favorite filling or flavor. Try a marshmallow filling, creamy buttercream, or peanut butter (like this recipe!).
- Dipped cookie – The butter cookie can also be dipped by itself, like I did with the Healthier Thin Mints. Or the cookie sandwich can be dipped in dark – or even white – chocolate.
Fun Chocolate Halloween Cookies
Chocolate butter cookies are like a cross between a sugar cookie and a shortbread cookie. The cookies are made with a higher ratio of butter – hence the name – and the result is a tender, slightly sweet, cookie. Below is what you can expect with chocolate butter cookies:
- The cookies do not spread – Even with all of the butter in the cookies, these cookies are like a shortbread in that they do not spread.
- Not overly sweet – In contrast to a classic sugar cookie, the butter cookies do not have a lot of sugar. A little less sugar is what contributes to the tender and crumbly cookie.
- Rich chocolate flavor – I personally attribute the rich chocolate flavor to the Dutch process cocoa.
- Easy to roll out and cut – Once the cookie dough has been chilled, it is easy to roll out and cut into shapes with cookie cutters.
Ingredient List
- All-Purpose Flour
- Cocoa Powder
- Salt
- Unsalted Butter
- Granulated Sugar
- Egg Yolk
- Vanilla Extract
- Milk
- Peanut Butter
- Powdered Sugar
- Semi-Sweet Chocolate Chips
- Coconut Oil
- Marshmallows
- Sprinkles
Helpful Tips
- Don’t overmix the cookie dough – Butter cookie dough is drier than your typical cookie dough (for example, chocolate chip cookie dough). The butter will moisten the dough, however, if it is a warmer/drier day, you may need to add a little milk to moisten the dough.
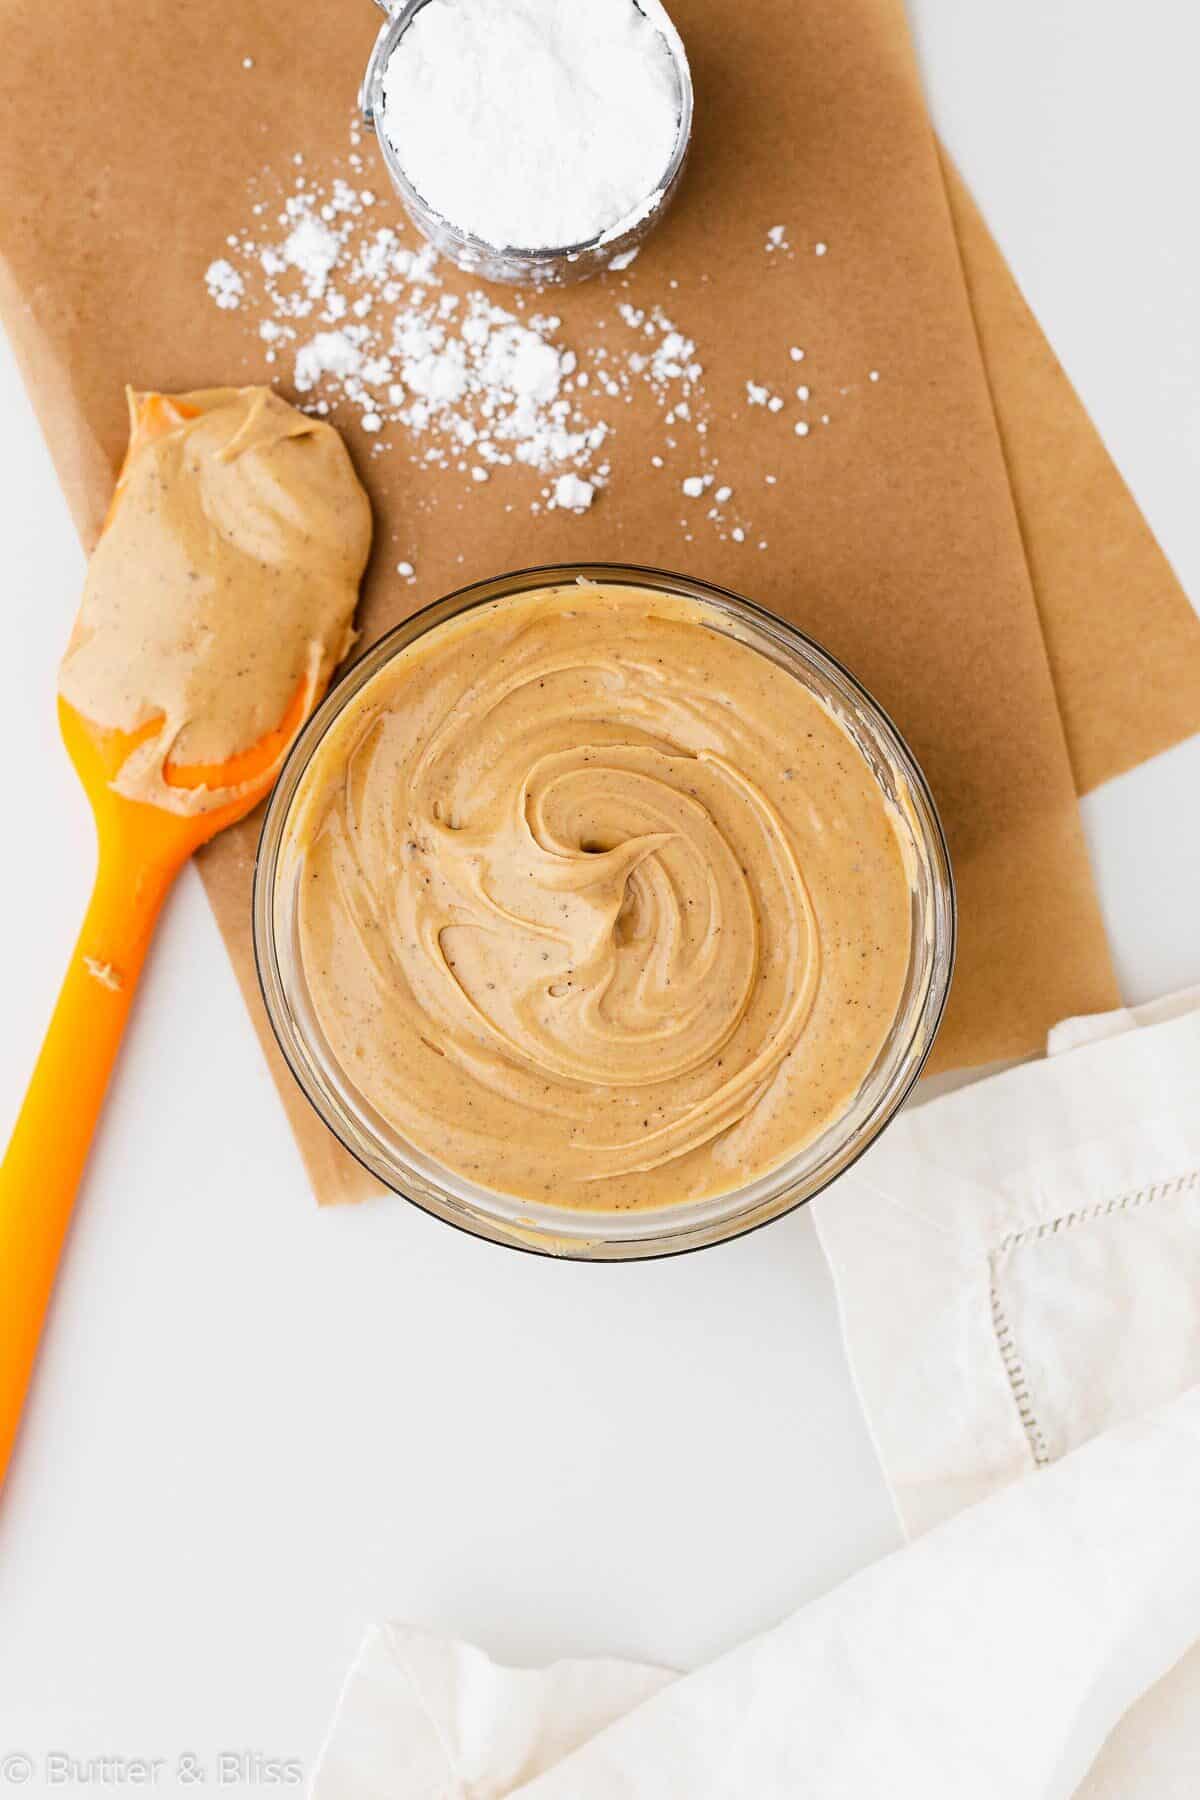
- Regular creamy peanut butter works best – I recommend using regular creamy peanut butter for the filling – like Jif. This way you don’t have to worry about mixing the oil and peanut butter separation you get with some natural peanut butter. And the creamy peanut butter makes an easier to spread or pipe.
- Add powdered sugar to taste – When adding the powdered sugar to the peanut butter filling, add as much or as little as you prefer. The powdered sugar helps to make the filling thick, and it also adds sweetness.
- Chill the dipped cookies – After the cookies have been dipped in chocolate, let them chill in the refrigerator for 15 to 30 minutes to allow the chocolate to fully set.
- The melted marshmallow is messy – However, that is part of the fun of decorating the cookies. You can try to use two forks to web the melted marshmallow over the cookies. Otherwise, embrace the mess and use your fingers!

Recipe FAQ
Yes, natural cocoa will work. Keep in mind you may find the cookie to have an acidic chocolate taste.
The dough is supposed to be drier and crumbly. Chilling the dough will bring it all together. However, if the dough seems excessively dry, add 1 to 2 teaspoons of milk.
This is up to you and how thick you like your cookies. I rolled my cookies out to approximately 1/4 inch thick.
I like to keep my dipped cookies in the refrigerator to keep the chocolate firm. However, the cookies should store fine if stored covered at room temperature. Just make sure it isn’t too warm, otherwise the chocolate will melt.
More Small Batch Chocolate Cookie Recipes
- Chocolate Mint Whoopie Pies
- Healthier Thin Mint Cookies
- Chocolate Sugar Cookie Sandwiches
- Flourless Chocolate Cookies
- Chocolate Crinkle Cookies
Chocolate Peanut Butter Dipped Cookie Sandwiches
by Erin Cernich
Ingredients
Chocolate Butter Cookie
- 1 cup, plus 2 tablespoons all-purpose flour
- ¼ cup unsweetened cocoa powder, Dutch process
- ¼ teaspoon salt
- 6 tablespoons unsalted butter, room temperature
- ¼ cup, plus 2 teaspoons granulated sugar
- 1 large egg yolk (room temperature)
- ½ teaspoon vanilla extract
- 1 to 2 teaspoons milk
Peanut Butter Filling
- ¼ cup creamy peanut butter
- 2 tablespoons unsalted butter
- ½ cup powdered sugar
Chocolate Coating
- ¾ cup semi-sweet chocolate chips
- 1 teaspoon cold pressed refined coconut oil
- ½ cup mini marshmallows (optional)
- sprinkles (optional)
Instructions
Chocolate Butter Cookies
- In a small mixing bowl, whisk together the flour, cocoa powder, and salt.
- In a medium mixing bowl, add the butter and sugar. Using a hand held mixer on medium high speed, cream the butter and sugar until pale, light, and fluffy.
- Add the egg yolk and vanilla extract to the creamed butter and continue to beat until thoroughly incorporated. Reduce the speed to low and add the dry ingredients in a few increments – beating after each addition until mostly incorporated. With the final addition, beat just until no dry streaks remain and the dough has been moistened by the butter. Do not overmix the dough. The dough is supposed to be dry and scrappy. If it is too dry and not getting moistened by the butter mixture, add 1 to 2 teaspoons of milk. Tip – If using a hand held mixer and the dough is too tough to mix, mix the dough by hand with a spatula or wooden spoon.
- Pour the dough onto a sheet of plastic wrap and shape into a disc. Cover tightly and refrigerate for at least 30 minutes.
Peanut Butter Filling
- You can make the peanut butter filling while the dough is chilling, or while the cookies are baking and cooling.
- Brown the butter – In a small saucepan, add the butter. While stirring, heat over medium heat until the butter has melted, started to turn brown with little brown flecks, and smells nutty. Remove from the heat. Note – This small amount of butter will brown quickly, so do not turn your back on it.
- Add the peanut butter to the brown butter and return to low heat to just melt the butter and peanut butter together.
- Transfer the peanut butter mix to a medium mixing bowl. Using a hand held mixer with beater attachments, add the powdered sugar in a few increments. After each addition, mix on low speed to just incorporate the powdered sugar (and not make a mess!). After the final addition, turn up to medium speed to mix the filling until smooth and creamy. Tip – If you prefer a thicker filling, add more powdered sugar a tablespoon at a time. Keep in mind, the filling will thicken as it cools.
- Cover the bowl with a piece of plastic wrap and set aside on the counter until ready to assemble the cookies.
- Bake the Cookies – 15 minutes into the dough chill time, preheat the oven to 350F degrees and adjust the oven rack to the middle position. Line two baking sheets with pieces of parchment paper.
- Place the chilled cookie dough between two sheets of parchment paper. Roll the dough to about 1/4 inch thick – or thinner if you prefer a thinner cookie. Tip – Use the sheets of parchment from the lined baking sheets to save on parchment! You will need to re-roll and cut out the dough at least twice to use up the dough.
- Use a round cookie cutter (I used a 2-inch round cookie cutter) and cut out the cookies. Place the cut out cookies on the baking sheets (put the parchment back on the baking sheet!), about 2 inches apart. Note – These cookies do not spread. Spacing them apart allows for better heat destitution around the cookies. You will likely have scraps left that are too small to cut into a cookie that can be discarded or baked.
- The number of cookies you get from the dough will depend on how thick/thin you roll the dough, and the size of cookie cutter.
- Bake the cookies, one baking sheet at a time, for 8 minutes. Cool the cookies on the baking sheet set on a wire cooling rack for 5 minutes. Then transfer the cookies to the rack to cool completely. Note – Because of the dark color, it will be hard to tell if the cookies are baked to golden perfection. You can test if the cookies are done by gently touching them and they have a baked exterior, and you will start to smell the baked cocoa. Do not overbake the cookies as they can burn very quickly.
- Assemble the Cookies – On a baking sheet, divide the cookies equally into tops and bottoms. Pipe or spoon equal amounts of the peanut butter filling onto the cookie bottoms. Put the cookie tops on. Chill the cookie sandwiches for at least 30 minutes in the refrigerator or freezer. Note – Chilling the assembled cookies makes them easier to dip into the melted chocolate.
Chocolate Coating
- Over a Double Boiler – Fill a saucepan with two inches of water and heat to a simmer. Set a heat-proof mixing bowl over the top of the saucepan (large enough so it does not touch the water), and add the chocolate chips and coconut oil.
- Heat the chocolate until it has just melted and remove from the heat.
- Dip the Cookies – Using a fork or offset spatula, dunk the chilled cookie sandwiches into the melted chocolate – rotating around to thoroughly coat them – and place back onto the baking sheet. Chill the dipped cookies in the refrigerator until the chocolate has set.
- Optional Marshmallow Web – In a small bowl, melt the marshmallows in the microwave for about 30 seconds. Using your fingers (this gets messy!) or two forks, randomly string the melted marshmallow over the top of the cookies. The marshmallow firms up quickly, so work fast! Top with Halloween sprinkles and Enjoy!
Notes
- Serving Size – The number of cookie sandwiches will depend on how thick you roll out the dough, and the size of the cookie cutter.
- Mixing – You can also use a stand mixer fitted with the paddle attachment and a 3-quart mixing bowl. This particular bowl works on Kitchen Aid tilt-head mixers.
- Marshmallow Web – There is no specific direction or method for applying marshmallow web. Melted marshmallow is stringy and sticky, making it a perfect web when applied randomly.
Nutrition Estimates


About the Author …
Hi, I’m Erin! With years of experience baking for two in my own small household, I know about the love for desserts without the leftovers. I’ve tested, written, and photographed every one of the 300+ recipes on my website. And even had some of my desserts featured on Taste of Home, The Spruce Eats, ELLE, Parade, and more! From traditional to gluten free desserts for two, I have the recipe for you.
Click here to learn more about me →