Homemade Cream Puffs
This post may contain affiliate links. See my disclosure policy.
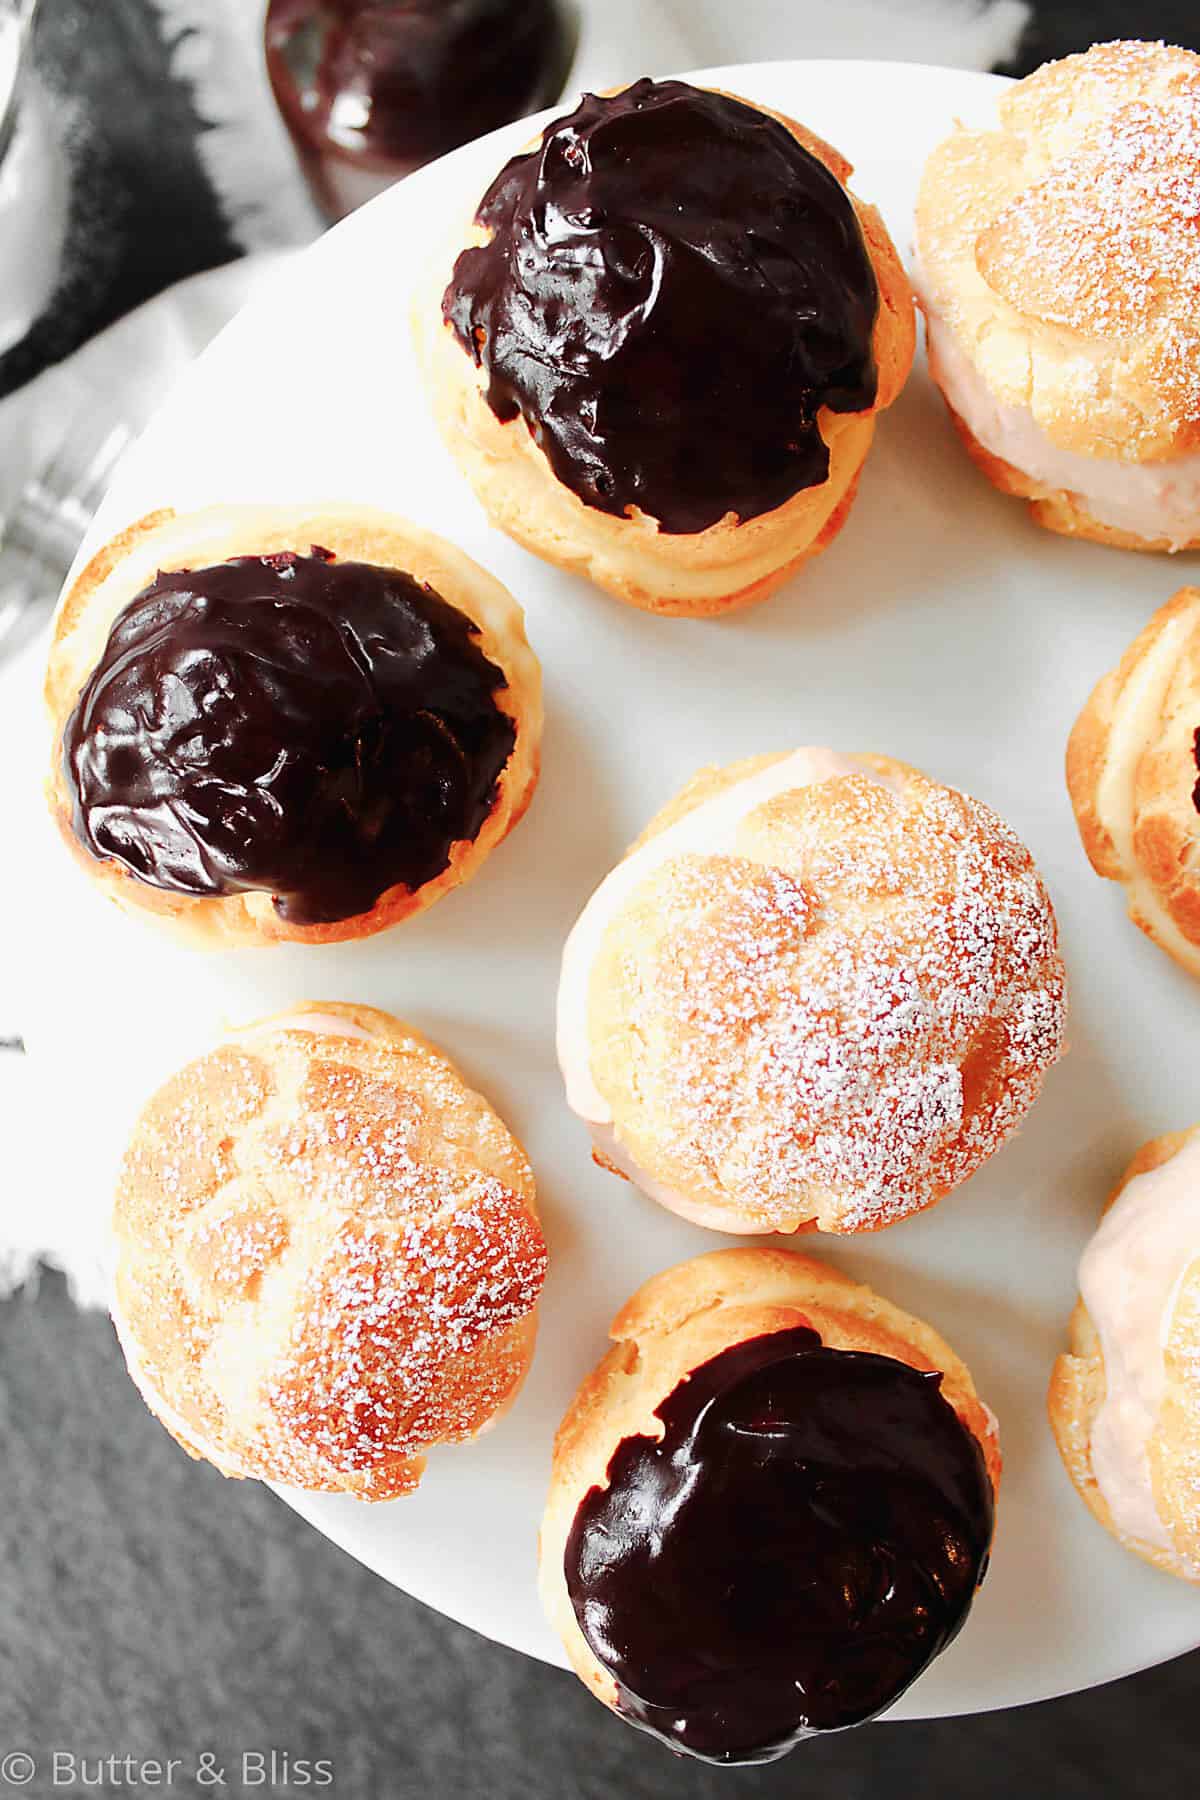
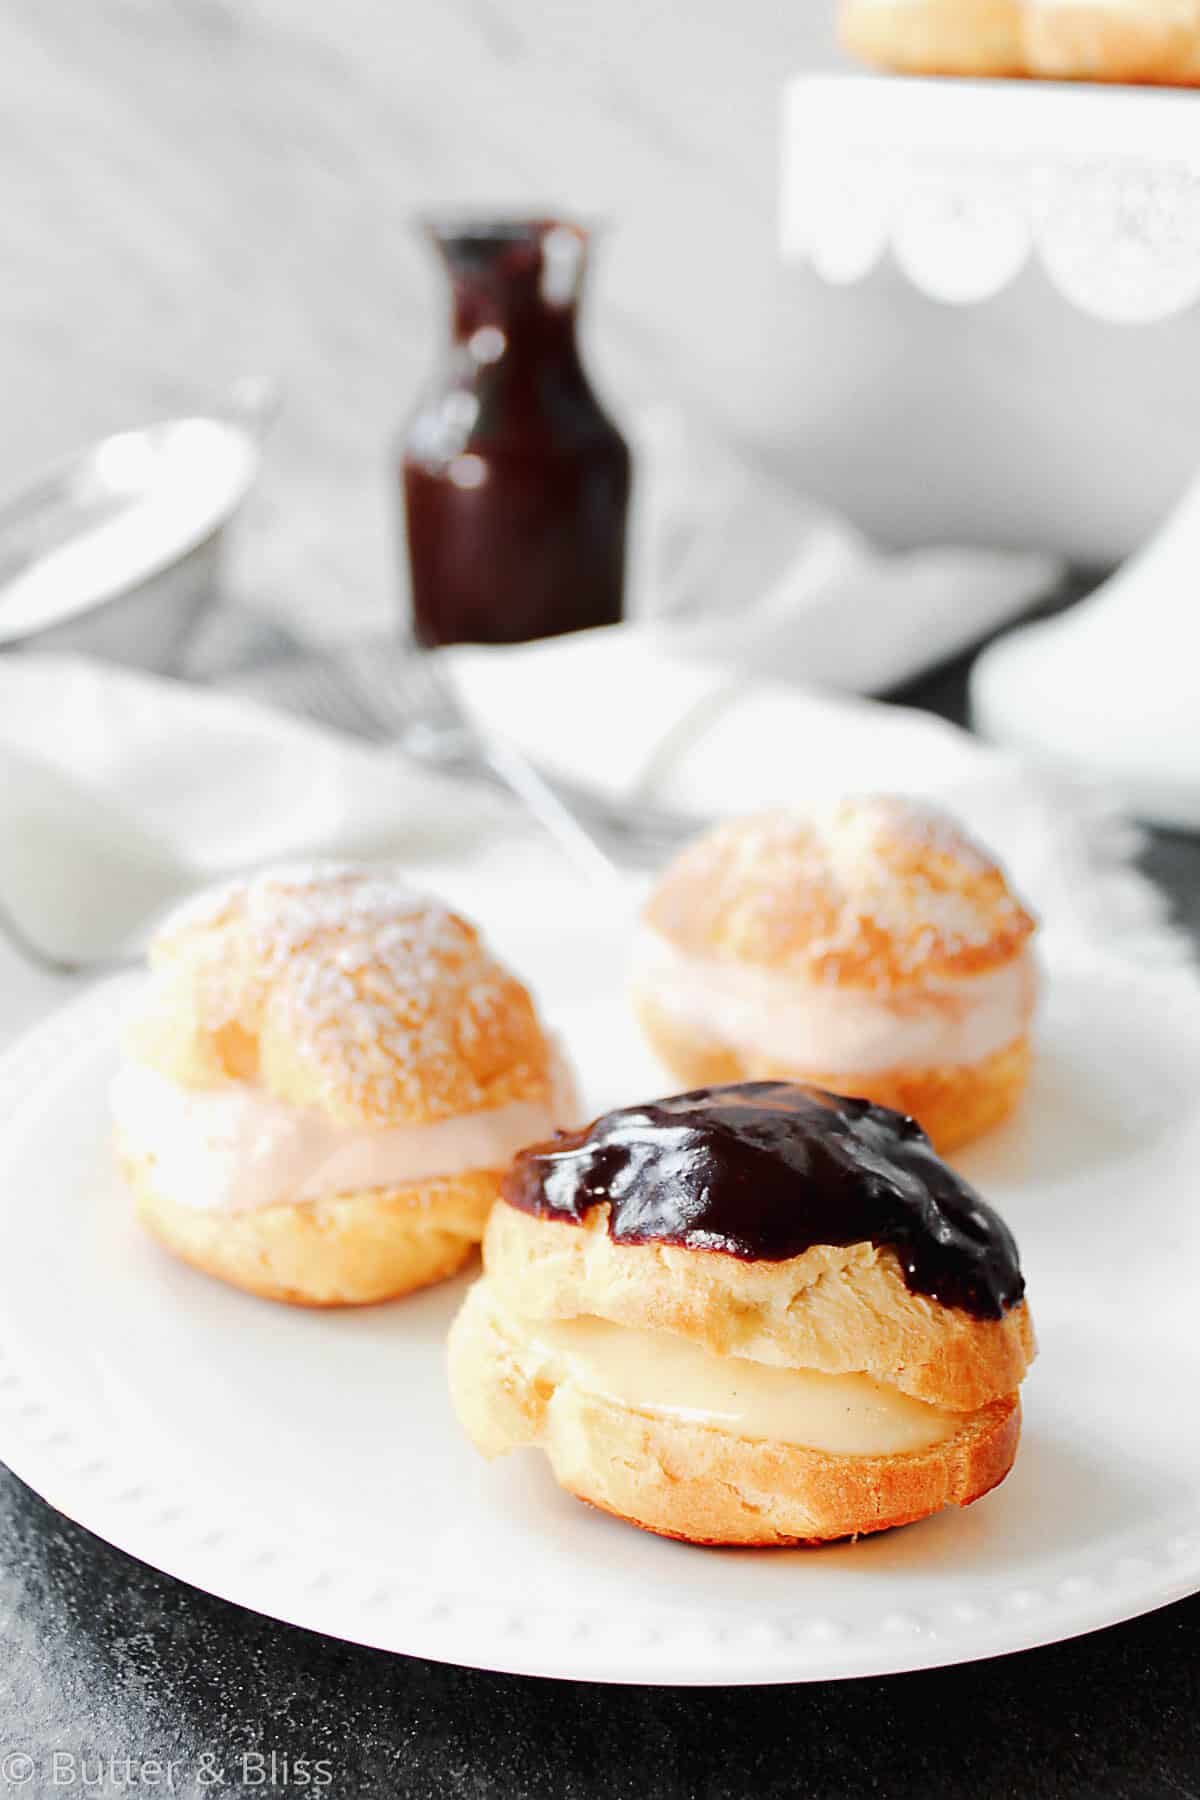
These are classic French Homemade Cream Puffs filled with your choice of a smooth and creamy filling. The cream puffs are made with pâte à choux dough which makes a light and tender pastry with a crunchy exterior and soft interior. Fill the cream puffs with pastry cream, flavored whipped cream, or lemon curd.
Homemade Cream Puffs
Don’t let the fancy French name for the little pastry delights intimidate you. Making the cream puff is relatively simple. And the result is an airy yet crispy puff that is the perfect vehicle for any filling you like. Perhaps that is why you can’t just eat one. 🙂
How cream puffs, puff
The miracle of these puffs is how they rise in the oven. When they rise, this leaves an opening in the middle that begs to be filled with a whipped cream or pastry cream. The cream puff itself is not overly sweet, and you don’t want it to be. The filling and topping will give you the sweetness you need to make these an impressive dessert. However, I do add a little sugar to the mix. You can always omit the sugar if you want to fill your puff with a savory filling (like a whipped veggie cream cheese, or a spinach dip).
There are many recipes and methods for making the cream puffs. Some recipes call for more flour, less butter, more eggs, all water or all milk. I have found that keeping even ratio’s of everything still bakes a perfect puff.
To Pipe or Spoon
One other thing you may find in other recipes is the technique bakers use to place the dough on the baking sheets. Some pipe the dough into 2-inch rounds on the baking sheet, others spoon a mound on the baking sheet. I have tried both techniques and I prefer to spoon the dough into a mound. The reason is simple – it is easier and one less step.
Both techniques have yielded the same result – puffy, airy pastries. My thought is if I can get the same result without having to prepare a piping bag, then I am going to choose the path of least resistance! 🙂 Also, if I am completely honest with you, I am not the best piper. I’d rather practice my piping techniques on cookies than making fancy French pastries.
I would recommend you try both to get an idea of which you prefer. To pipe the dough, I recommend a 1-inch plain piping tip. Pipe 2-inch mounds, lifting the tip 2-3 times to give you a ‘tree’ like mound. Then you need to wet your fingertip with water and tap down the tip of the dough, otherwise, it will burn.
Start by cooking the dough
With so few ingredients in the cream puff dough, making the dough is relatively easy. It is an interesting shift from making a traditional dough, in that you heat all of the ingredients first, with the exception of the eggs. Heating the ingredients yields a sturdy dough that still has a soft inside.
When you begin to make the dough in the saucepan, as the liquid ingredients heat to a boil, the butter will have melted. Just as everything comes to a boil is when you remove the pan from the heat to add the flour. You add all of the flour at once to make sure it is all incorporated evenly, then mix vigorously until incorporated. The saucepan goes back on the heat to essentially cook the flour. As the dough gets to the right consistency, it will pull away from the sides of the pan and there will be a thin film on the bottom of the pan – this is when you know it is done.
Adding eggs to the dough
You do want the dough to cool slightly before adding the eggs. This is because you do not want to scramble the eggs and it also alleviates an overly ‘eggy’ taste in the cream puff. I also like to beat all of the eggs ahead of time because there may be times where you do not need all of them. You are looking for a consistency that is thick, yet pipeable, and that looks stringy when you lift up the beater. It is possible to get a batter that is too runny and in this case, they won’t puff.
Since there are no leavening agents in the recipe, the rise of the puff comes from the eggs and the air that gets trapped inside the puff. The cream puffs need a hot oven to cook in the beginning, then you reduce the heat to keep cooking and puffing without burning the puff. I also like to vent my cream puffs once they are done cooking to release the trapped air so the inside of the puff is not too moist. This is why I cut the slit on the sides then return the puffs to oven for a few minutes.
Filling the Cream Puffs
Another technique variation bakers may use is how they fill the cream puff. Some cut the puff in half and others may create a hole on the bottom of the puff with a piping tip and pipe the filling into the puff. The difference may just be optics and that you can see what the filling is or be pleasantly surprised. My recommendation is to choose a method that you like better!
Flavored filling options
For the fillings for these filled cream puffs, I wanted to demonstrate a few options. One is the traditional pastry cream, which I would recommend so you can get practice on making great pastry cream. Also because it is absolutely delicious with cream puffs!
The other options are simple vanilla whipped cream and lemon curd. I decided to amp up the simple whipped cream and add some strawberry flavor. To take it a step further, folding in some tart lemon curd to make a refreshing springtime flavor. Honestly, I don’t think there is a bad filling you can use for these cream puffs.
What I do recommend is having fun with these little filled cream puffs to make them your own. You will have enough puffs to try different filling and topping flavors and I can assure you, your family will thank you for them! 🙂

Homemade Cream Puffs
by Erin Cernich
Ingredients
Cream Puffs
- ½ cup whole milk
- ½ cup water
- 8 tablespoons unsalted butter, cut into 8 pieces
- 1 tablespoon granulated sugar
- 1 teaspoon salt
- 1 cup all-purpose flour
- 4 large eggs, beaten (in a liquid measuring cup)
Pastry Cream Filling
- ¾ cup heavy whipping cream
- ¾ cup whole milk
- ½ cup granulated sugar
- 2 large egg yolks
- 2 tablespoons cornstarch
- 2 tablespoons unsalted butter, cut into 2 pieces
- 1 and ½ teaspoons vanilla bean paste, or vanilla extract (vanilla extract will work too)
Lemon Curd Filling
- ¼ cup fresh lemon juice – from 1-2 lemons
- 2 teaspoons lemon zest
- 6 tablespoons granulated sugar
- 2 large eggs (room temperature)
- 4 tablespoons unsalted butter, cut into cubes
Strawberry Whipped Cream Filling
- 1 cup heavy whipping cream
- ¼ cup powdered sugar, or to taste
- 3 tablespoons freeze dried strawberries, ground to powder
Chocolate Icing
- ½ cup semi-sweet chocolate chips
- ¼ cup heavy whipping cream
Instructions
- Make the Pastry Cream, Lemon Curd, and Whipped Cream Fillings first.
Pastry Cream
- In a medium saucepan, heat the heavy cream and sugar over medium heat until simmering, stirring occasionally.
- While the cream is heating, in a medium bowl, whisk the milk, eggs yolks, and cornstarch until thoroughly mixed. Slowly drizzle in the cream mixture, whisking constantly. Return the mixture back to the saucepan and cook over medium heat, whisking constantly, until the mixture thickens – about 2-3 minutes.
- Remove from heat and stir in the vanilla paste (or vanilla extract) and butter. Strain the cream through a fine-mesh strainer set over a medium bowl. Cover with plastic wrap, pressing the wrap directly on top of the cream to prevent a skin from forming. Refrigerate for at least 2 hours or up to 2 days. The cream will thicken more in the fridge.
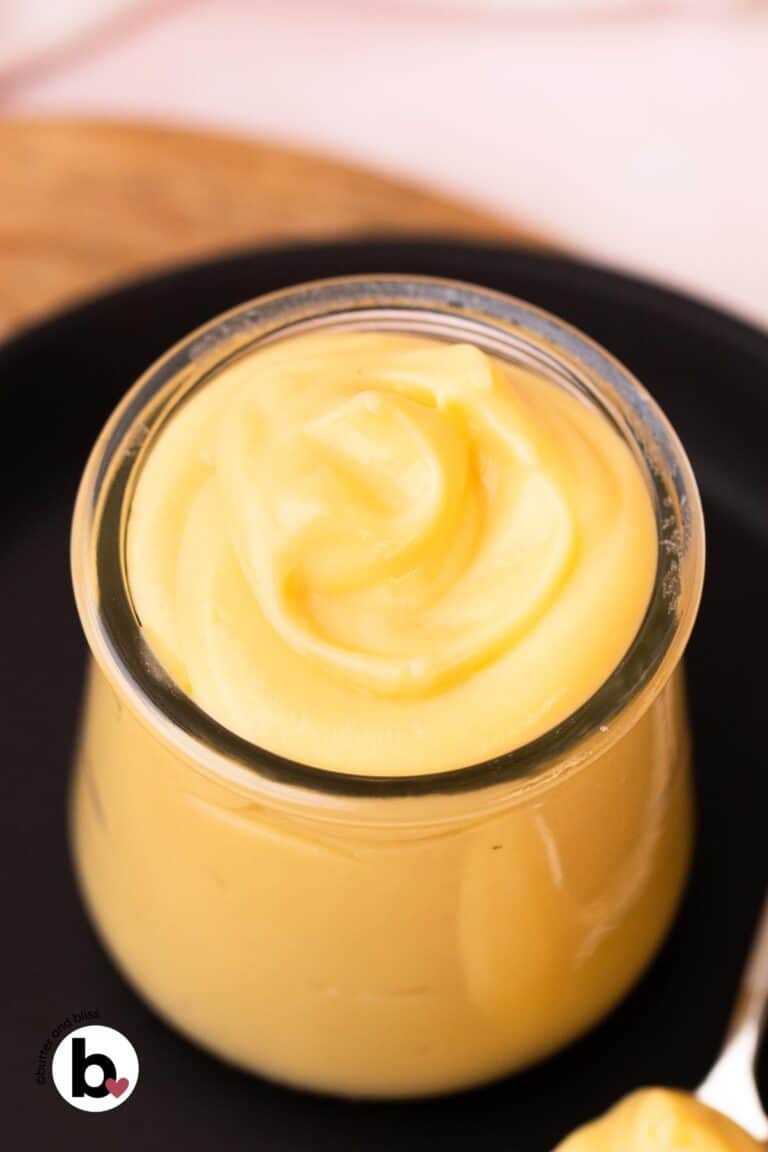
Lemon Curd
- In a medium, heavy-bottom saucepan, whisk together the lemon juice, zest, eggs, and sugar, Cook over medium heat, whisking constantly, until the mixture thickens slightly. Begin adding the butter pieces – a few at a time and whisking until melted before adding more butter. Continue to mix until the curd is smooth and thickened and coats the back of a spoon without dripping – about 5 minutes in total to cook the curd.
- Strain the curd over a fine mesh strainer set over a medium glass or ceramic bowl. Cover with plastic wrap, pressing the wrap directly on top of the curd to prevent a skin from forming. Refrigerate for at least 2 hours or up to 1 week. The curd will thicken more in the fridge.
Strawberry Whipped Cream
- In a blender or food processor, grind the freeze-dried strawberries with the powdered sugar for just a few seconds, until the strawberries turn to powder.
- In the mixing bowl of a stand mixer fitted with the whisk attachment, whisk the heavy cream on low speed to start, until it starts to bubble. Then turn the up the speed to medium-high and slowly start to spoon in the strawberry/sugar mixture. Whisk until soft peaks form – about 3-5 minutes. Cover and refrigerate until needed.
Cream Puffs
- Preheat the oven to 425F degrees and move the oven rack to the middle position. Line two baking sheets with parchment paper.
- In a heavy saucepan, add the milk, water, butter, sugar, and salt. Bring to a boil over medium-high heat. Remove the pan from the heat and add the flour, all at once. Stir vigorously with a wooden spoon. Return the pan to medium heat and continue to stir constantly until the mixture starts to form a soft ball and pulls away from the pan and a thin film coats the bottom and sides of the pan – about 3-4 minutes.
- Remove the pan from the heat and let the mixture cool for about 2-3 minutes.
- Transfer the mixture to the bowl of a stand mixer fitted with the paddle attachment. On low speed, beat for about 2-3 minutes to allow the choux paste to slightly cool. Do not beat the mixture longer than 3 minutes, otherwise, the dough may start to separate.
- On medium speed, begin to add the beaten eggs, 1 at a time or 1/4 cup, and beat until fully incorporated before adding the next egg. As you are adding the last egg, add slowly as you may not need all of it. Check your batter for a thick, yet pipeable consistency that is smooth and shiny and it will be ‘stringy’ when you lift the paddle. Beat for at least 2 minutes after the last egg is added.
- Sprinkle the parchment paper on the prepared baking sheets lightly with water. The moist parchment paper creates a nice humid environment for the cream puffs to puff!
- Using a small cookie scoop, drop generously sized 2-tablespoon mounds on the baking sheet, spacing 2″ apart. You should be able to fit 12 puffs on each baking sheet.
- Bake one sheet at a time. Bake for 15 minutes, then reduce the oven temperature to 350F degrees and bake for an additional 15-20 minutes, until golden brown. Do not open the oven door while the cream puffs are baking!
- Remove the cream puffs from the oven and cut a small slit on the side of each and return them back to the oven for another 2-3 minutes, this allows the steam to escape so the inside of the puff is not too moist. Place the puffs on a wire rack to cool completely.
- Turn the oven temperature back up to 425o degrees, and repeat the process with the second batch.
- Cut open each cream puff and fill with your preferred filling!
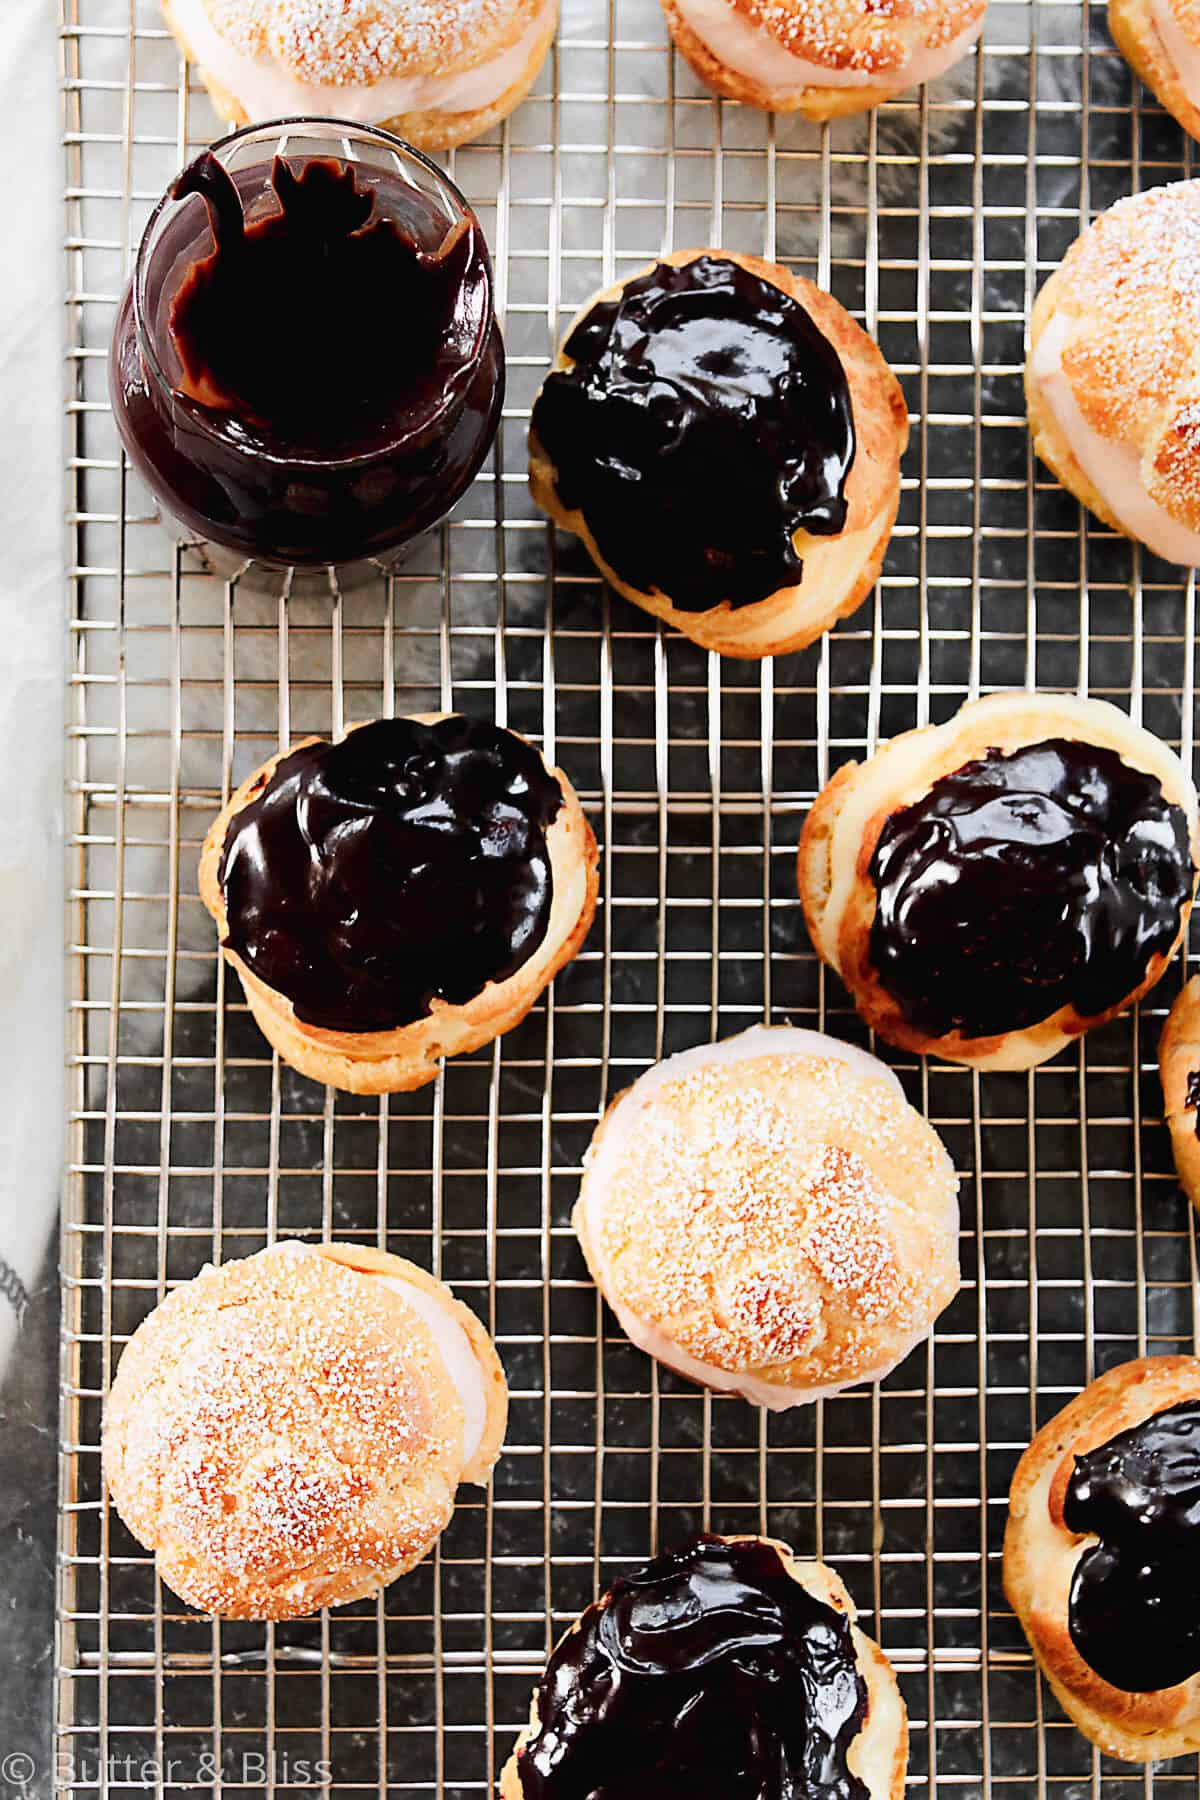
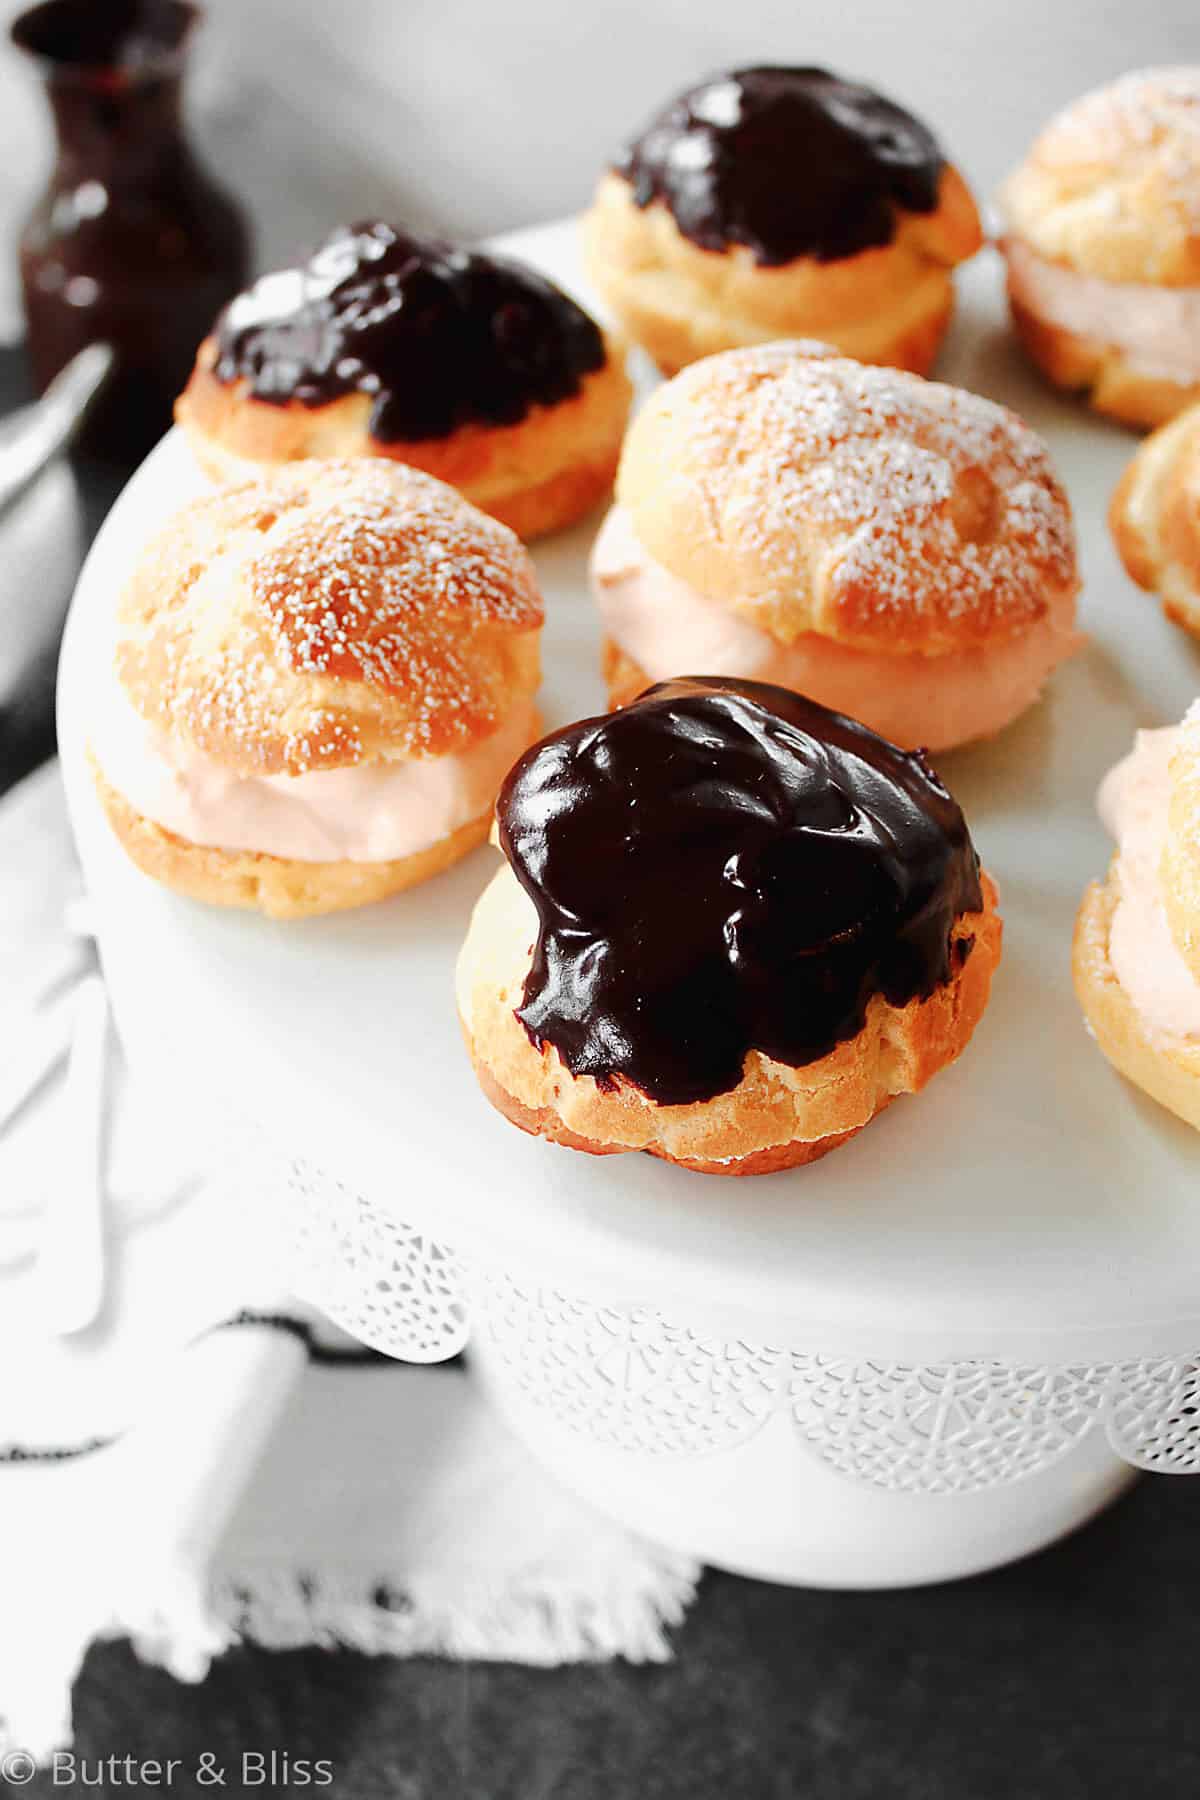
- For the Pastry Cream-Filled Cream Puffs – spoon a generous amount of the pastry cream into the bottom of the cream puff. Dip the top of the cream puff into the chocolate glaze and set back on top, and enjoy!
- For the chocolate icing – in a microwave safe bowl, heat the chocolate chips and cream until the chocolate begins to melt and the cream is heated – about 1 minute. Remove from the microwave and stir until the chocolate and cream are fully combined and the chocolate has melted.
- For the Strawberry Whipped Cream & Lemon Curd Filled Cream Puffs – You can either keep the whipped cream and lemon curd separate or fold the lemon curd into the whipped cream (as pictured). Keeping separate – spoon a spoonful of the lemon curd on the bottom of the puff, top with a spoonful of whipped cream, put the cap back on and sprinkle with powdered sugar. Combining – spoon a generous amount of the cream/curd mixture into the bottom of the puff, put the cap back on and sprinkle with powdered sugar.
- Filled cream puffs can be stored in an airtight container in the fridge for up to 3 days. Any longer and they get soggy. Unfilled cream puffs can be kept at room temperature in an airtight container for 1 day, in the fridge for up to 5 days, or frozen for up to 3 months. Thaw at room temperature.
Nutrition Estimates
TRY THESE SMALL BATCH RECIPES NEXT!


About the Author …
Hi, I’m Erin! With years of experience baking for two in my own small household, I know about the love for desserts without the leftovers. I’ve tested, written, and photographed every one of the 300+ recipes on my website. And even had some of my desserts featured on Taste of Home, The Spruce Eats, ELLE, Parade, and more! From traditional to gluten free desserts for two, I have the recipe for you.
Click here to learn more about me →