Small Batch Chocolate Peppermint Thumbprint Cookies
This post may contain affiliate links. See my disclosure policy.
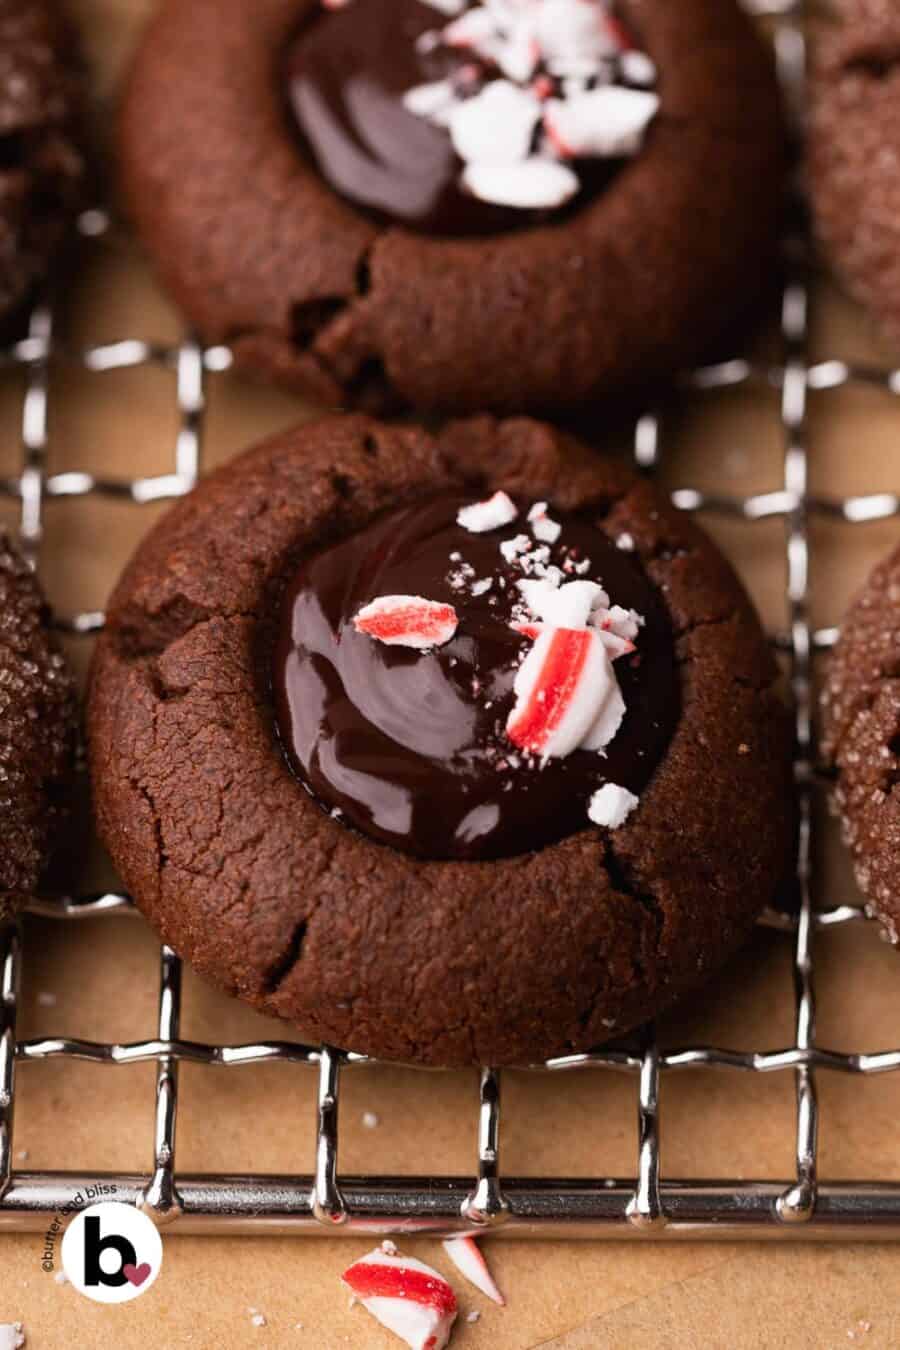
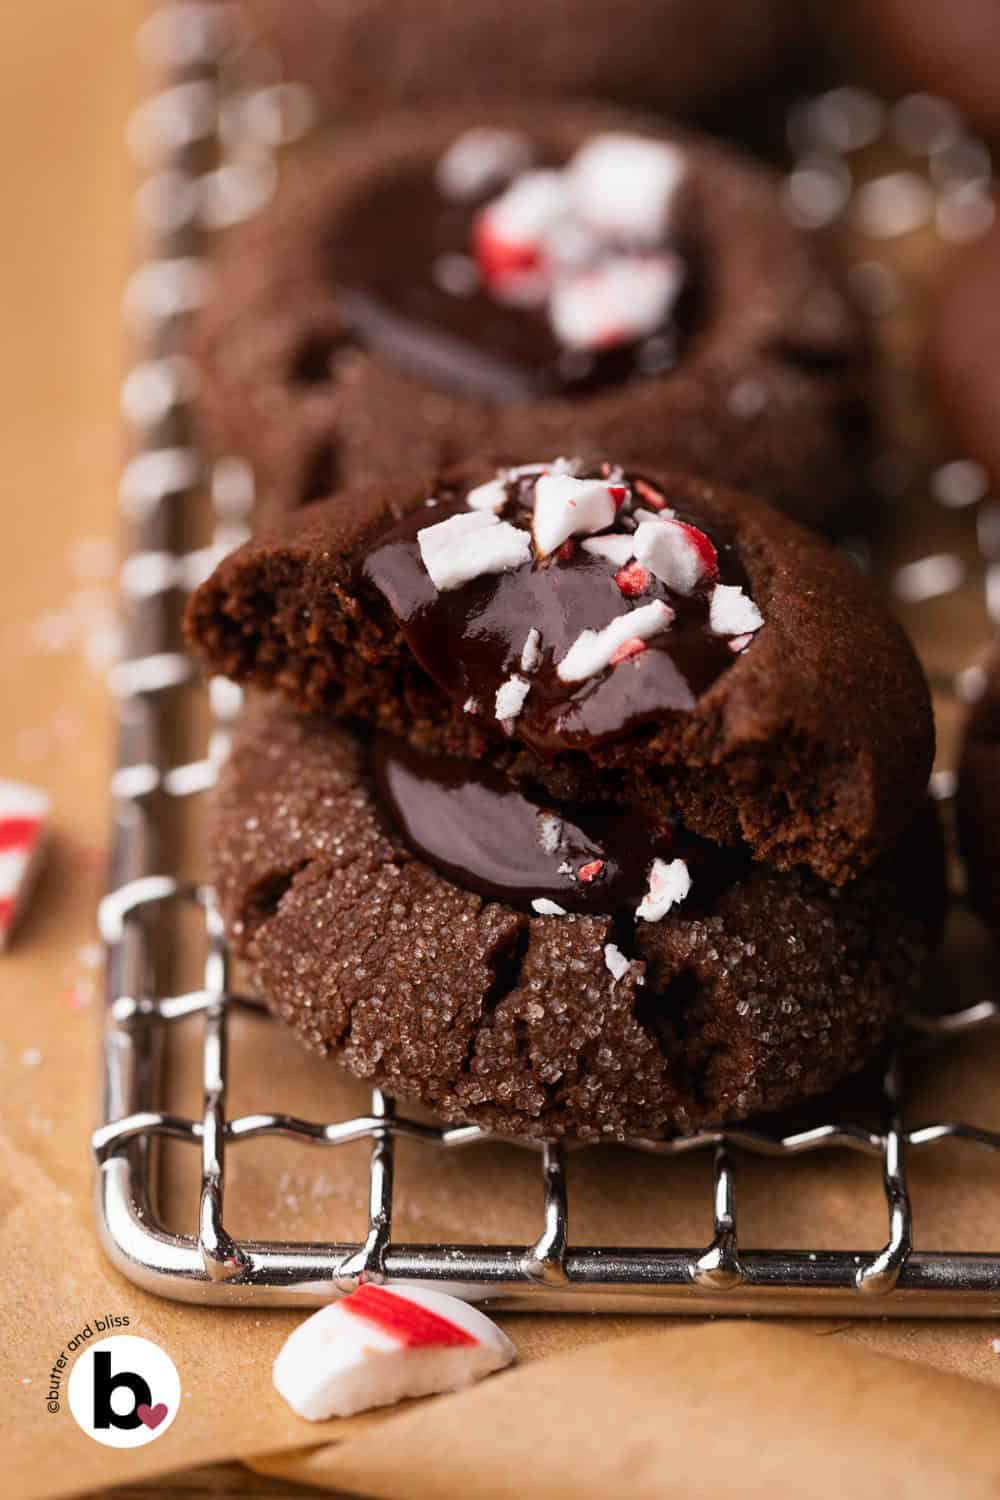
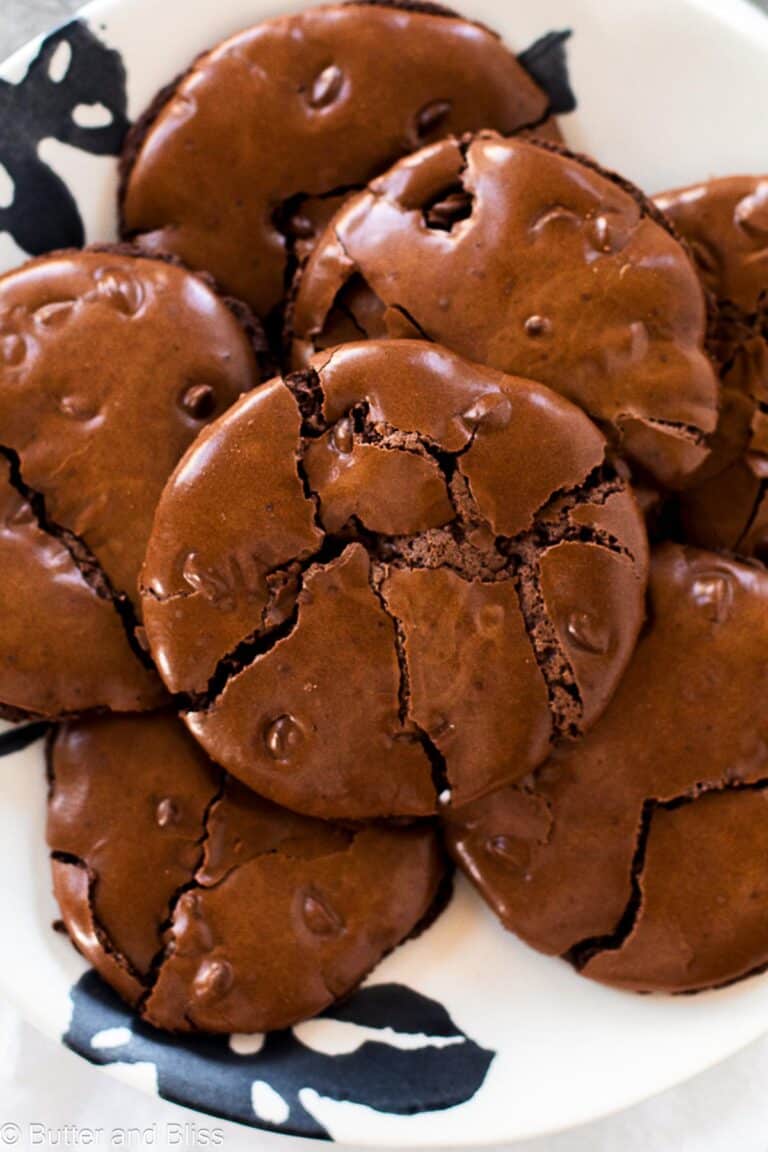
These small batch chocolate peppermint thumbprint cookies will be the crowd favorite on your holiday cookie platter. One dozen chewy cookies made with the perfect ratio of butter and brown sugar, deep Dutch-process cocoa, and filled with glossy peppermint ganache. Easy holiday cookies in under an hour — perfect for slipping into your Christmas cookie sampler rotation.
Chocolate + Peppermint Cookie Cheat Sheet
- Yield: 12 Cookies
- Total Time: 57 minutes (includes 30-minute chill)
- Flavors: Deep cocoa, butter, and cool peppermint.
- Texture: Chewy and fudgy centers, with caramelized edges.
- ✨Why Bake These: Small batch (room for variety!), party-ready and gift-worthy, and impossibly easy.
Anytime I can fill the center of a cookie with something, I’m in. Whether it’s creamy frosting like my small batch of pumpkin thumbprints or glossy ganache like these, it feels like two desserts in one. And especially when it is my favorite combo of flavors: chocolate and peppermint.
The small batch makes perfect sense for my household of two — and even better, it leaves room for variety. The chocolate and peppermint combo is a holiday favorite for me, but to appease the tastes of my husband (and guests), one dozen cookies means I can bake more types for my holiday cookie platter without ending up with extras we’ll never finish!
Chewy chocolate cookies are my thing (see my small batch chocolate crinkle cookies for proof 🙂 ). I love the deep, rich flavor you only get from Dutch-process cocoa, especially when it meets a tender, melt-in-your-mouth texture.
Even with an easy cookie like this, it took me several rounds of testing. I wanted chewiness, simplicity, and a tidy batch of twelve. Turns out, the secret was balance — equal parts butter and brown sugar give the cookies their soft centers. And I’m not one to turn down a little extra butter.
Let me show you how these cookies come together.
How To Make A Dozen Chocolate Peppermint Thumbprints


The dough itself is easy — classic creaming method, a quick chill, and bake.
Where these thumbprints get their personality is in the shaping and filling. The dough is neat enough to roll into rounds between the palms of your hands.
They’ll spread a little as they bake, so give them a bit of space on the baking sheet. All 12 will fit on one pan — even better, so you don’t have to worry about rotating pans mid-bake.
To make the required thumbprint, press the back of a teaspoon into the center of each cookie, just deep enough to hold a puddle of ganache (it’s the same trick I use for my small batch chocolate-filled cookie cups — foolproof every time.) The wells will almost certainly puff up a bit as the cookies bake, but a quick re-indent while the cookies are warm keeps them ready for filling.
💡My Pro Tip: Standard cookie-making steps have you chill the dough before shaping it. I flip the order for these chocolate cookies because the dough gets pretty firm as it chills. Simply put, rolling the dough into balls first is easier.

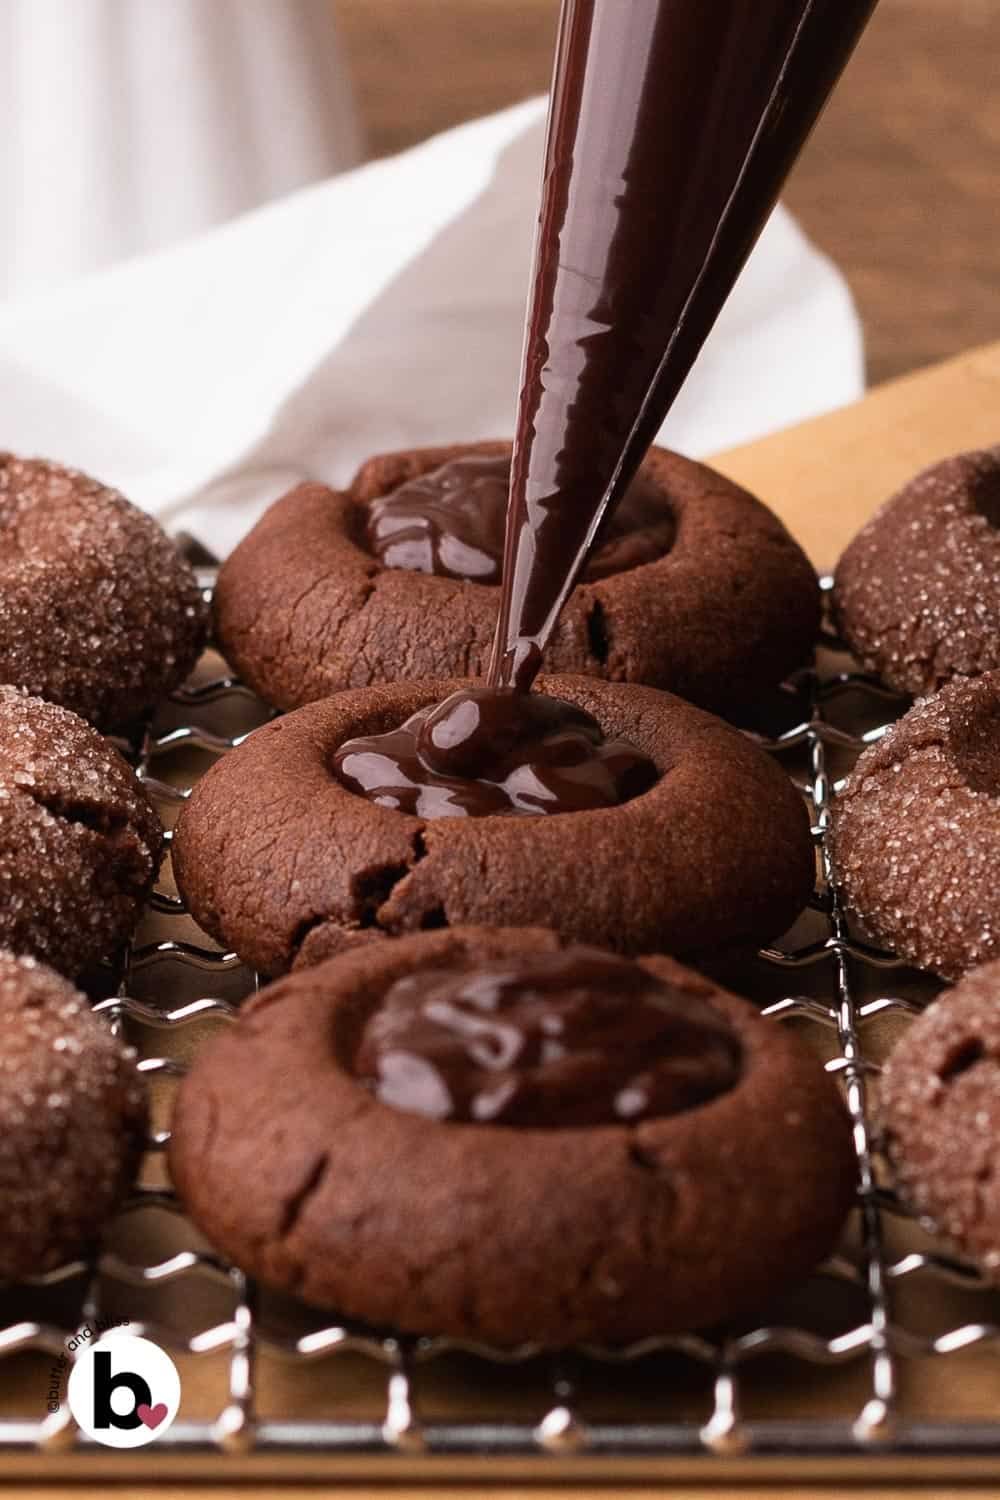
Once cooled, this is the fun part: fill each well with glossy peppermint-infused ganache.
The homemade ganache is made with 3 ingredients – heavy cream, peppermint extract, and chocolate chips (or a chocolate baking bar for even smoother ganache). Heat the cream in the microwave and pour it over the chocolate and peppermint. Let it sit for a few minutes before stirring to give the chocolate time to melt.
I like to pipe it in for a clean finish, but dolloping with a small spoon works just as well. And it will thicken as it cools — which makes the cookies great for stacking or shipping.

Festive Touches On Your Thumbprint Cookies
There are a couple of things that will make your chocolate thumbprints sing holiday.
- Before you bake the cookies, you can roll them in sugar to give them a little sparkle and crunch. Or do what I do and make a mix of sugared and plain.
- Sprinkle some crushed candy canes on top of the ganache to punctuate the peppermint flavor.
- Bonus: combine the two and add crushed candy canes to the rolling sugar. 🎉
Did You Make It? Let’s Hear About It!
⭐⭐⭐⭐⭐
Baked a small batch? Don’t leave me hanging! Drop me a comment and star rating below and let me know how your thumbprints turned out — chewy centers, shiny ganache, and all.
Small Batch Chocolate Peppermint Thumbprint Cookies
by Erin Cernich
Ingredients
Chocolate Thumbprint Cookies
- 6 tablespoons unsalted butter, room temperature
- 6 tablespoons brown sugar, light or dark
- 2 tablespoons granulated sugar (plus more for rolling; optional)
- 1 large egg yolk
- ½ teaspoon vanilla extract
- ¾ cup all-purpose flour
- 3.5 tablespoons unsweetened cocoa powder, Dutch process
- ¼ teaspoon baking powder
- ¼ teaspoon salt
Peppermint Ganache Filling
- ¼ cup semi-sweet chocolate (chips or baking bar)
- 3 tablespoons heavy whipping cream
- ⅛ teaspoon peppermint extract (more or less to taste)
- crushed candy canes (to sprinkle on top)
Instructions
- Line a baking sheet with a piece of parchment paper.
- In a medium mixing bowl, add the butter, brown sugar, and granulated sugar. Use a hand mixer (or stand mixer) and beat on medium-high speed until light and creamy – at least 3 minutes. Add the egg yolk and vanilla and mix until well combined. Scrape the sides of the bowl as needed.6 tablespoons unsalted butter, room temperature, 6 tablespoons brown sugar, light or dark, 1 large egg yolk, 1/2 teaspoon vanilla extract, 2 tablespoons granulated sugar
- Sprinkle the flour, cocoa powder, baking powder, and salt over the butter mix. On medium-low speed, mix until a thick dough forms. It will start off crumbly, then the butter will moisten the flour, and the dough will start to pull away from the sides of the bowl. Note – If a dough ball doesn't come together, add a teaspoon of milk at a time until it does.3/4 cup all-purpose flour, 3.5 tablespoons unsweetened cocoa powder, Dutch process, 1/4 teaspoon baking powder, 1/4 teaspoon salt
- Use a cookie scoop to portion the cookies. Roll the dough into a ball in the palm of your hands and place at least 2 inches apart on the baking sheet. At this point, you can roll the dough balls through granulated sugar. Using the back of a teaspoon, make wells in the center of each cookie.
- Cover the baking sheet with plastic wrap and refrigerate for at least 30 minutes.
- Preheat the oven to 350F degrees and adjust the oven rack to the middle position.
- Bake the cookies for 10 to 12 minutes, or until the edges are set. While baking, the wells may fill back in slightly. As soon as the cookies come out of the oven, place the baking sheet on a wire cooling rack and reform the wells with the back of the teaspoon. Let the cookies cool on the pan for 10 minutes, then transfer to the wire rack to cool completely. Note – The cookies may crack a little around the edges when baked, which is ok. You can try to press the cracks back together as soon as they come out of the oven, or just leave them.
Peppermint Ganache Filling
- Once the cookies have cooled, make the ganache. Add the chocolate chips to a small mixing bowl. Then, warm the heavy cream in the microwave or on the stove-top. Heat until warm, not boiling.1/4 cup semi-sweet chocolate, 3 tablespoons heavy whipping cream
- Pour the warm cream over the chocolate and let the mix sit for about 3 minutes to allow the cream to melt the chocolate. Stir the ganache until fully mixed and smooth. Add the peppermint and taste – add a little more if you prefer a stronger peppermint flavor. Let the ganache cool and start to thicken for about 10 minutes.1/8 teaspoon peppermint extract
- Pour or pipe the ganache into the wells of the cookies and sprinkle with crushed candy canes.crushed candy canes
Notes
- Serving Size – This is a small batch recipe that can be doubled.
- Stand Mixer – You can use a standard mixer and attachments with a smaller 3-quart mixing bowl. The smaller bowl makes mixing the small batch dough easier and more even. You can try the bowl that comes with the mixer; you will just have to scrape down the sides of the bowl more.
- Expect A Thick Dough – The dough is firmer than your typical cookie dough. If the weather is hot or dry, you may need to add a couple of teaspoons of milk to get the dough ball to form.
- Storing – The cookies can sit at room temperature in a covered container for up to a week.
- Freezing the Cookie Dough – The cookie dough can be frozen for up to 3 months. Shape the dough into cookie balls and place them in a freezer bag. Thaw in the refrigerator.
- Freezing Baked Cookies – Baked and filled cookies can be frozen for up to 3 months. Either in a Tupperware, or gently placed in a freezer bag. Defrost at room temperature.
Nutrition Estimates


About the Author …
Hi, I’m Erin! With years of experience baking for two in my own small household, I know about the love for desserts without the leftovers. I’ve tested, written, and photographed every one of the 300+ recipes on my website. And even had some of my desserts featured on Taste of Home, The Spruce Eats, ELLE, Parade, and more! From traditional to gluten free desserts for two, I have the recipe for you.
Click here to learn more about me →

The dough was really crumbly. Should it be that way when shaping it?
Hi Melissa – it is a firmer dough. Under-mixing it could make the dough crumbly, or if it’s too cold. Either shaping the dough before chilling may help, or let the dough sit at room temp for 5 to 10 minutes may help shape it. Thanks for the feedback though, and trying the recipe!