Chocolate Mini Cakes with Marshmallow Filling
This post may contain affiliate links. See my disclosure policy.
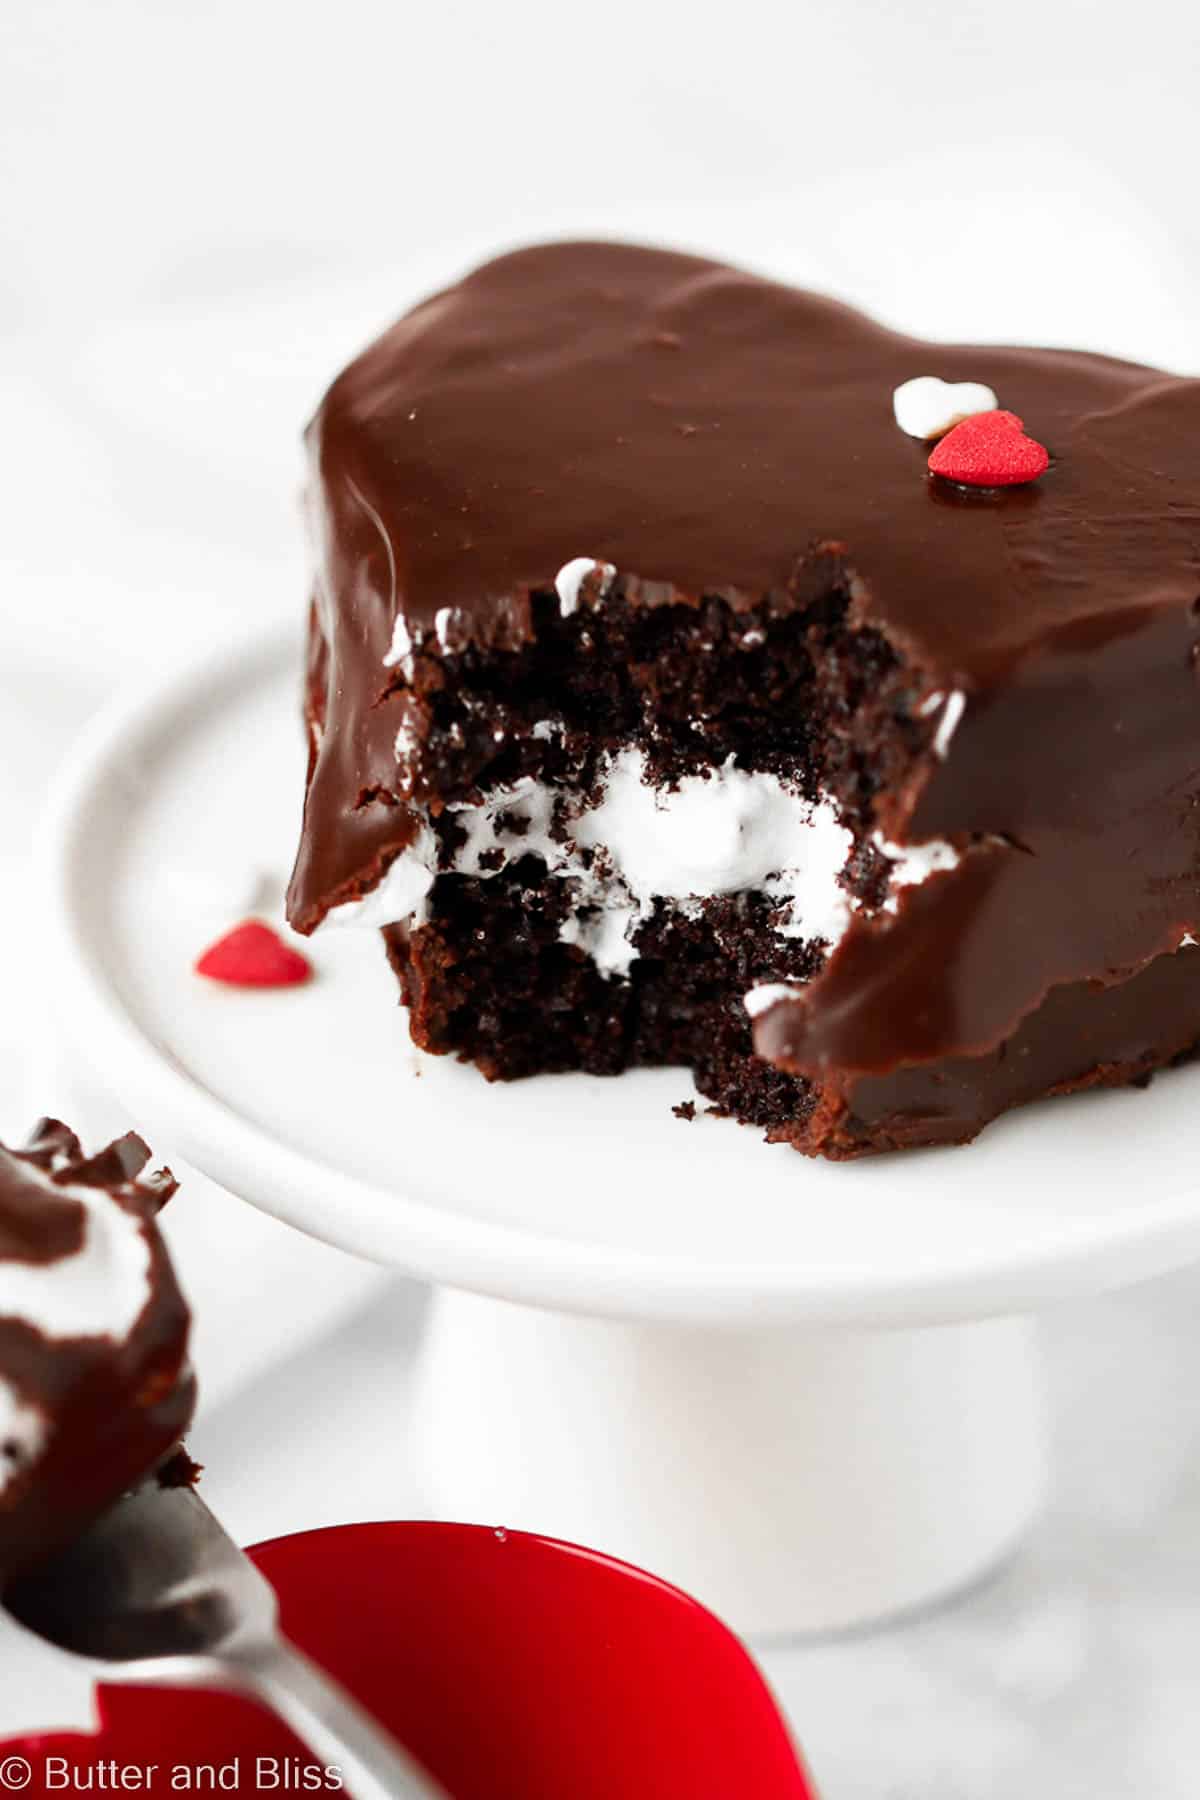
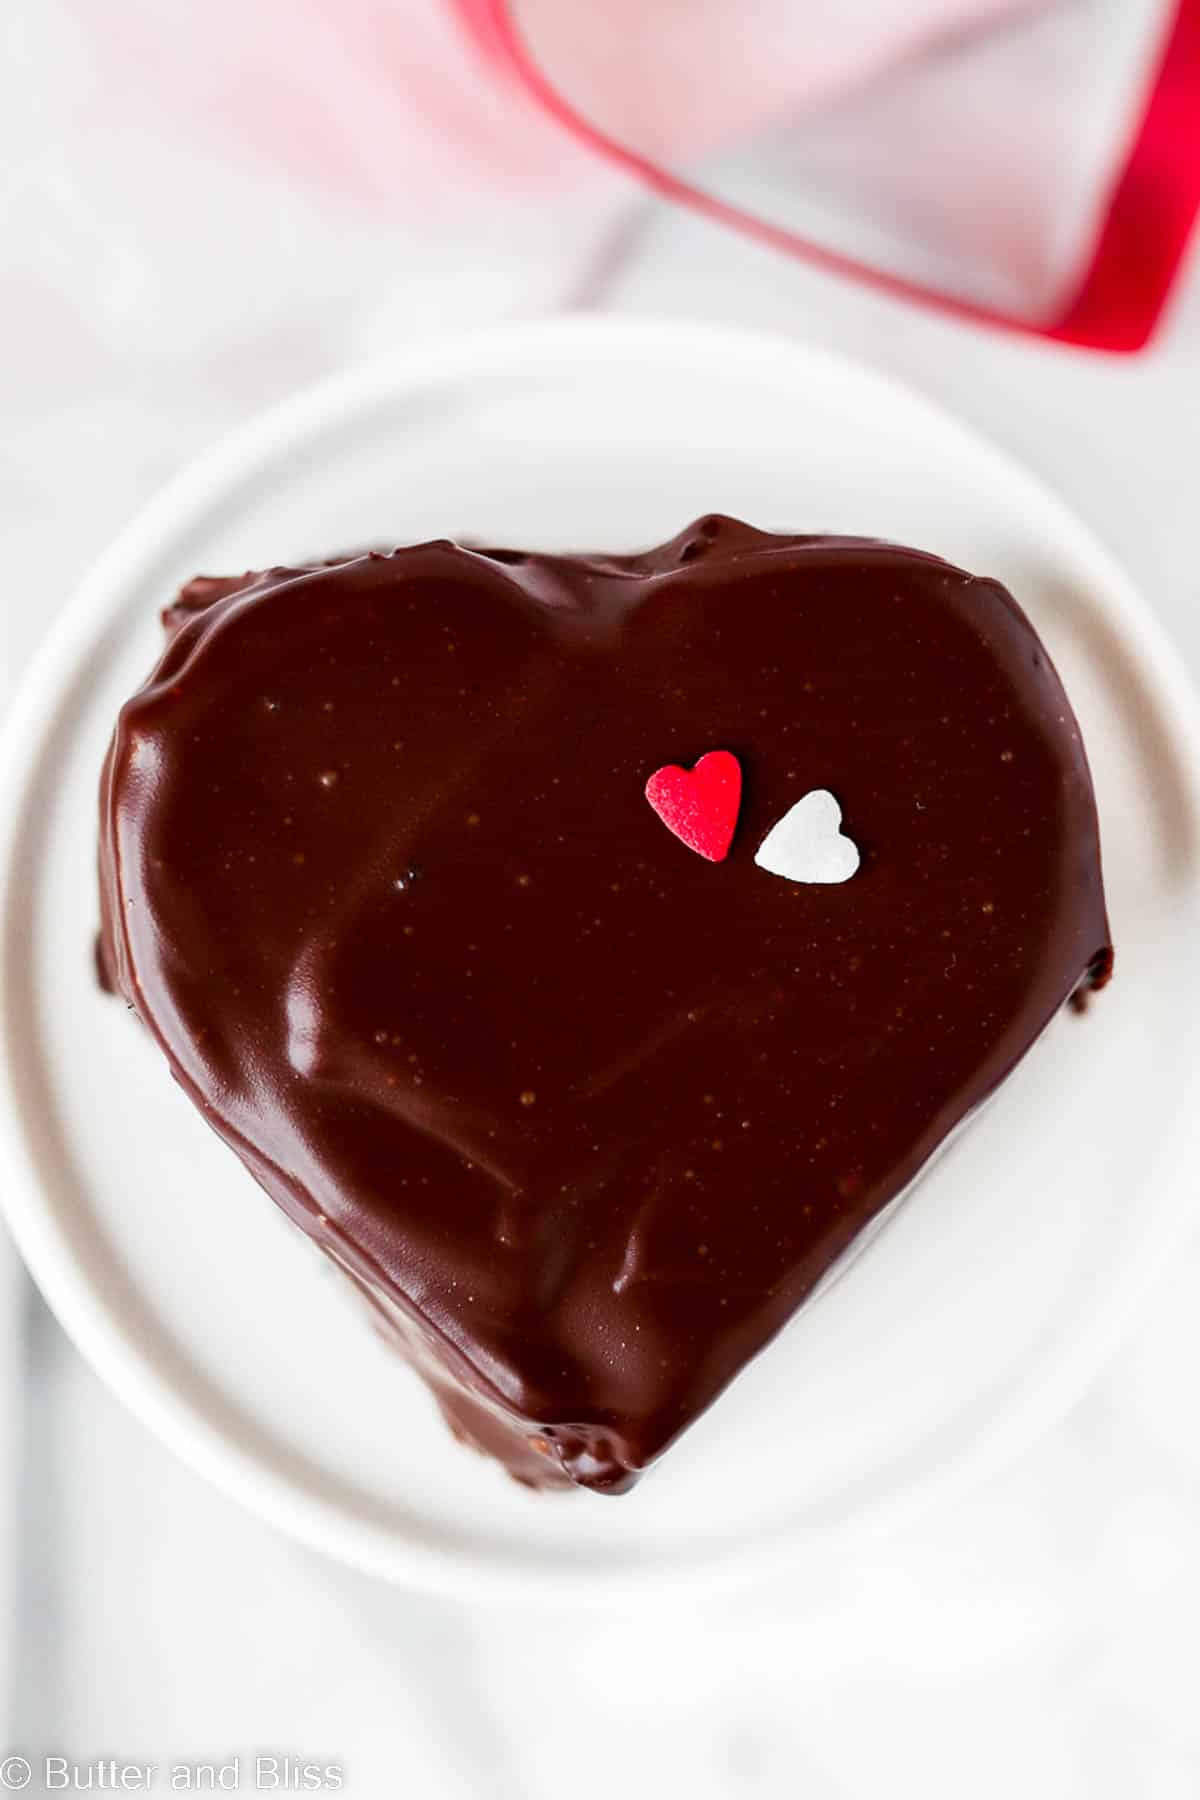
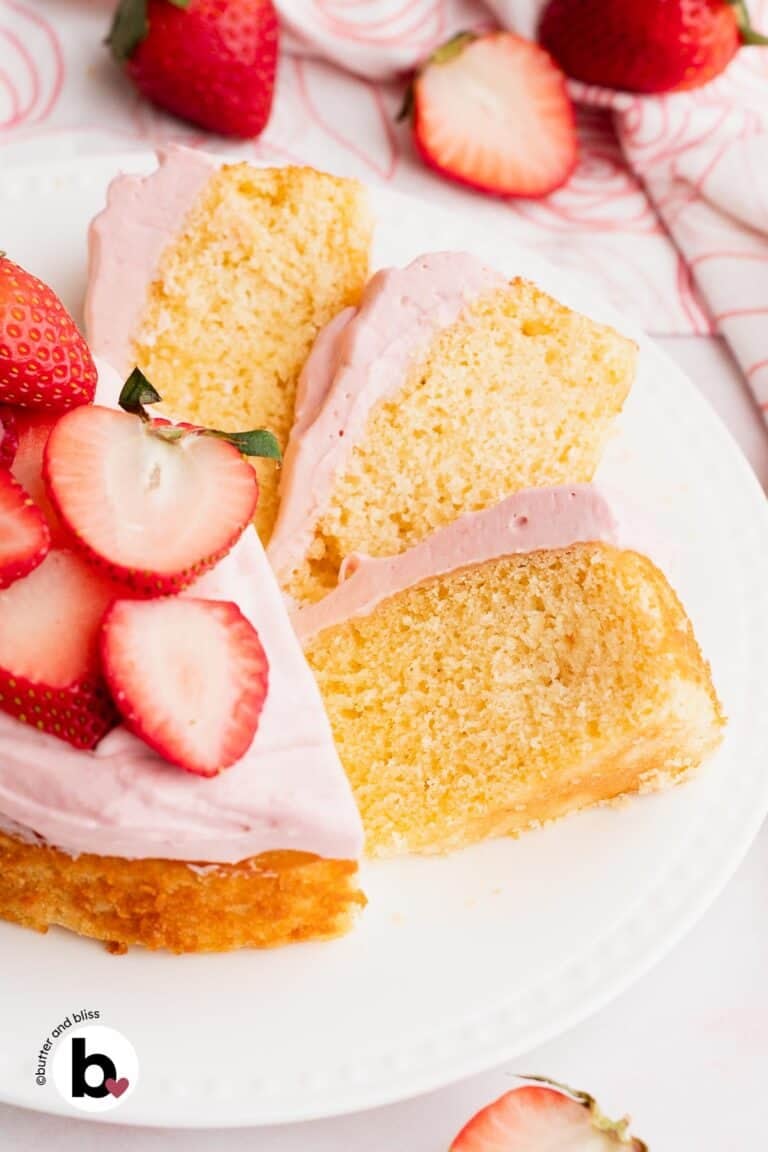
These chocolate mini cakes with marshmallow filling are everything you remember from the classic childhood treat. And now they make the sweetest Valentine’s Day dessert for two! Two layers of rich chocolate cake are filled with fluffy marshmallow cream and finished with a sweet chocolate ganache shell.
Let’s address the elephant in the room first. This recipe draws inspiration from one of my childhood favorite treats – the Hostess Ding Dong. But at my age, my metabolism can’t take eating a whole box of Ding Dongs.
So, I decided to make my own homemade magical chocolate cakes. Not that the caloric intake is any different. It’s more of a reward for figuring out how to take all the best parts of the original and make it my own.
The Best Parts Of These Chocolate Cakes
- Moist chocolate cake – This cake is full of chocolate flavor and adapted from the small batch chocolate layer cake and 6-inch chocolate cake for two. It stays moist with the help of sour cream and oil.
- Creamy marshmallow filling – The filling in the original is more of a vanilla cream. In this recipe, we use marshmallow meringue. Still light, fluffy, and flavored with vanilla. But if you’re looking for a thicker frosting, try whipped chocolate ganache frosting – for double chocolate!
- Thick chocolate coating – I honestly don’t know how Hostess makes their magical chocolate shell. In my best attempt to replicate it, we make ganache and add coconut oil and corn syrup to help it stay firm and shiny.
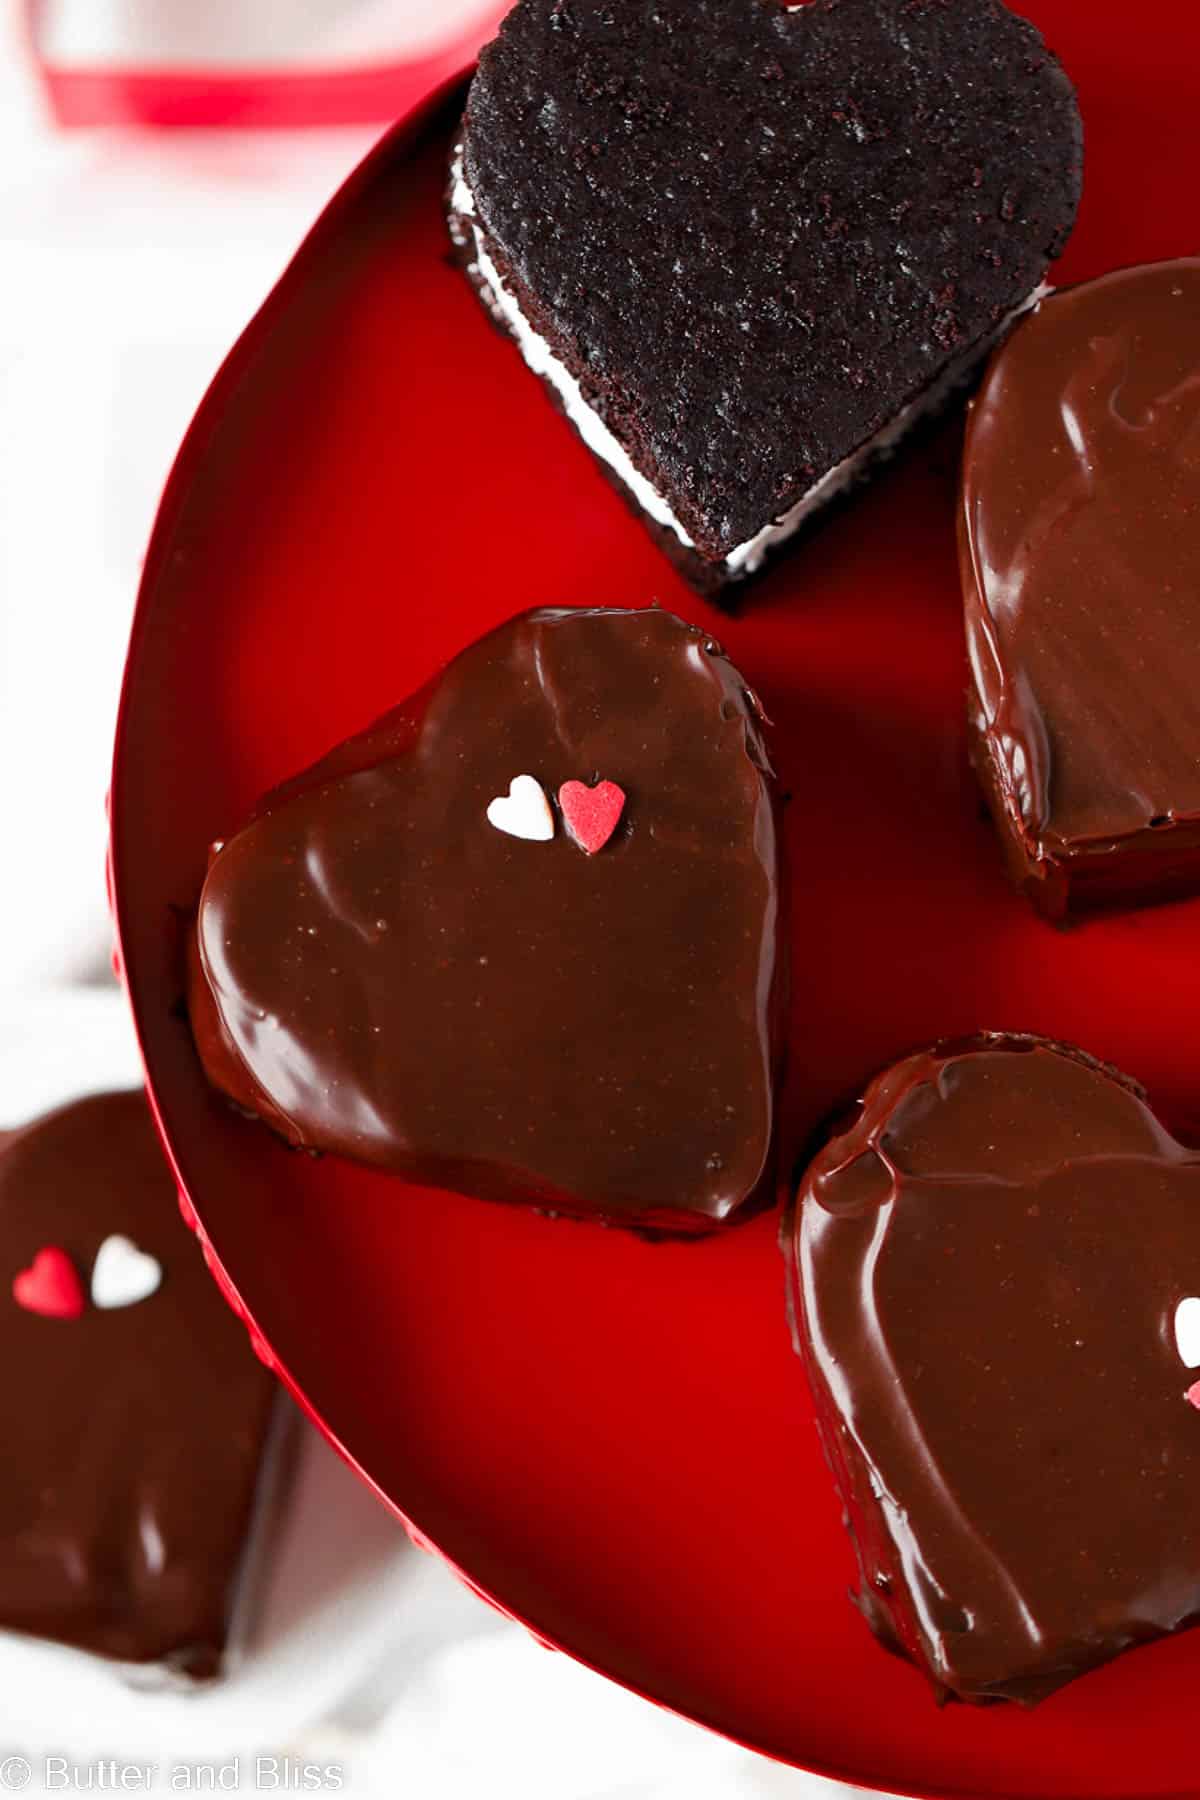
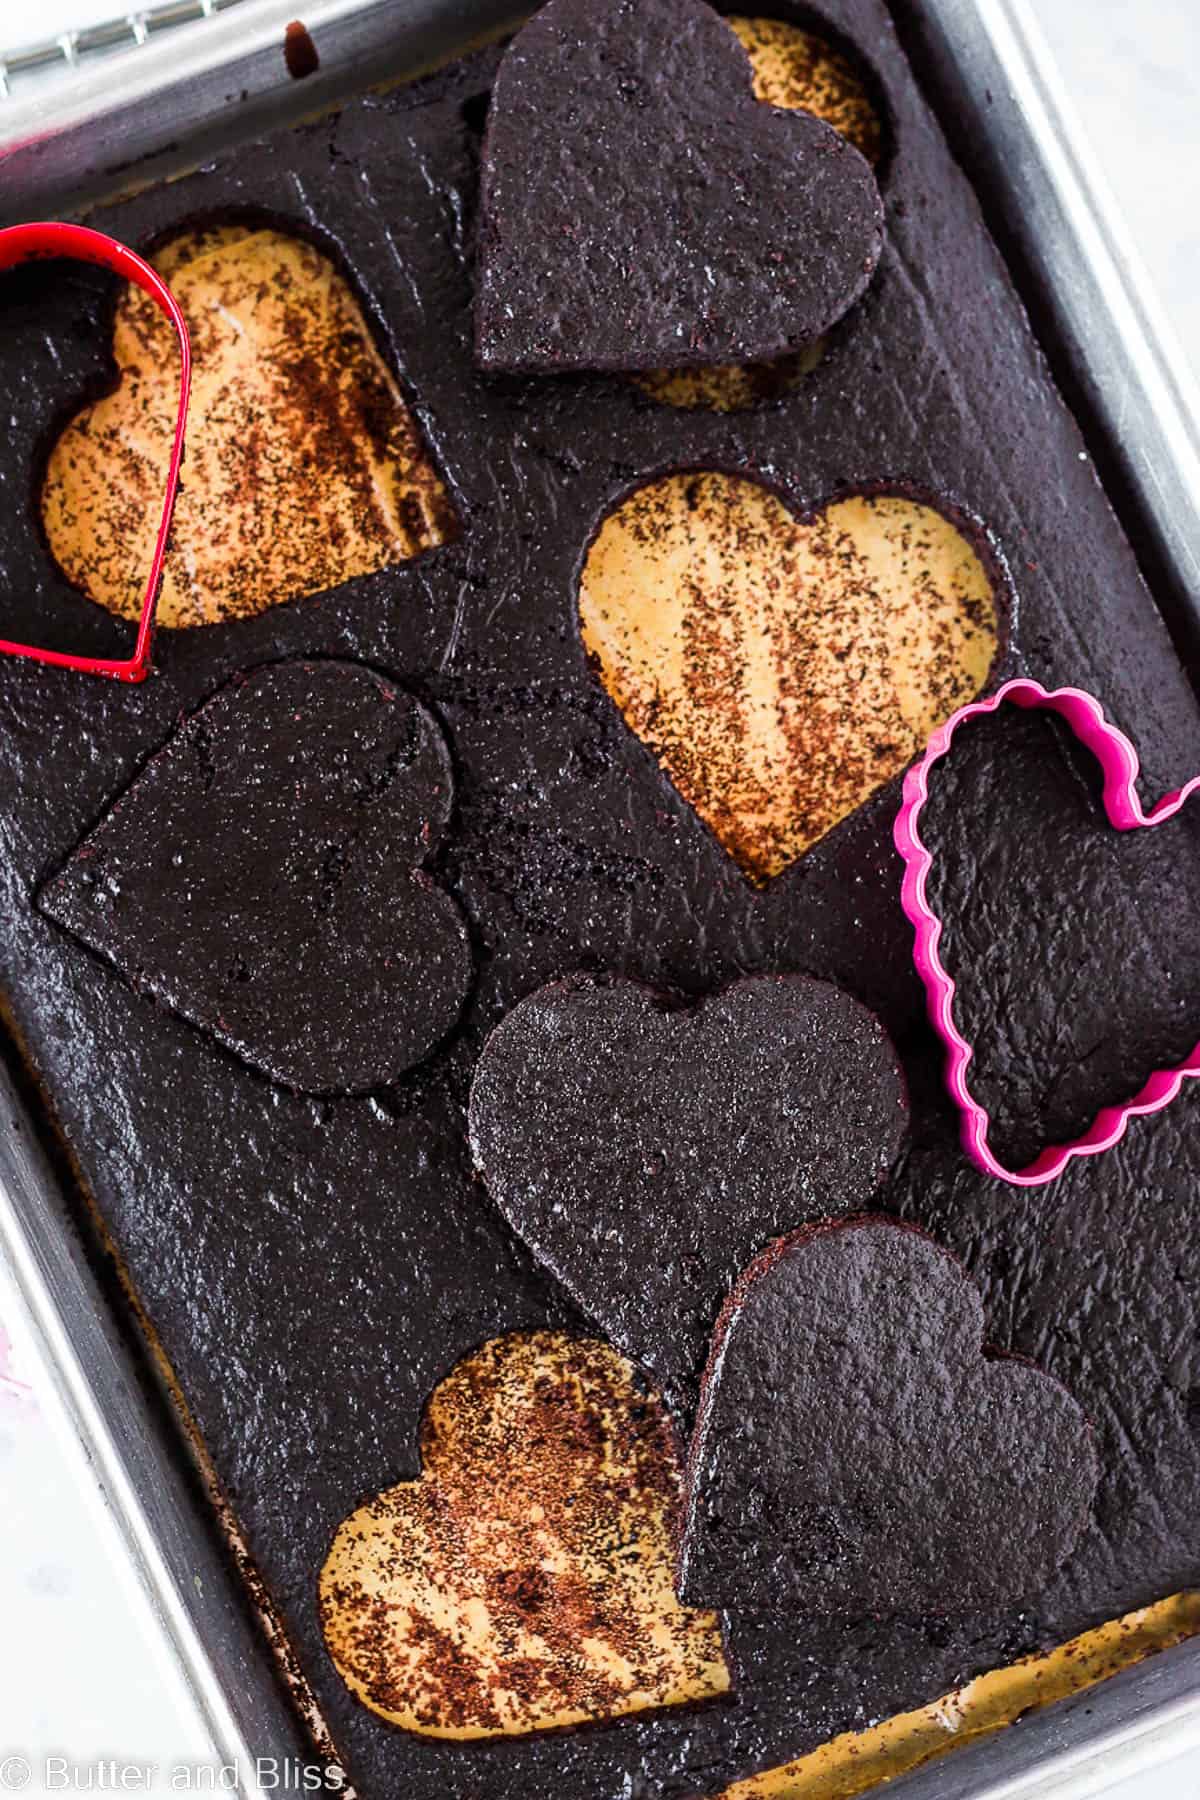
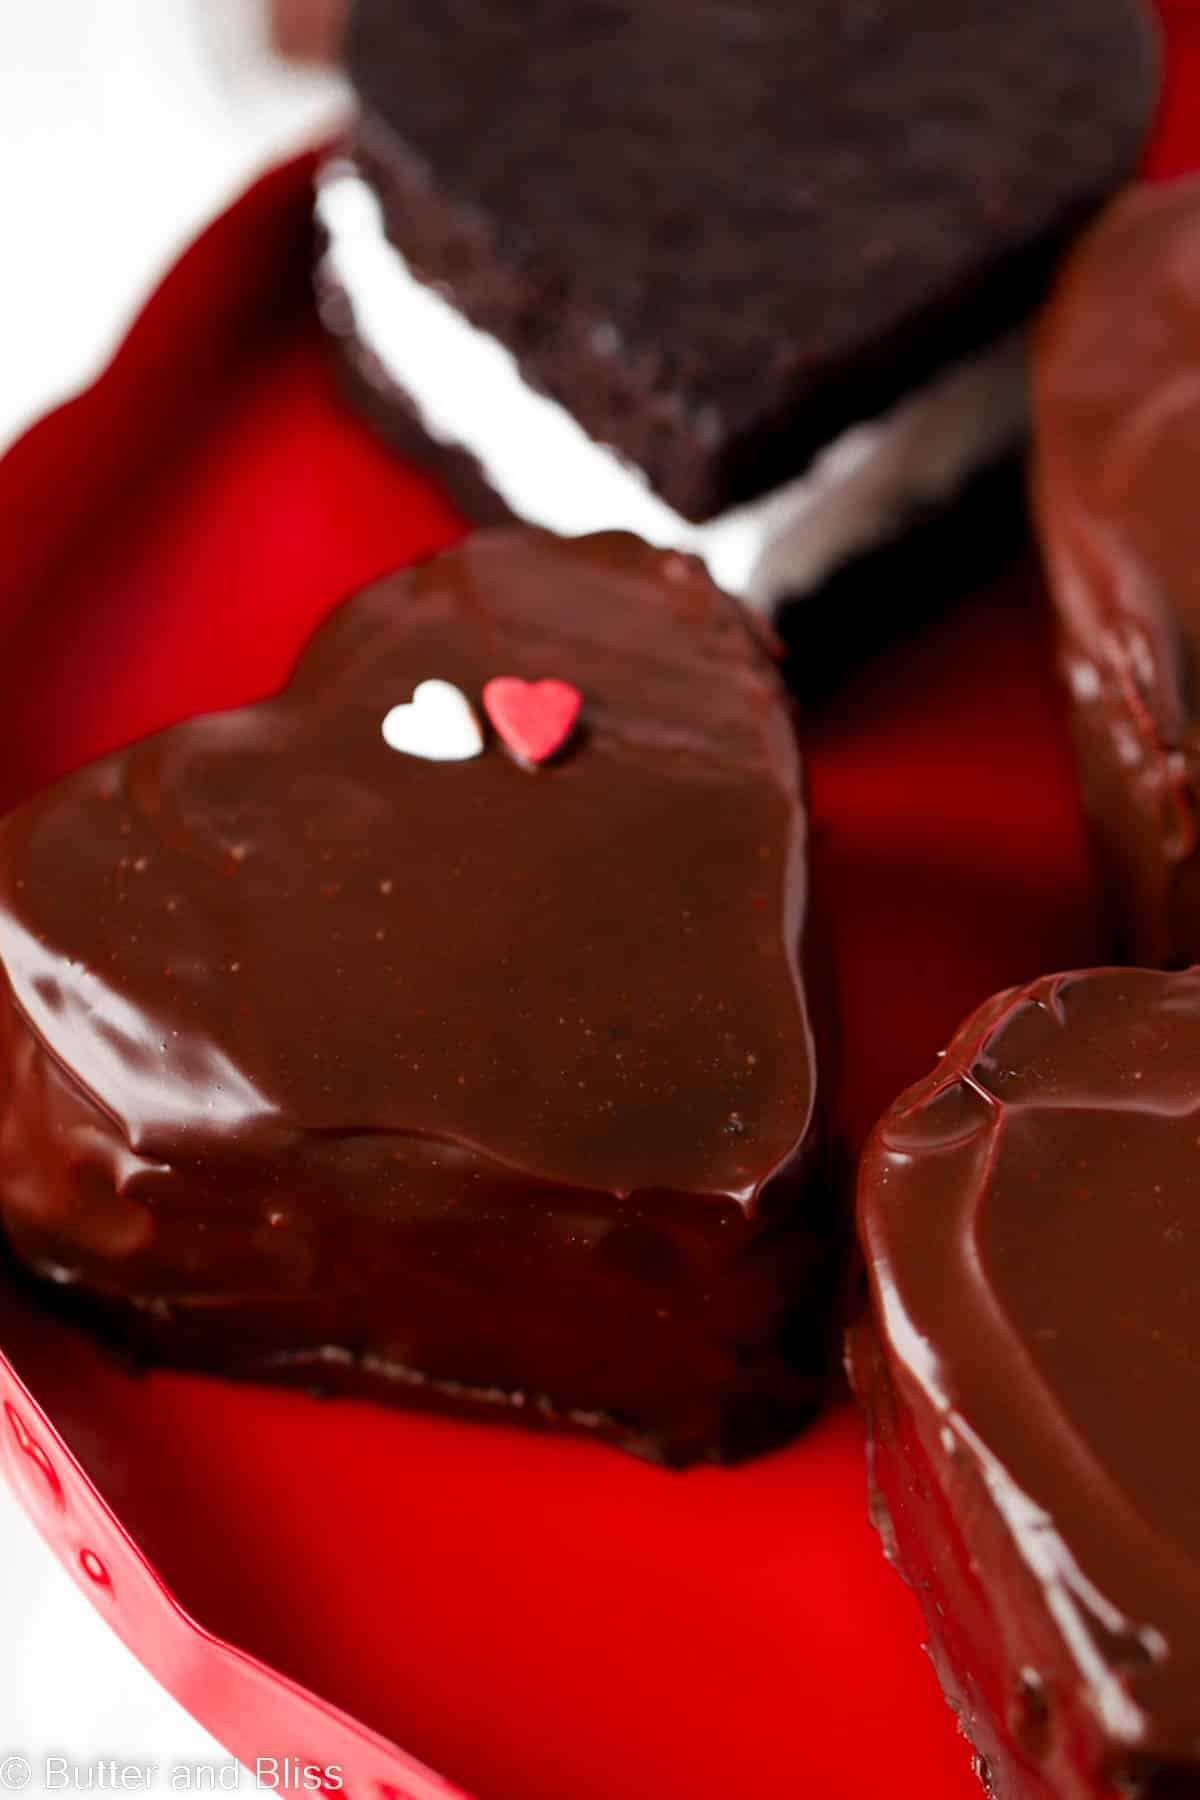
- Small batch – To stay on brand, this recipe starts with a small batch sheet cake and we cut it into pieces to make the mini cake sandwiches.
Creative Valentine’s Day dessert for two
Cookie cutters can be a baker’s best friend. Especially when wanting to make a treat that symbolizes a holiday. The Christmas tree, ghost, pumpkin – and of course a heart for Valentine’s Day.
I mean, I can’t free-hand cut a heart out of cake! 🙂
Not only are we using a heart-shaped cookie cutter in this recipe (or any size/shape cookie cutter you like), but the chocolate mini cakes with marshmallow filling embody all of the flavors you think of in a Valentine’s Day dessert:
- Chocolate
- Marshmallow
- Sprinkles
- More chocolate!
Helpful Tips
- Watch the cake – Baking a sheet cake does not take as long as baking in a cake pan. The cake is thinner and, therefore will bake faster. The cake is done once it is springy to the touch and starts to pull away from the pan. Of course, you can test it with a toothpick inserted in the middle and it comes out mostly clean.
- Make sure the egg white is free from yolk and oil – Either of these will inhibit the egg white from beating to stiff peaks. I often wipe my mixing bowl and mixer attachments with vinegar to make sure they are clean.
- Use a digital thermometer – To make the marshmallow and heat to a temperature to make the egg white safe to consume (160F degrees). I highly recommend one as a staple in your kitchen if you bake often.
- Cooling rack + baking sheet – When you are ready to coat the cakes with chocolate, set the cooling rack on a baking sheet with sides. This allows the chocolate to drip down the cakes and the baking sheet catches the drips.
- Refrigerate the finished cakes – To allow the ganache to set and harden.
- Use sprinkles – If this is a Valentine’s Day dessert, dress up the mini cakes with some fun sprinkles!

FAQ
Yes. Use a 6-inch square or round cake pan. You will need to slice the cake in half to make the layers. Also, the bake time will need to be adjusted. Start checking the cake at 15 to 18 minutes.

Chocolate Mini Cakes with Marshmallow Filling
by Erin Cernich
Ingredients
Chocolate Cake
- ½ cup granulated sugar
- 2 tablespoons canola oil (or any neutral oil)
- ¼ cup full fat sour cream, room temperature
- 1 large egg, room temperature
- 1 teaspoon vanilla extract
- ½ cup all-purpose flour
- ¼ cup unsweetened cocoa powder, Dutch process
- ½ teaspoon baking powder
- ¼ teaspoon baking soda
- ¼ teaspoon salt
- ¼ cup medium brew coffee, very hot
Marshmallow Filling
- 1 large egg white, room temperature
- 1 tablespoon water, room temperature
- ¼ cup granulated sugar
- 1 teaspoon light corn syrup
- ⅛ teaspoon cream of tartar
- ½ teaspoon vanilla extract
Chocolate Ganache Coating
- ¾ cup semi-sweet chocolate (chips or baking bar)
- 2 teaspoons cold pressed refined coconut oil
- 2 teaspoons light corn syrup
- ½ teaspoon vanilla extract
- ½ cup heavy whipping cream
Instructions
Chocolate Cake
- In a medium mixing bowl, add the sugar and oil. Whisk together until mixed. Add the sour cream, egg, and vanilla extract. Mix until smooth and creamy.1/2 cup granulated sugar, 2 tablespoons canola oil, 1/4 cup full fat sour cream, room temperature, 1 large egg, room temperature, 1 teaspoon vanilla extract
- Sift the flour, cocoa powder, baking soda, baking powder, and salt over the top of the wet ingredients. Use a spatula to gently fold the dry ingredients into the wet ingredients until no dry streaks remain. Note – I recommend sifting the dry ingredients over the wet ingredients to make sure there are no lumps. You can set a fine mesh strainer over the top of the bowl with the wet ingredients to sift all of the dry ingredients.1/2 cup all-purpose flour, 1/4 cup unsweetened cocoa powder, Dutch process, 1/2 teaspoon baking powder, 1/4 teaspoon baking soda, 1/4 teaspoon salt
- Add half of the hot coffee to the batter and mix until just incorporated. Then add the remainder of the hot coffee and mix the batter until smooth.1/4 cup medium brew coffee, very hot
- Pour the batter evenly into the prepared baking sheet and bake for 10 to 15 minutes or until the cake is springy when touched and the cake starts to pull away from the sides of the baking sheet.
- Cool the cake in the pan set on a wire cooling rack for 10 minutes. Then invert the cake onto to the cooling rack and gently remove the parchment paper (if it stuck to the cake). Cool the cake completely before cutting and assembling.
Marshmallow Filling
- When the cakes are cool and you are ready to assemble the cakes, make the filling.
- Simmer about 2-inches of water in a saucepan. In a heat-proof mixing bowl large enough to fit on top of the saucepan – without touching the water – add the egg white, water, sugar, corn syrup, and cream of tartar. Set the bowl on top of the saucepan and attach a thermometer to the side of the bowl (recommended – see notes below).1 large egg white, room temperature, 1 tablespoon water, room temperature, 1/4 cup granulated sugar, 1 teaspoon light corn syrup, 1/8 teaspoon cream of tartar
- Using one of the whisk attachments as your whisk, constantly whisk the mixture until foamy and white. We want the sugar to dissolve and the temperature of the mixture to reach 160F degrees. This may take up to 4 minutes. If you don't have a thermometer, you can test if the sugar has dissolved by carefully rubbing a little of the egg white between your thumb and index finger – if done, you will not feel sugar granules.
- Remove the bowl from the heat, and add the vanilla extract. Using a hand-held mixer with whisk attachments, beat on medium speed until stiff peaks form, and the frosting is pillowy and glossy. This may take about 2 and 1/2 minutes.1/2 teaspoon vanilla extract
- The frosting is ready to be used immediately. If storing, place in an airtight container and refrigerate for up to 2 days. Longer than that, the frosting may start to loosen and separate. I do not recommend keeping the frosting at room temperature for longer than 4 hours.
- Assembling the Cakes – Use a knife or cookie cutter (size and shape of your choice) to cut out 8 pieces of cake. Note – the number of mini cakes you get from the sheet cake will depend on the size and shape of your cuts/cookie cutter. You will have cake scraps that you can freeze (wrap tightly and put in a ziploc), make into cake pops, or just eat!
- Spread an even amount of marshmallow filling evenly onto 4 pieces of cake and top with the remaining cake pieces. Put the assembled cakes on a baking sheet and refrigerate while you make the chocolate ganache.
Chocolate Ganache Coating
- In a liquid measuring cup, add the chocolate, coconut oil, corn syrup and vanilla extract. Using a measuring cup will make it easier to pour the ganache over the cakes.3/4 cup semi-sweet chocolate , 2 teaspoons cold pressed refined coconut oil, 2 teaspoons light corn syrup, 1/2 teaspoon vanilla extract
- In a small saucepan, heat the heavy cream until bubbles start to form along the sides of the pan. Note – You can also heat the cream in the microwave. I recommend 15 second increments until it is hot and steamy. You don't want it to full on boil.1/2 cup heavy whipping cream
- Pour the heated cream over the chocolate chips. Let the mixture sit for 2 to 3 minutes to start to melt the chocolate. Then stir until the chocolate is smooth and silky.
- Coating the Cakes – To coat the mini cakes, set the wire cooling rack inside a baking sheet. This will allow the chocolate to completely drip down the cakes and the baking sheet will catch the drips. Note – If you do not have the rimmed baking sheet, set the wire rack over parchment or wax paper – something that is easy to clean up.
- Coat one cake at a time – Pour a small amount of ganache on top of the cake until it starts to drip down the sides of the cake. Use a small offset spatula to smooth out the ganache on the top and sides of the cake. Pour more ganache on the cake as needed to make sure the sides get completely coated. Keep in mind you have 4 cakes to coat, so be careful not to use too much ganache on one cake.
- Carefully transfer the assembled cakes to your serving plate (I use the offset spatula to lift them off the wire rack). Refrigerate the cakes for at least 2 hours to allow the ganache to set. Enjoy!
Notes
- This a recipe for a small quarter-size sheet cake – You can also use a 6-inch round or square cake pan and cut the cake into two layers to create the filled mini cakes.
- Coffee – The strength of the coffee is up to you. I use instant coffee granules to make a small cup of hot coffee because it is a little stronger than what I normally drink. However, I do not recommend super strong coffee – it can overpower the cocoa flavor in the cake.
- Watch bake time – This is a thin cake, so it won’t take very long to bake. The cake is done when it is springy to the touch, starts to pull away from the sides of the pan, and a toothpick inserted in the middle comes out mostly clean.
- Cake scraps – You will have cake scraps. You can freeze them (wrap them tightly with plastic wrap and place them in a Ziploc bag), mix them with vanilla dairy-free frosting, and make cake pops, or just eat!
- Separate the egg white when it is cold – I’ve learned this through practice and professional advice.
- Storing – I recommend storing leftovers in the refrigerator because of the marshmallow filling. Cover the cakes with a cake stand lid, or plastic wrap. The cakes will stay moist for up to 3 days.
Nutrition Estimates
TRY THESE SMALL BATCH RECIPES NEXT!

About the Author …
Hi, I’m Erin! With years of experience baking for two in my own small household, I know about the love for desserts without the leftovers. I’ve tested, written, and photographed every one of the 300+ recipes on my website. And even had some of my desserts featured on Taste of Home, The Spruce Eats, ELLE, Parade, and more! From traditional to gluten free desserts for two, I have the recipe for you.
Click here to learn more about me →
This is a perfect replica of the Ding Dongs I remember from my childhood. The recipe and it’s ingredients are perfectly portrayed in this article. Thank you for your accurate rendition.
Love this – thank you James!